6. Types of Testing
6.1. Web Testing
Web Related test is one of the Automaton’s capabilities to design end-to-end tests, covering Web application & Mobile apps, backend components along with detailed test reports. Adding this feature to Automaton along with the others makes it a complete testing tool for your delivery framework.
Here is the step-by-step procedure to create a sample test case:
- Log in to the Automaton with URL in any browser.
- Click on create Test Suite. There are two ways to create Test Suite explained in Creating the First Test Suite.
- Once you click on the create test suite icon, the following page displays.
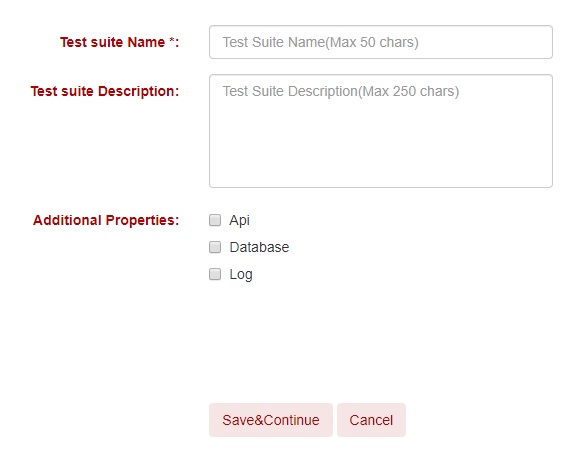
Fig. 6.1 Create Test Suite
Once the relevant fields are filled in and the test type is selected, you can click on the Save & Continue button to save your test suite. If you want to cancel creating a Test Suite, simply press the ‘Cancel’ button.
Once you click on the Save & Continue icon, you will navigate to Test Case List page. It will list all the test cases that you have created.
The next step is creating a Test Case. Click on the  icon for Create Test Case to create your first test case refer the figure shown below:
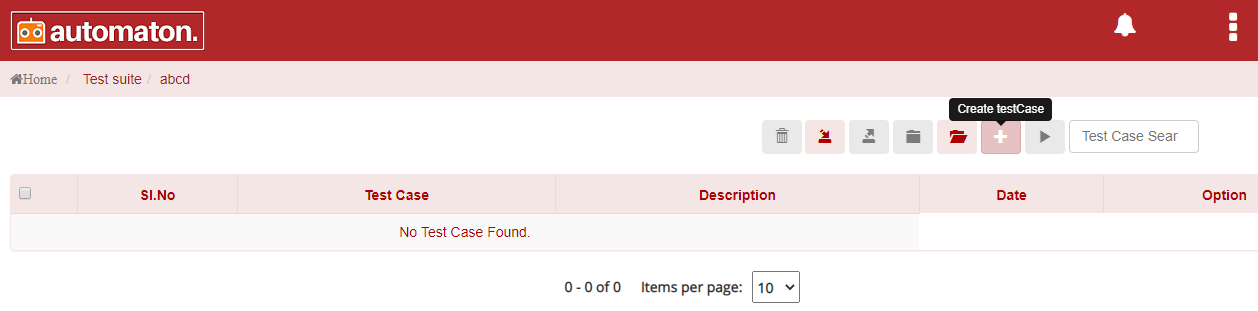
Fig. 6.2 Create Test Case
Once you click on the Create Test Case icon, user will be navigated to Test Case Properties page.
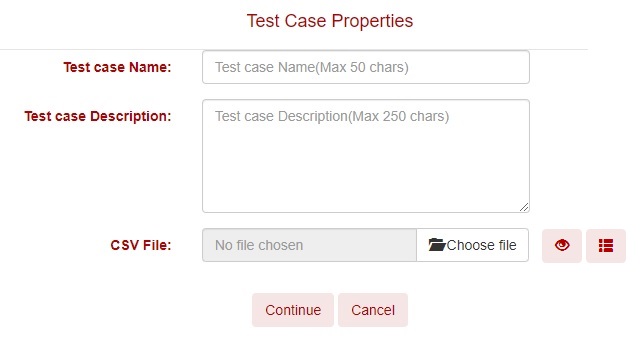
Fig. 6.3 Test Case Properties
Test Case name: It is a mandatory field to fill the name of the test case. Names can be of your own choice but should not exceed 50 characters and special characters are not accepted in this field.
Test Case Description: A description of a Test Case to be created. This field is optional. This field should not exceed 250 characters. Special characters are not allowed.
CSV Files (Comma separated value) Files: Csv files help the user to
execute multiple child test cases inside a test case. CSV file stores a
large amount of data in a specific format, hence each test cases get
created corresponding to the data present in that file while executing.
This field is optional. Users can provide CSV files either by clicking
the Choose File button or create a new CSV file by clicking the
create CSV icon  .
.
- Choose FIle: Click the Choose File button, the file explorer window will be opened where the user can browse and select the required csv file from any location in the system.
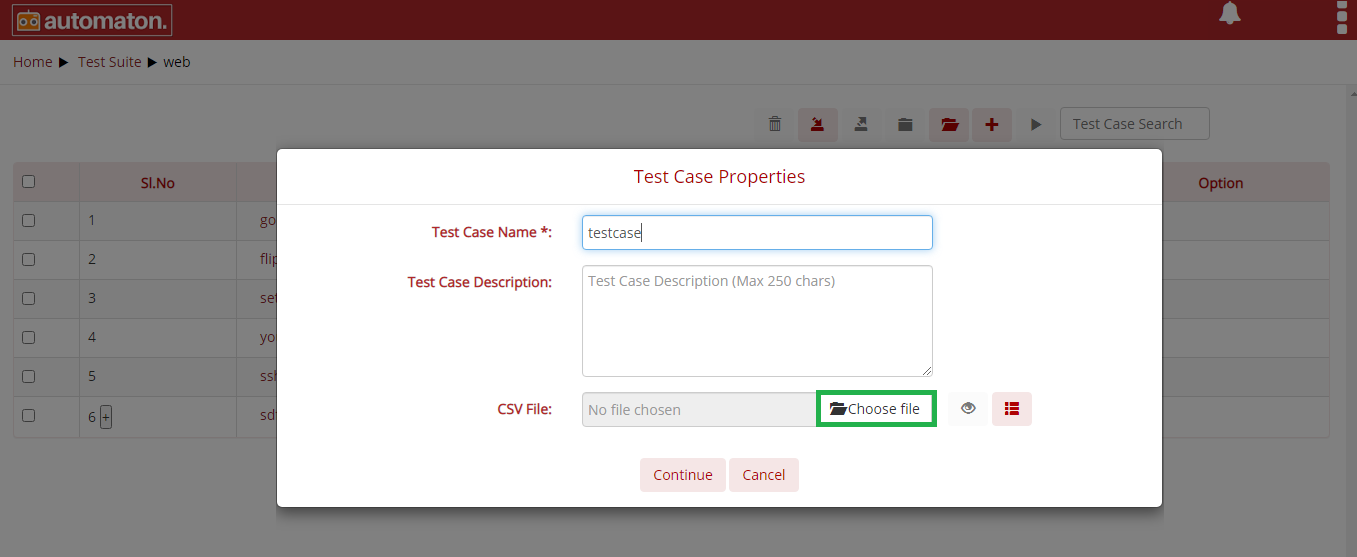
Fig. 6.4 Choose CSV file
- View CSV: Click the view icon
 to view the already
created csv file as shown below:
to view the already
created csv file as shown below:
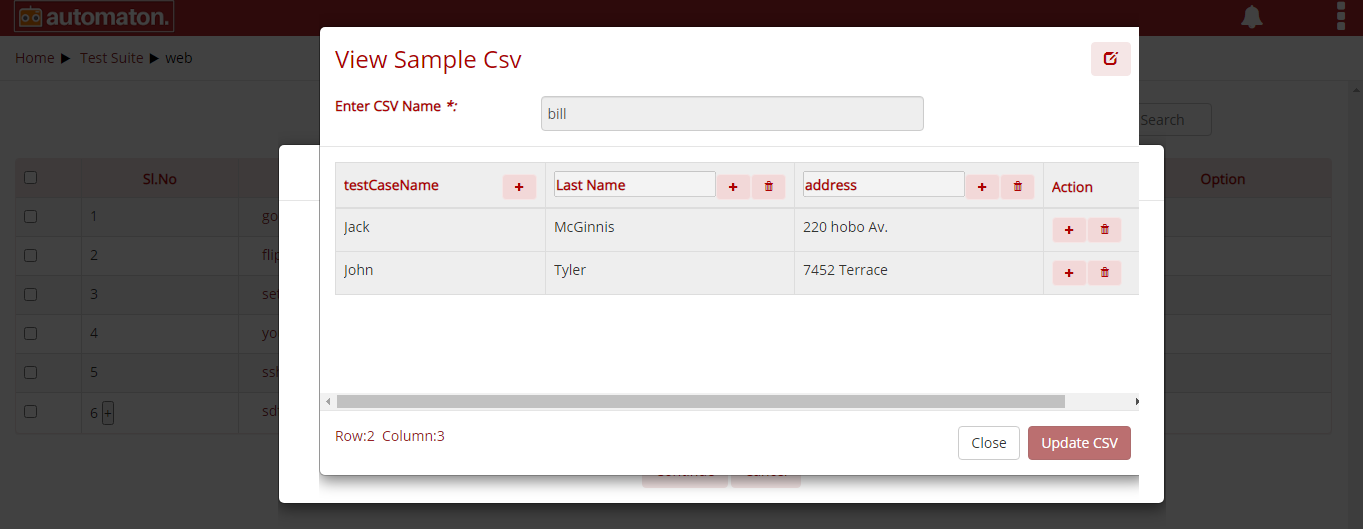
Fig. 6.5 View Sample CSV
If the user wants to edit any data click the edit icon
in the View Sample Csv dialog. Edit the required data and click the Update CSV button to update the changes.
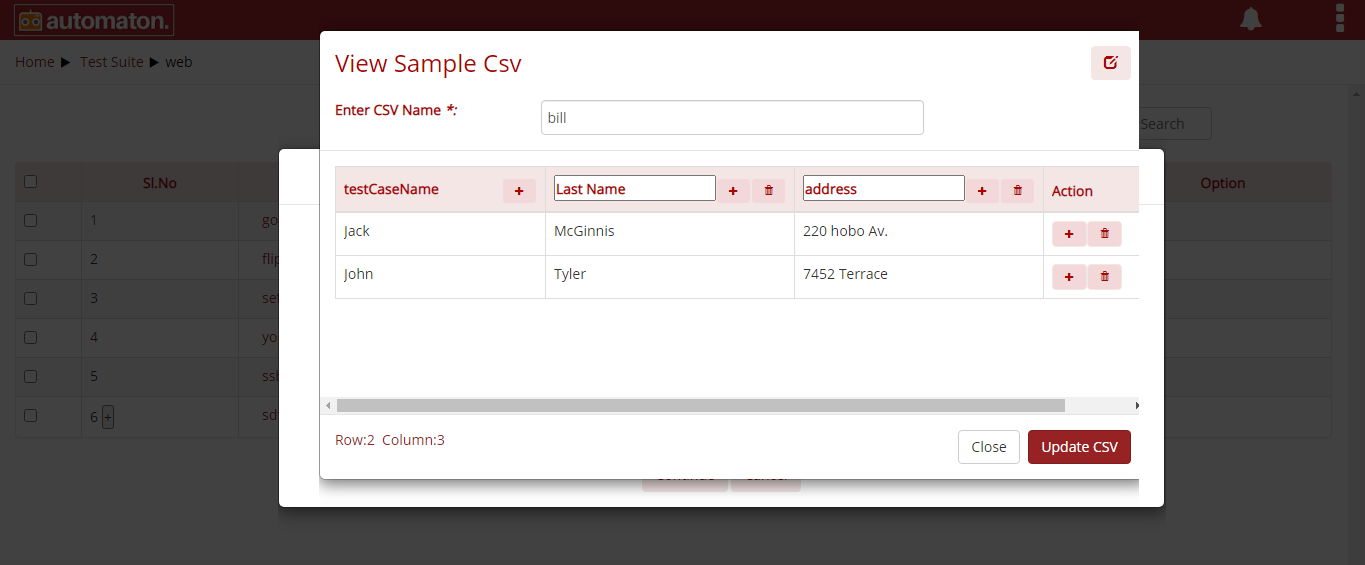
Fig. 6.6 Update CSV File
- Create Sample CSV: Click the create csv icon , a Create
Sample Csv dialog will be displayed as shown below:
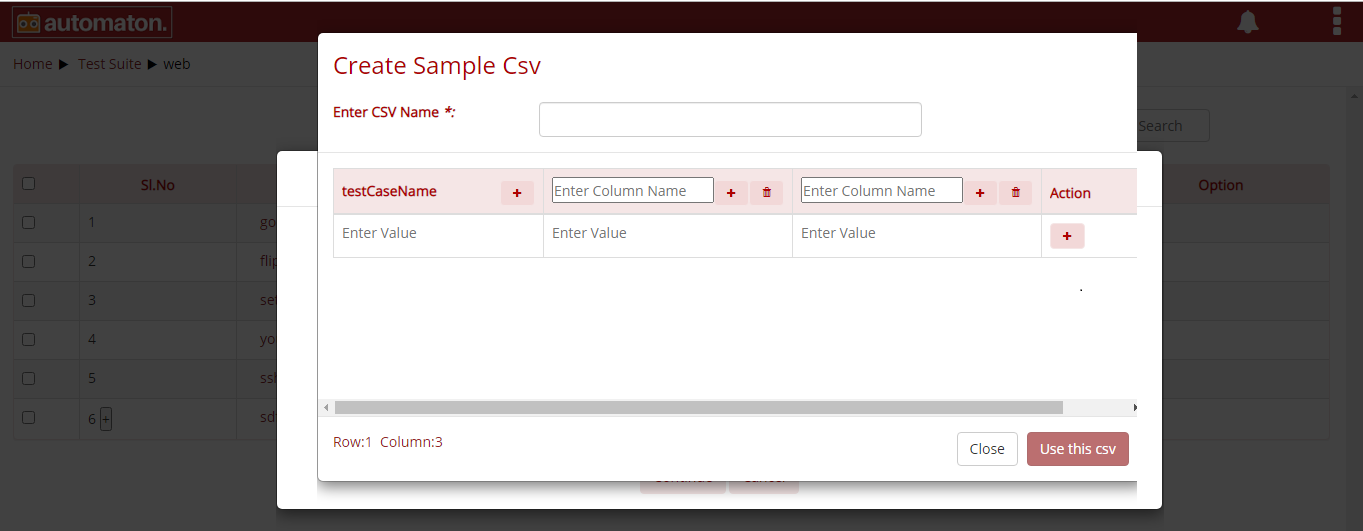
Fig. 6.7 Create Sample CSV
Here the user must provide a name for CSV in the Enter CSV Name field. User can either add a column or row by clicking the plus icon
. Users can add as many test cases and columns as they wish. Click the delete icon
to delete the respective field. Users will be notified with the respective error messages if they miss to fill any of the mandatory fields.
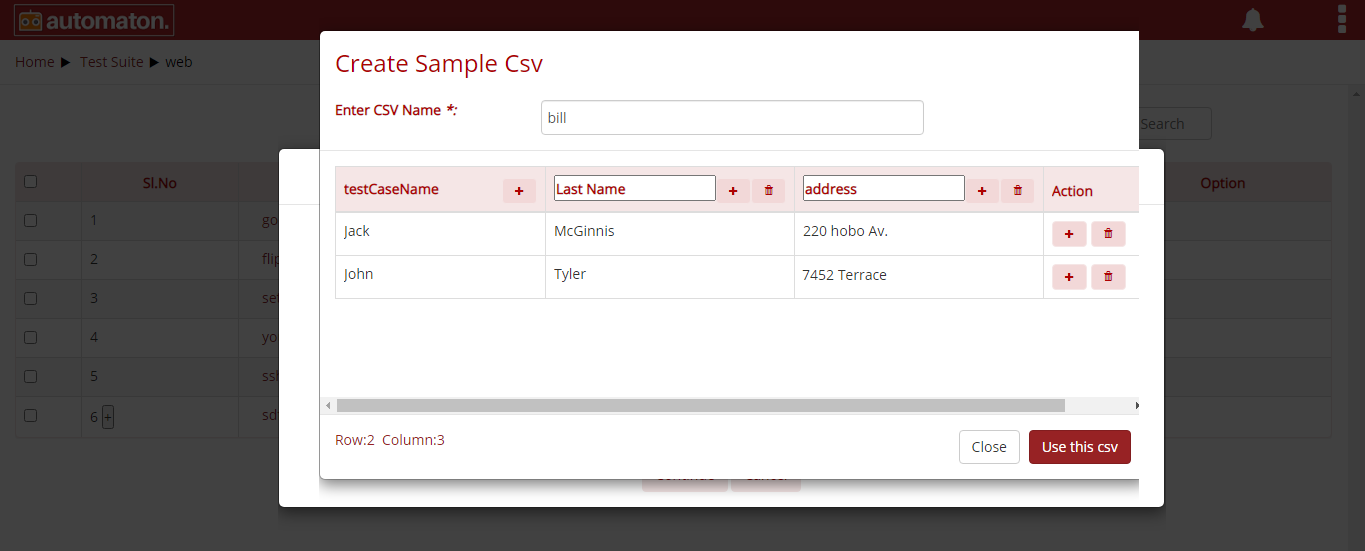
Fig. 6.8 New CSV
Click the Use this csv button to choose the newly created csv in the test cases or click the Close button to exit.
Note
- Csv Name is mandatory.
- Test Case Name is mandatory for the newly created rows.
- Users must enter the values for the created column headers. It can’t be empty.
Fig. 6.9 CSV File Selected
Click the delete icon on the Test Case page to delete the test case.
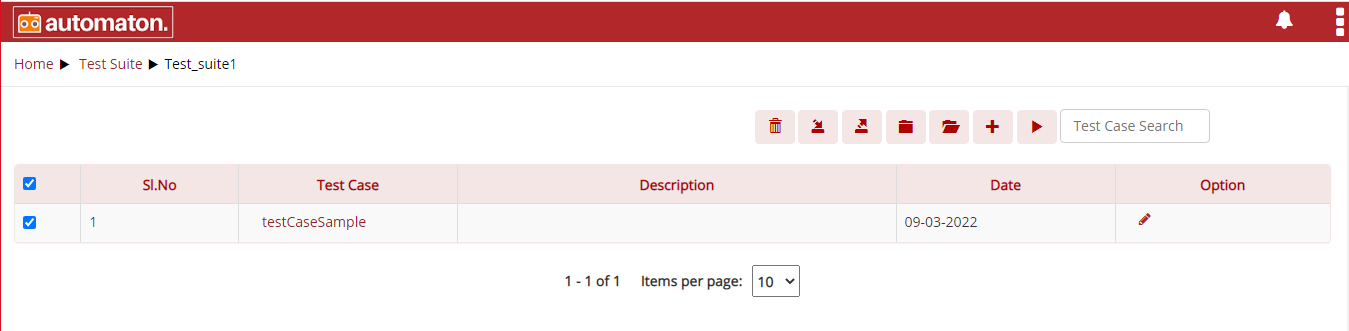
Fig. 6.10 Delete Test Case
The Delete Test Case dialog will be displayed click the Delete button to soft delete the test suite and users can delete the same permanently or restore from Trash. Click the Permanent Delete button to delete permanently or click Cancel to exit.
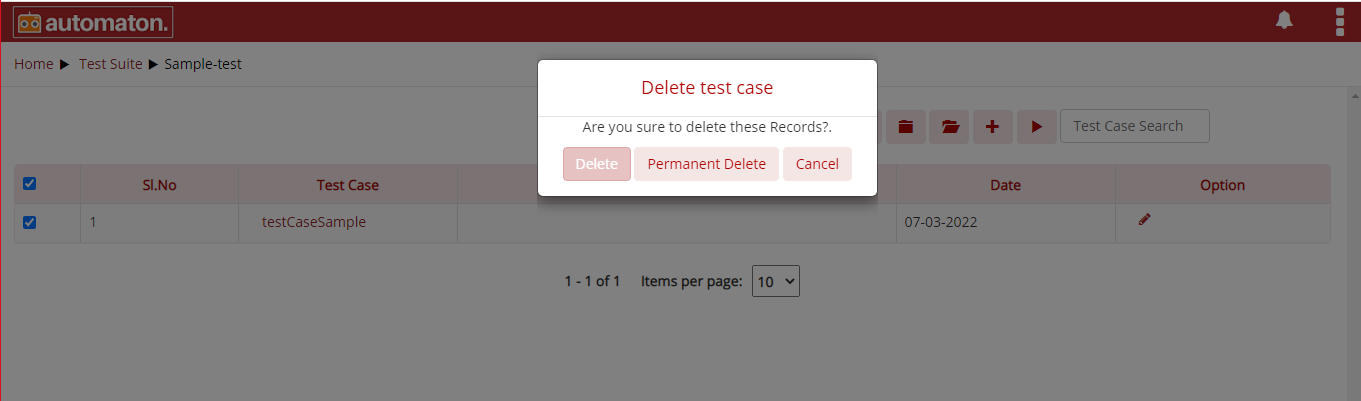
Fig. 6.11 Delete Test Case
Creating your first test case
Once you create your test case and press the continue button, you will be redirected to Automaton’s most unique feature, Create Test Case user interface as shown below:
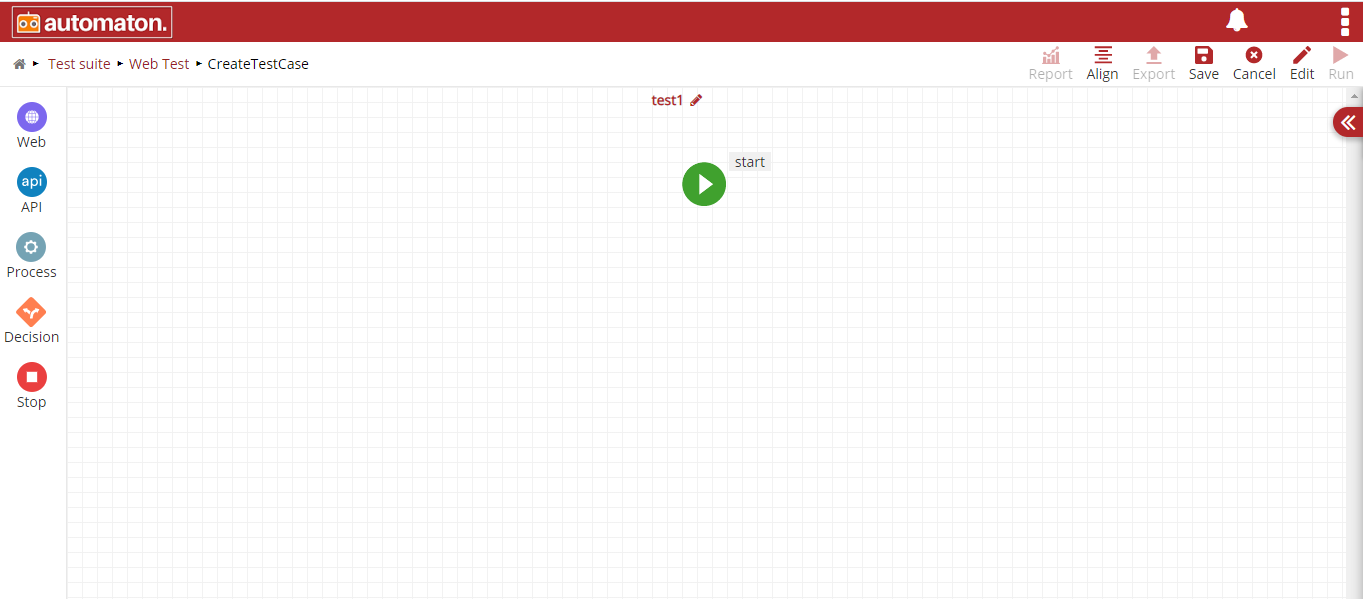
Fig. 6.12 Create Test Case
Click the edit icon ![]() next to the test case name, the Test Case
Properties dialog will be displayed where the user can either Choose CSV file or View and Update the already selected csv file or user
can Create Sample CSV by clicking the appropriate icon.
next to the test case name, the Test Case
Properties dialog will be displayed where the user can either Choose CSV file or View and Update the already selected csv file or user
can Create Sample CSV by clicking the appropriate icon.
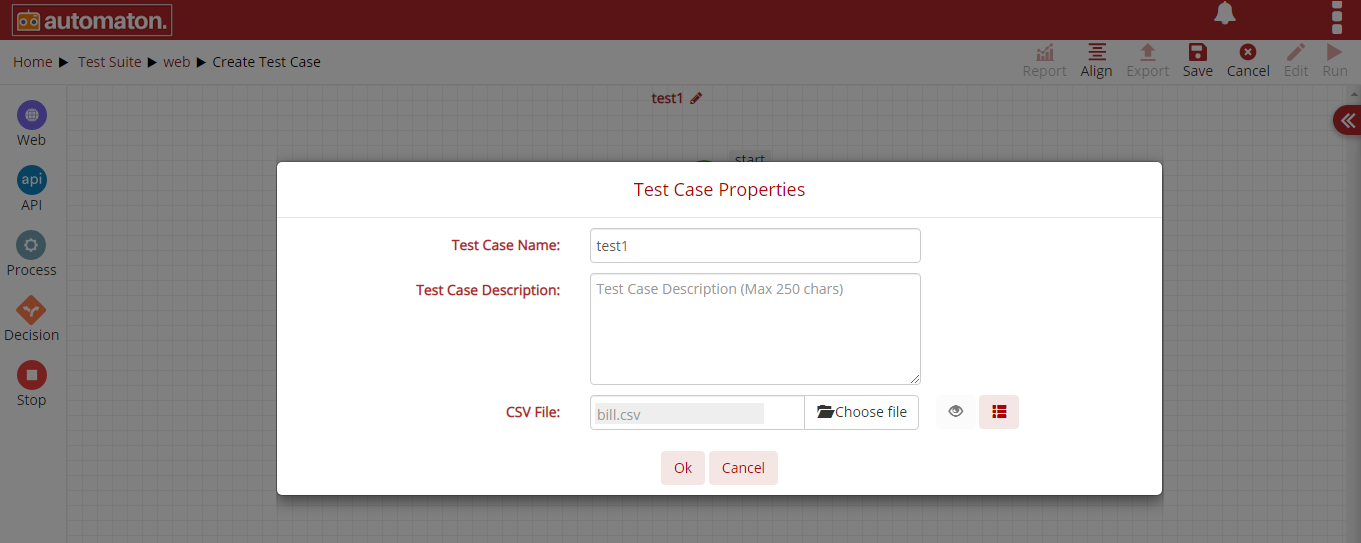
Fig. 6.13 View Test Case Properties
Click the Ok button to create and Cancel to exit.
Here we are going to execute a test case where user can be able to sign in and sign out from account Gmail by configuring respective element.
We can configure Start on clicking the icon. A configure box will pop up from the right side of the page. User must fill all the fields. Label field can be modified if required.
Here we are going to test Gmail Sign-in in the Chrome browser. If you wish to use Firefox or any IE, you can select those from the menu.
Action Type: Initialize.
Action: Launch Chrome.
Userdefined: Application Name refer below figure.
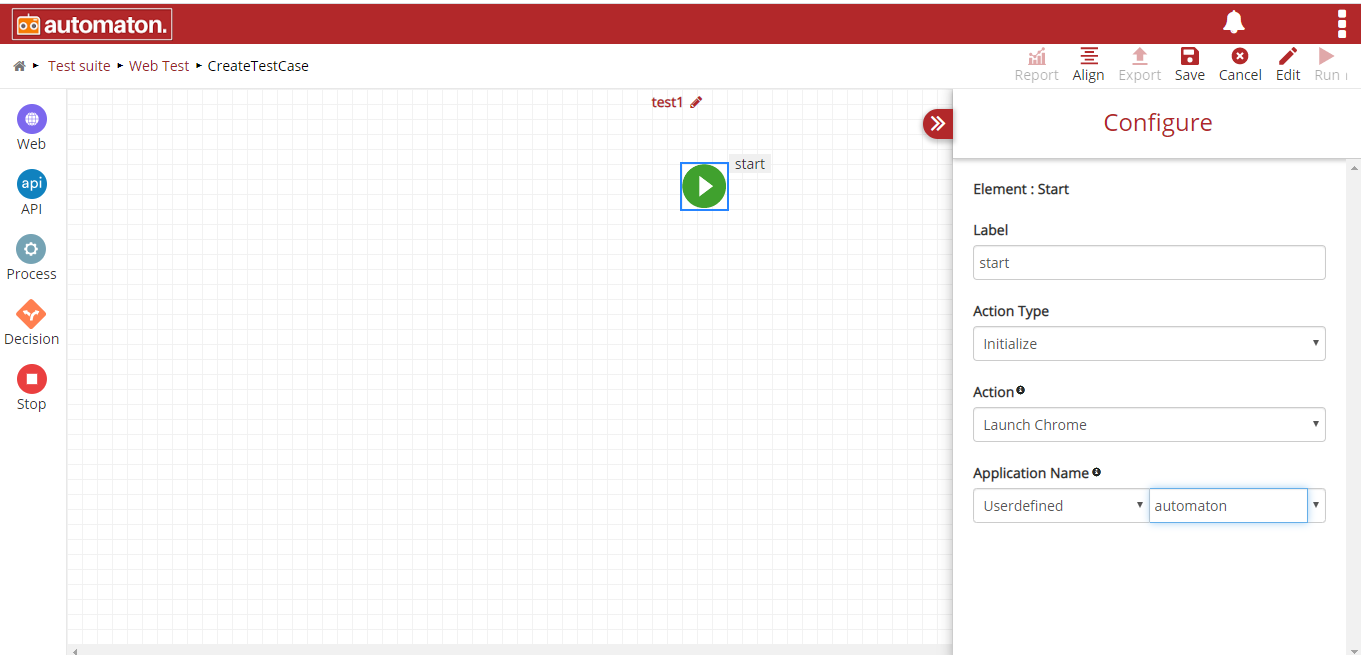
Fig. 6.14 Gmail Start
The second step is to open the page by hitting a URL.
Element: PROCESS, Label: open url
Select the Process element. Label field can be modified if required.
Below fields should be populated with corresponding data’s:
Action Type: UI Operations.
Action: Launch URL, to be selected from the drop-down.
Map to the Previous Step: Step ID and 0:Start
URL: Here we need to enter the Gmail account access URL.
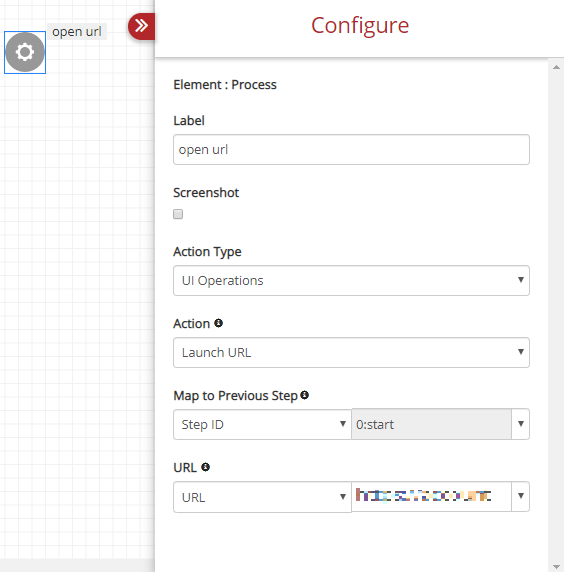
Fig. 6.15 Gmail Open URL
The third step is to enter the Username to sign In.
Element: Web, Label: set username
Select the Web as an element. Label field can be filled if required.
Below fields should be populated with corresponding data’s:
Action Type: Set Operations.
Action: Enter Content in Text Box.
Map to the Previous Step: Step ID and 0:Start.
Now we need to locate the username box using Xpath. To ease for finding xpath, Automaton offers the flexibility to use Xpath Creator plugin. Click on the Xpath creator plugin to see the steps.
Locate By: Xpath and enter the Xpath details. We are going to enter the username now. To do this select User-defined under Content and enter your username.

Fig. 6.16 Gmail Set Username
Once you enter your Gmail username, we need to click the Next button to reach the password entry page as shown in the below figure:
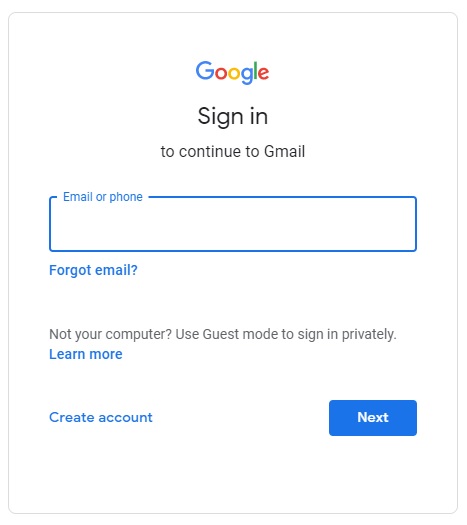
Fig. 6.17 Gmail Click NEXT
Element: Process, Label: mouse click
Label field can be modified if required.
Action Type: Mouse Operations.
Action: Left Single Click.
Map to the Previous Step: StepID and 0:Start.
We are locating the Next button in Gmail Sign In, through XPath. The Xpath value is filled in Locate By: Xpath.
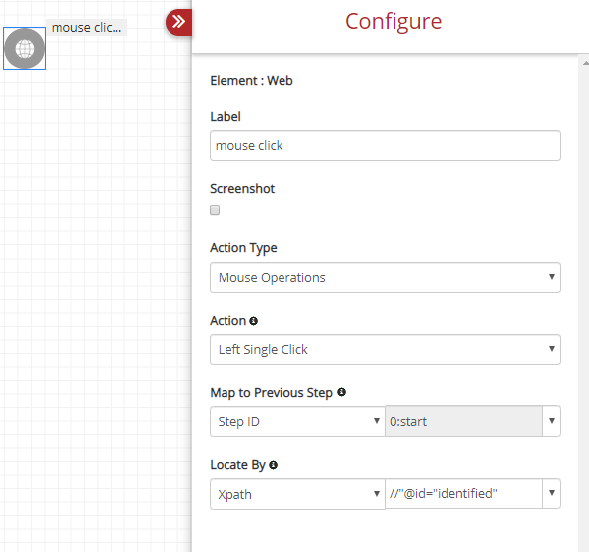
Fig. 6.18 Gmail Mouse Click Next
The next step is to wait some seconds till the page loads on clicking the Next button in Gmail Sign In.
Element: Process, Label: Wait
Once the Next button is pressed, it may take some time for the next page (Password entry page) to load.
Action Type: UI Operations.
Action: Sleep.
Once sleep is selected, you get the Time drop-down where you can set the wait time. In our example, 1000 is set which is 1000 milliseconds.
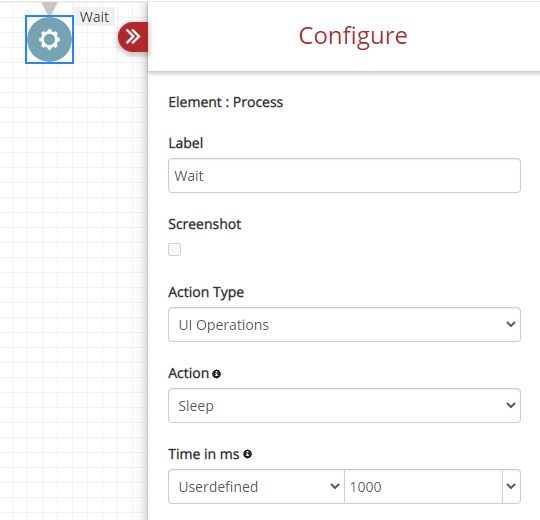
Fig. 6.19 Gmail Wait
Element: Web, Label: Enter Password
After waiting for 10 milliseconds, you will be reaching the Gmail Sign-In page where we can enter the password as shown in figure Gmail enter password UI. We need to enter our password and click the Next button to reach the inbox.
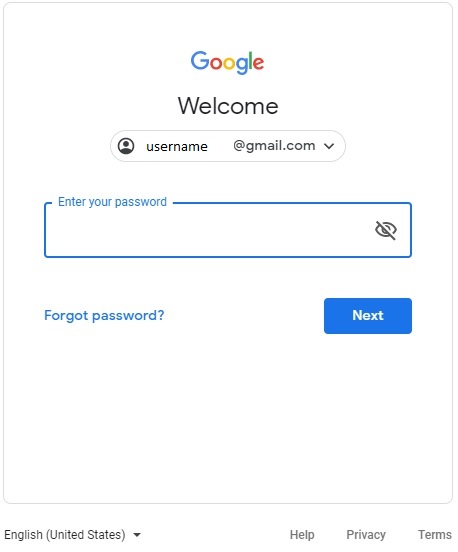
Fig. 6.20 Gmail Enter Password UI
The next step is to enter the password :
Label: Enter Password.
Action Type: Set Operations.
Action: Enter Content in Text Box.
Map to Previous Step: StepID and 0:Start.
We are locating the password entry box by its XPath.
Locate By: XPath.
Content is where you enter the actual password. We can be able to hide the text contents by clicking an eye symbol.
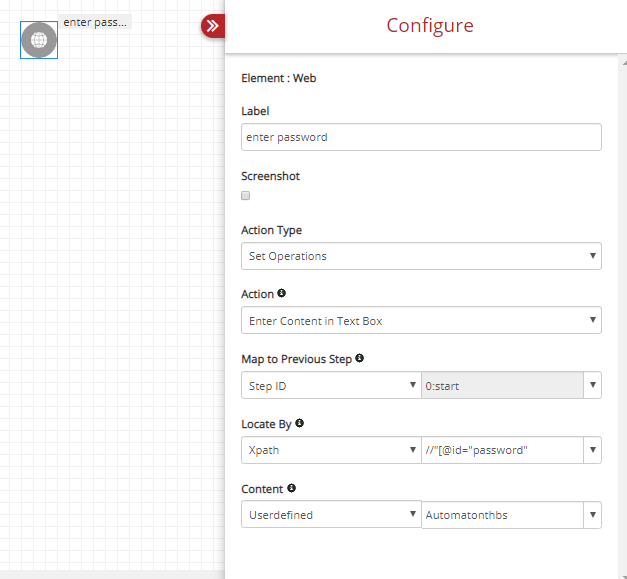
Fig. 6.21 Gmail Enter Password
Element: Web, Label: login click
Once the password is entered, we are clicking the Next button as a standard procedure to be followed.
Action Type: Mouse Operations.
Action: Left Single Click.
Map to Previous Step: StepID and 0:Start.
Locate By: XPath. The values should be entered.
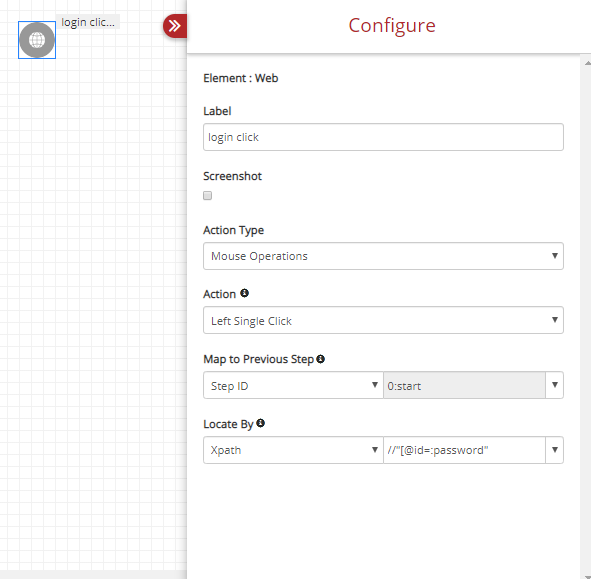
Fig. 6.22 Gmail Click Next After pw Entry
Element: Process, Label: Wait
Once the next button is pressed, we need Automaton to wait for some time before moving to the next step, the same way we waited after entering the Gmail username. The only difference here is the time set – we set 5000 milliseconds instead of 1000 as shown in below figure:
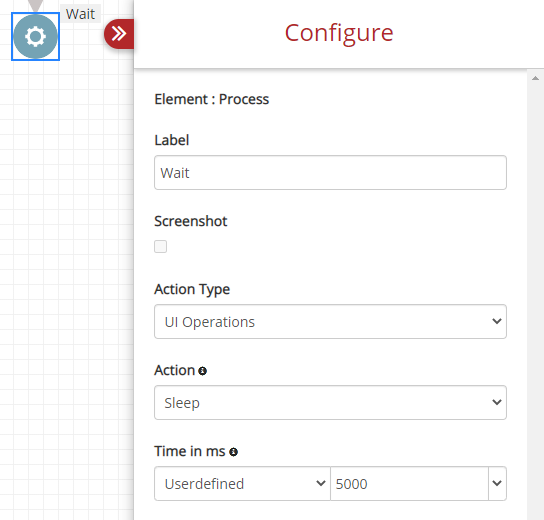
Fig. 6.23 Gmail Sign-in Wait After pw
Element: Web, Label: click profile
After a successful login to the Gmail inbox, we are signing out of Gmail in this test case. The first action to perform for signing out is clicking on the profile icon, displayed on the top right of the Gmail UI.
Label: click a profile to easily understand the type of action we are performing.
Action Type: Mouse Operations.
Action: Left Single Click.
Map to Previous Step: Step ID and 0:Start.
We are locating the profile icon by its XPath.
XPath: Locate by Xpath.
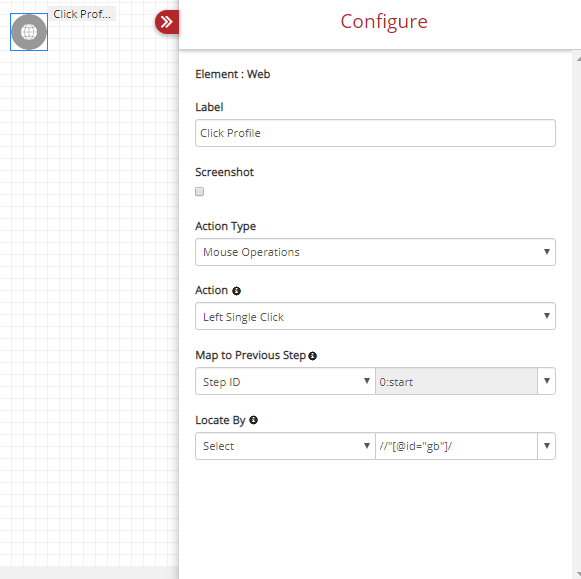
Fig. 6.24 Profile Icon Configure
Element: Process, Label: Quit
Once we successfully signed in and out of Gmail, we need to close the browser.
Action Type: UI Operations from drop-down.
Action: Close Browser -This will close the browser.
Map to Previous Step: StepID and 0:Start.
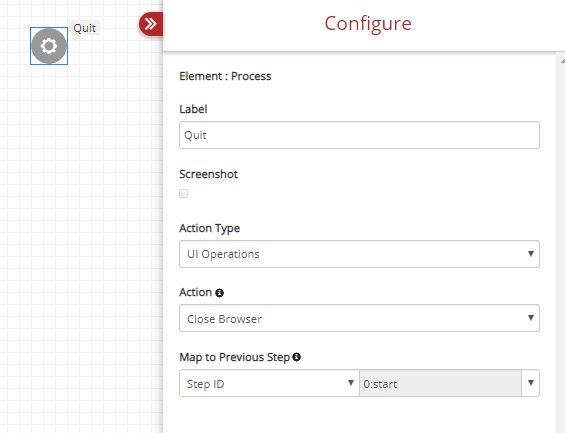
Fig. 6.25 Gmail Close Browser
Element: Stop, Label: Stop
After closing the browser successfully, you need to stop the test case refer figure shown below.
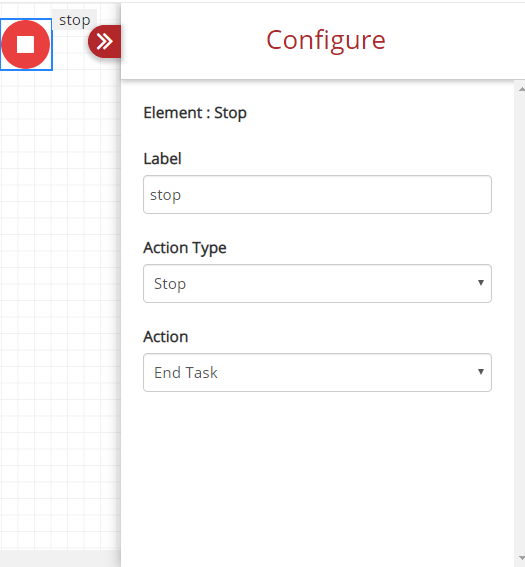
Fig. 6.26 Gmail Sign out Stop
Now we successfully created. Execute this web test case by clicking the Run button at the top right corner.
Xpath Creator Plugin
Xpath creator plugin is a browser extension that generates all possible xpaths of a selected web element in the website. This helps the user to easily find the xpath.
Steps to add Xpath creator plugin into the browser:
- Click the https://chrome.google.com/webstore/detail/xpath-creator/elfinpbofafmkgjbmkfeboccoohncjam?hl=en.
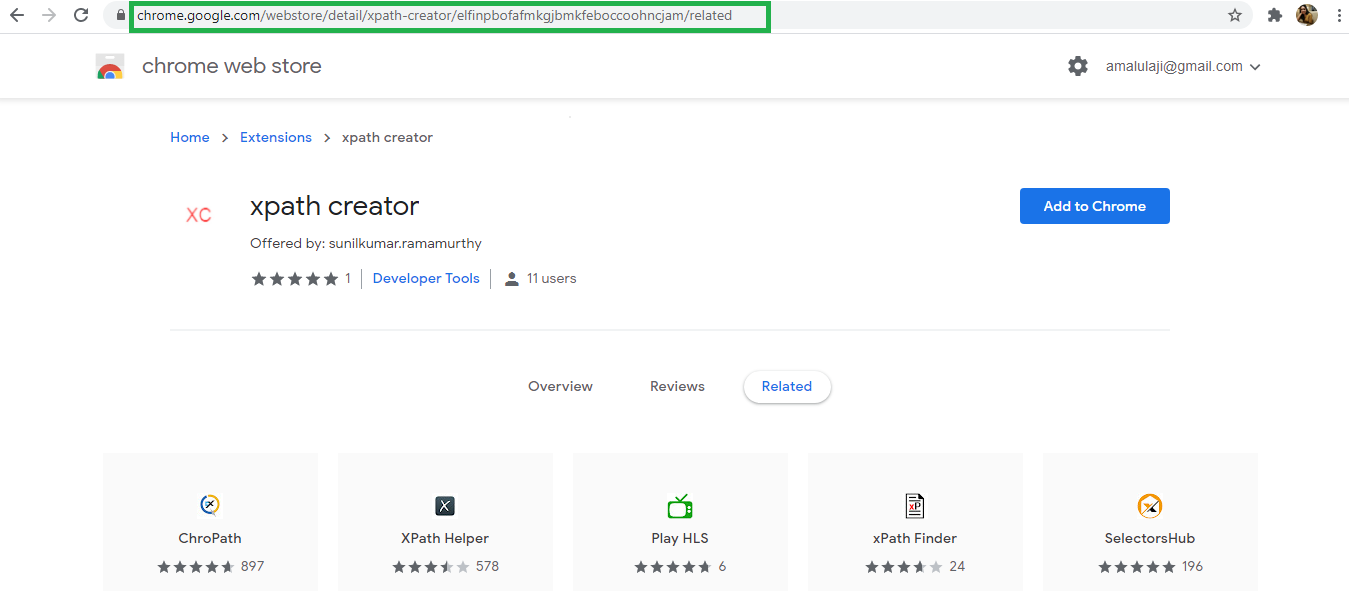
Fig. 6.27 Xpath Creator Plugin
- Click the Add to Chrome button, Add “Xpath creator” dialog will be displayed as shown below:
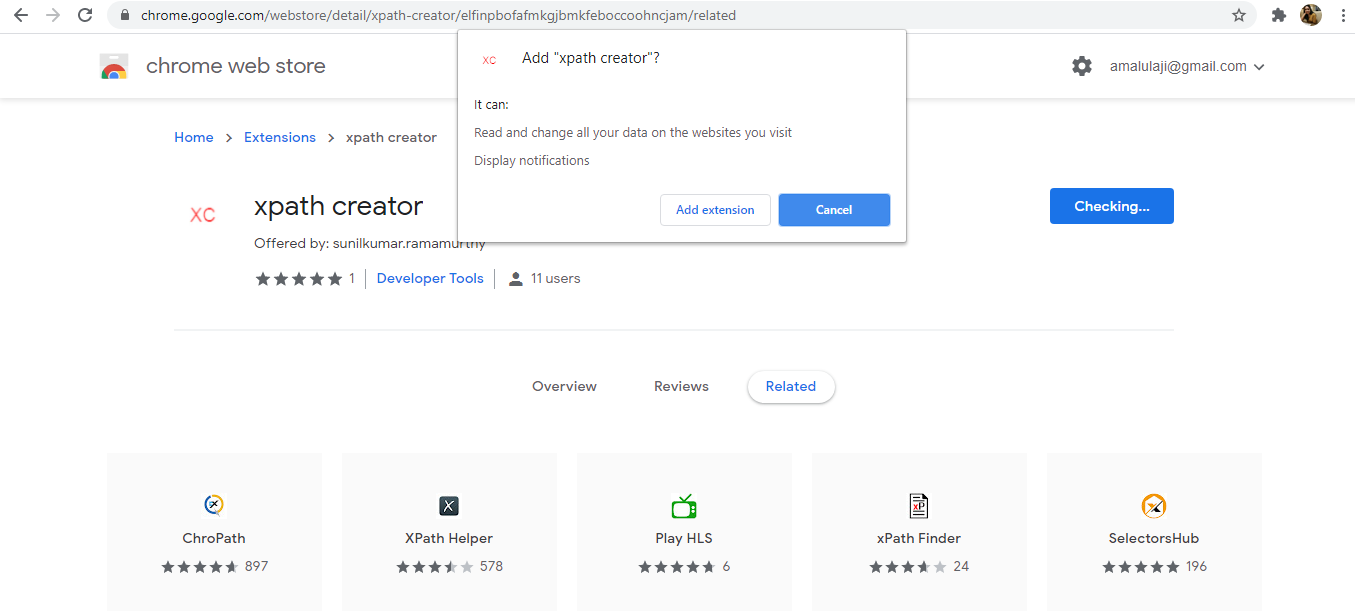
Fig. 6.28 Xpath Creator Dialog
- Click the Add extension button to add to the chrome.
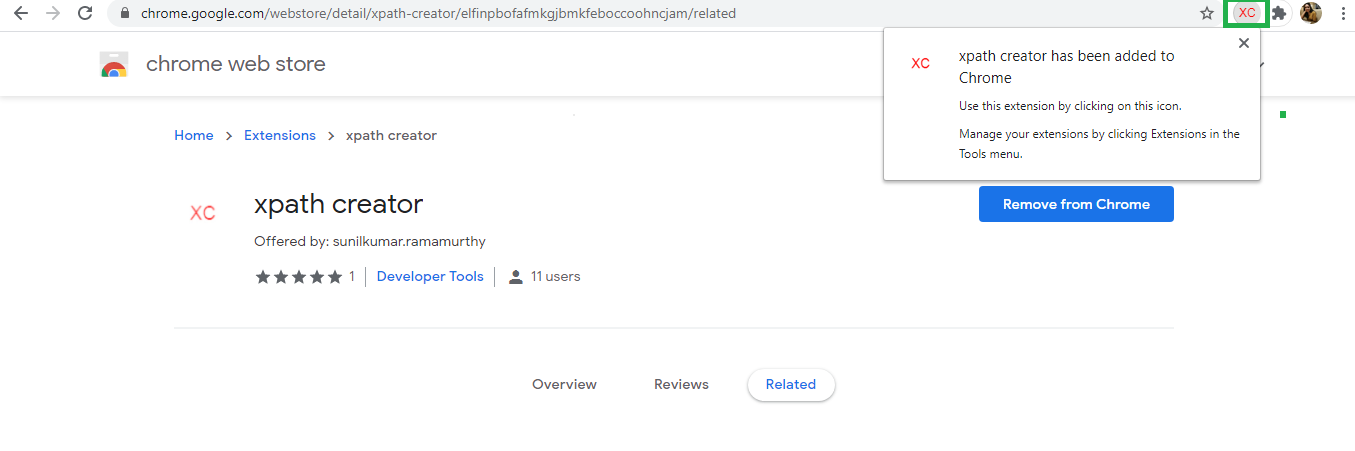
Fig. 6.29 Xpath Creator Added
- Once the plugin is installed, if the user wants an xpath of any web elements to create a test case in Automaton click on the respective web element. Its console will display all possible xpath related to that web elements. Users can choose the required one, copy and paste it in the Xpath field wherever required.
For example, In the demostore website if a user wants an xpath of Brands(web element): navigate to demostore.in>Women>Brands, then right click>Inspect>Console. In the console all possible xpath will be highlighted as shown below:
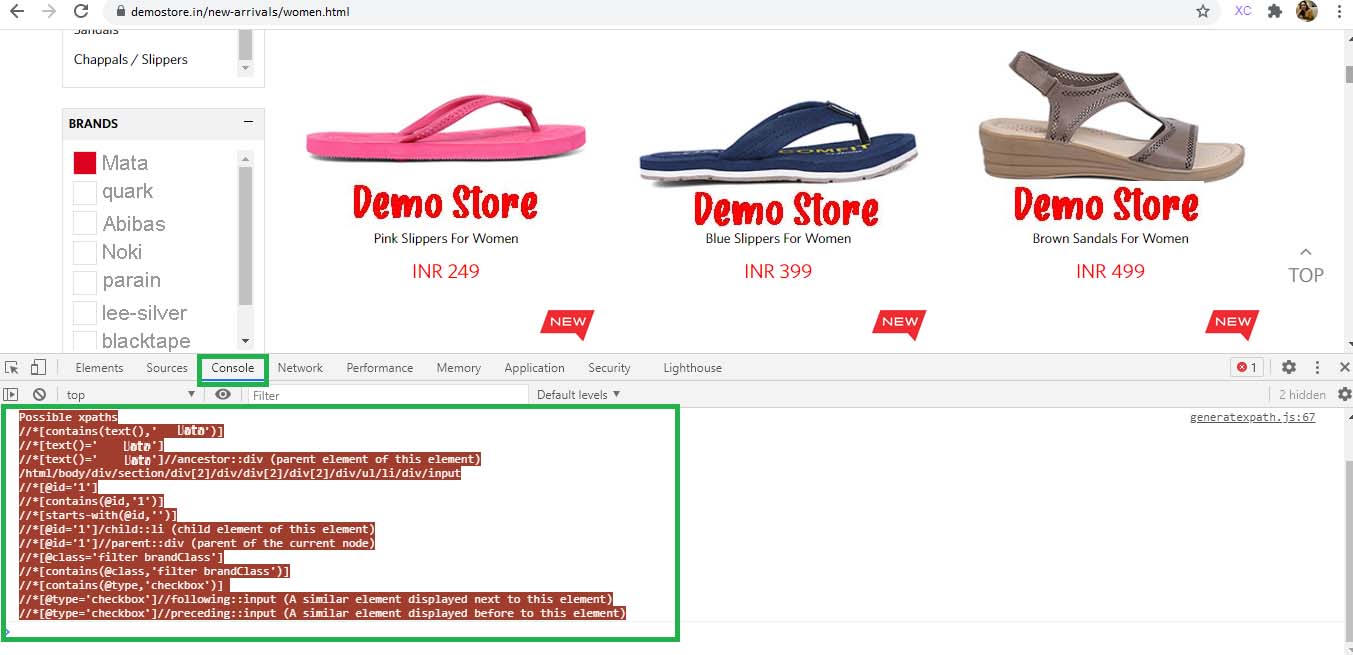
Fig. 6.30 Xpath
By using this plugin, users can select the xpath and proceed with the test case.
6.2. Application Program Interface (API) testing
Automaton supports Rest and Soap API Test cases.
Creating API test suite
To execute API related test cases, first we should create an API related test suite.
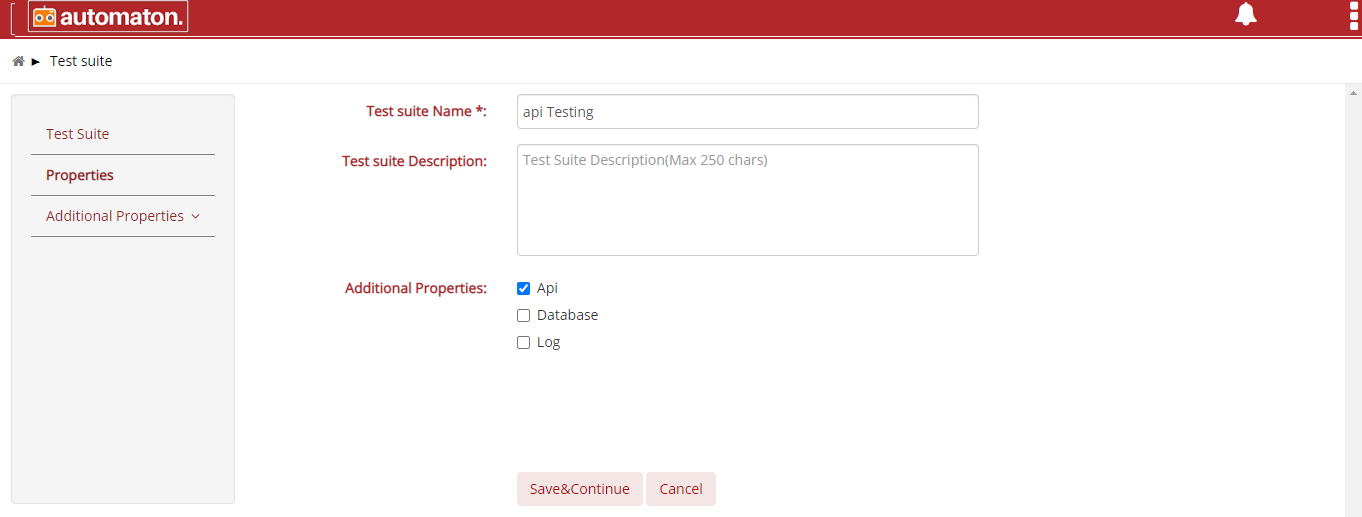
Fig. 6.31 API Test Suite Creation Step 1
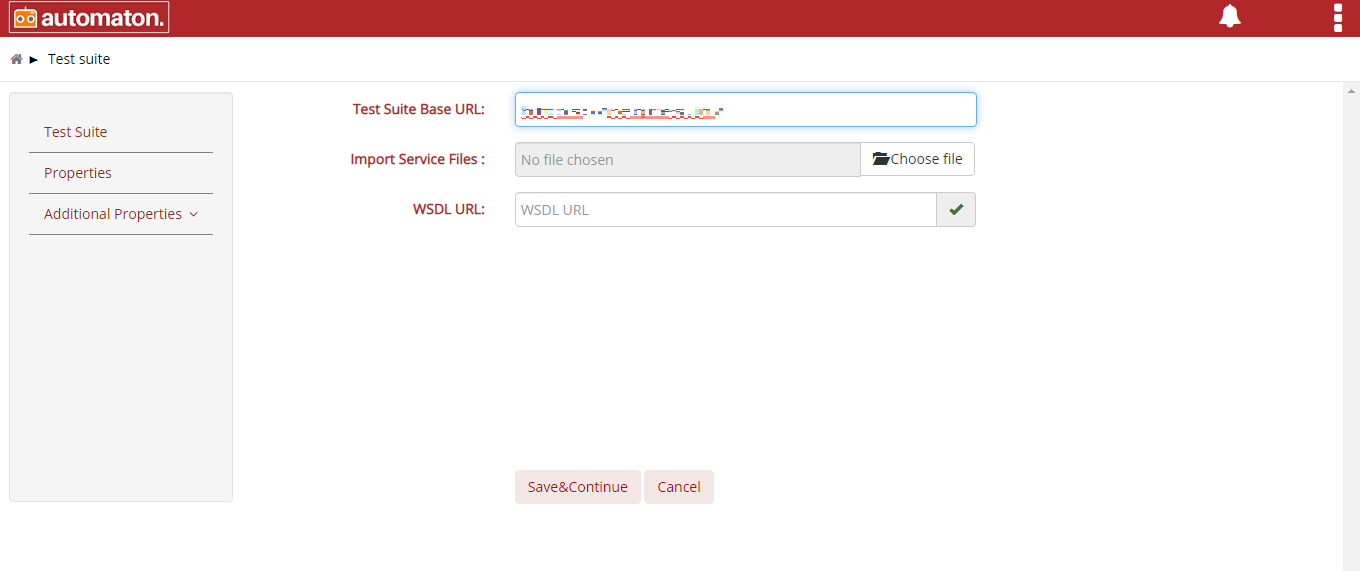
Fig. 6.32 API Test Suite Creation Step 2
Test Suite Base URL: The base URL represents the base location. When the user wants to call multiple APs’s the same URL will be taken. This is an optional field.
Import Service Files: In this field users can upload the service files like wsdl, swagger, yaml or swagger zip. This is an optional field.
WSDL URL: Here users can provide an URL or link of wsdl. This is
an optional field. The  will validate the wsdl URL.
File List: This field will be displayed only if the user has uploaded the file in the Import Service Files field. This field will also display the list of files uploaded such as wsdl,
swagger, yaml, swagger zip. We can delete the uploaded file by clicking on the corresponding cross icon  . Once
the file is uploaded user has an option to autogenerate the testcases.
Click the checkbox corresponding to the uploaded file in the File List field to auto generate the test case. The auto generated test cases can be viewed in the test case list page. These test cases contain data for
further execution.
. Once
the file is uploaded user has an option to autogenerate the testcases.
Click the checkbox corresponding to the uploaded file in the File List field to auto generate the test case. The auto generated test cases can be viewed in the test case list page. These test cases contain data for
further execution.
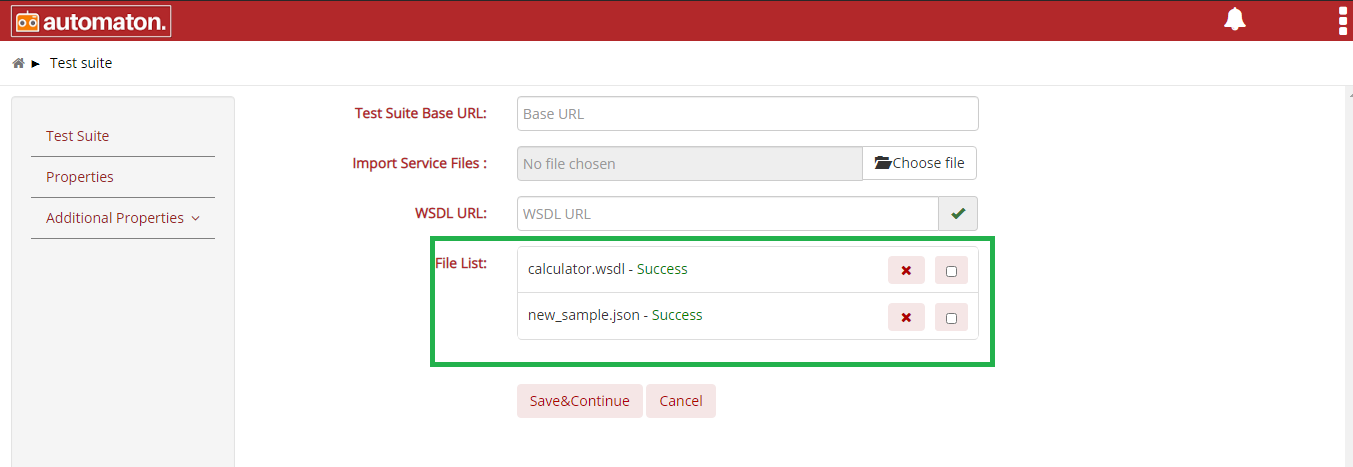
Fig. 6.33 File List
Note
User must initialize the test generated services before performing auto generation.
Autogenerate Swagger
Steps to autogenerate Swagger:
- Click the plus
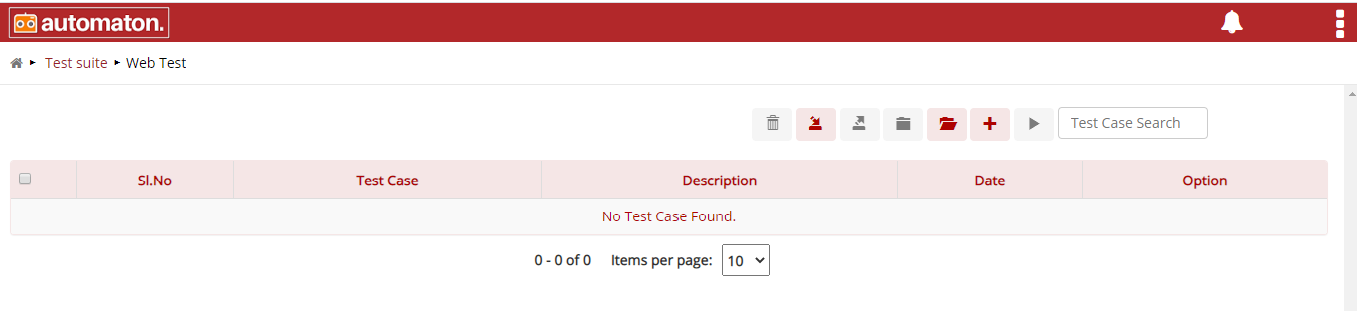
Fig. 6.34 Test Suite
- Create Test suite by providing Test suite Name and checking Api in Additional Properties. Click Save&Continue.
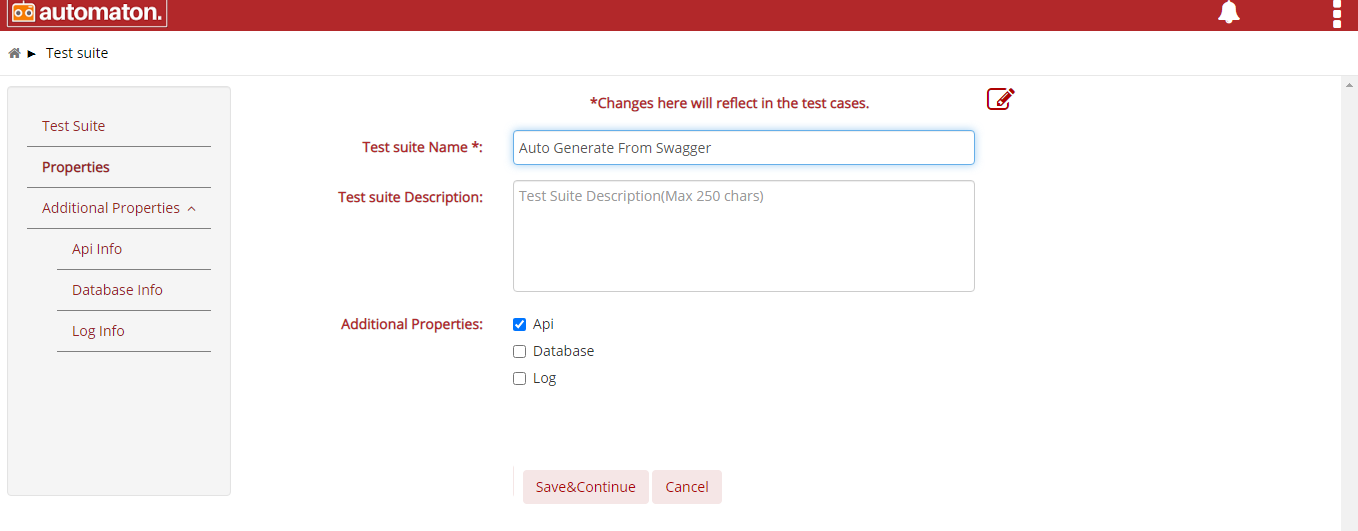
Fig. 6.35 Swagger Test Suite
- Click on Choose file and Select a Swagger file. Users can upload ‘n’ number of files at-once.

Fig. 6.36 Choose Swagger File
- Once the chosen file is uploaded the Swagger file will be verified and displayed at the File List field along with the Success message. Select the checkbox to enable autogenerate. Click Save&Continue.
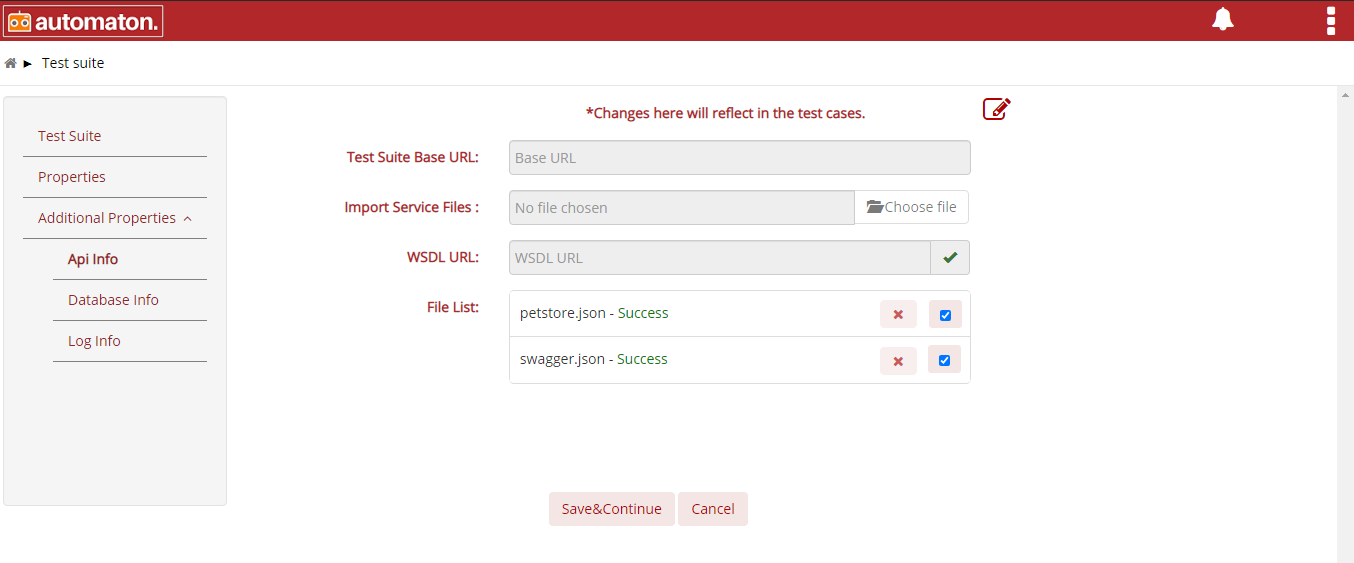
Fig. 6.37 Upload Swagger file
- On clicking Save&Continue Swagger file will start generating and display in the Test case List page.
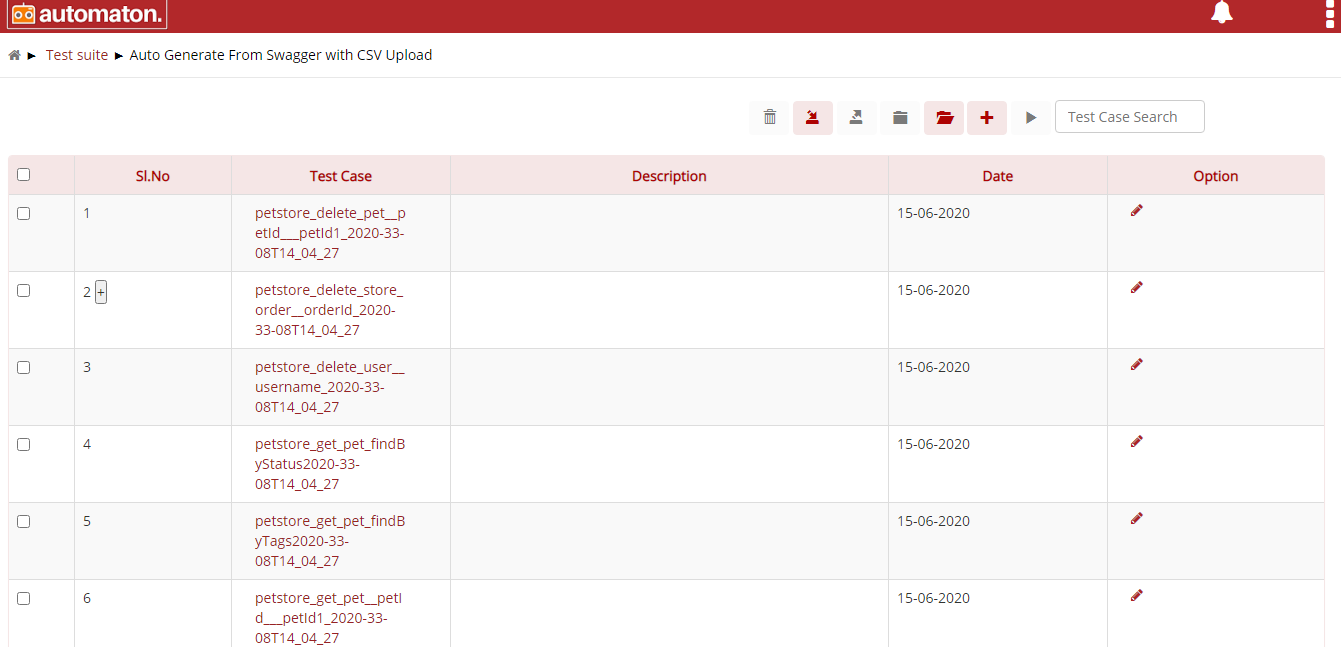
Fig. 6.38 Wsdl Testcase List Page
- Click the test case to display the flow.

Fig. 6.39 Add API Flow
Note
The format of the test case name be File name, Operation Name, Method, Timestamp
- Click on api element to see the details in the Configure. All the values will be automatically populated.
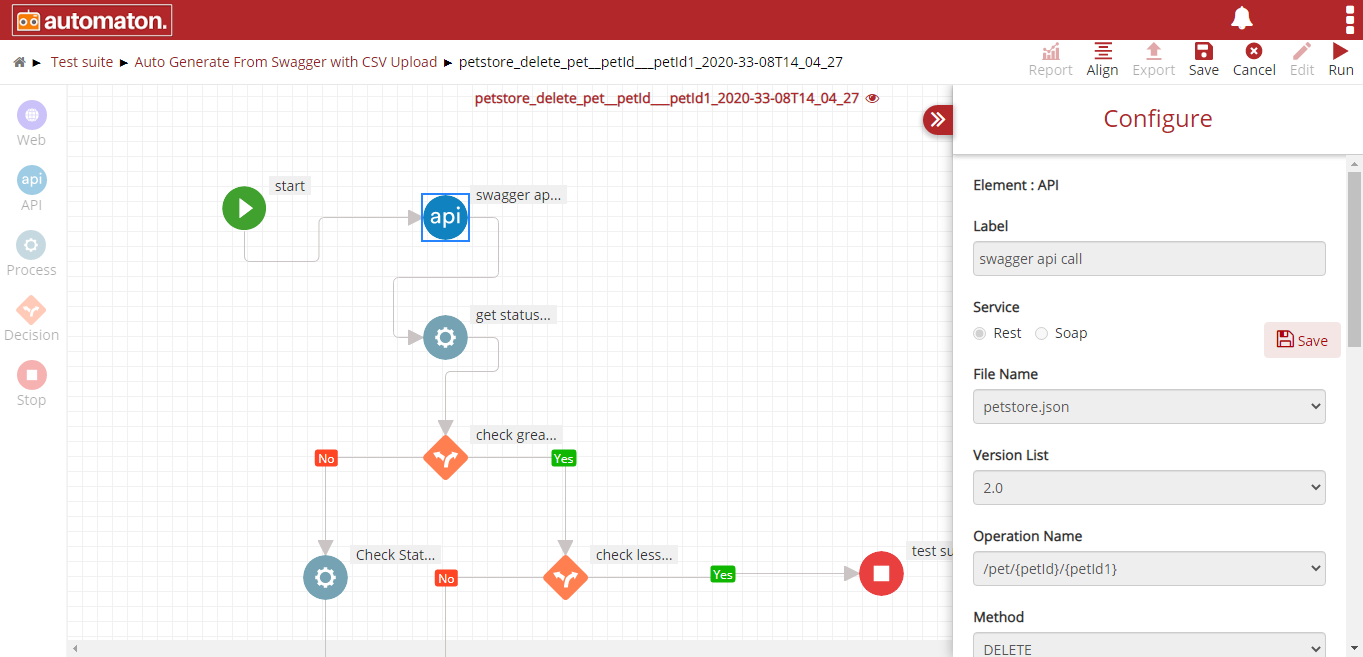
Fig. 6.40 Api Configure Panel
- Click on Path to see the details, here the values will be automatically generated.
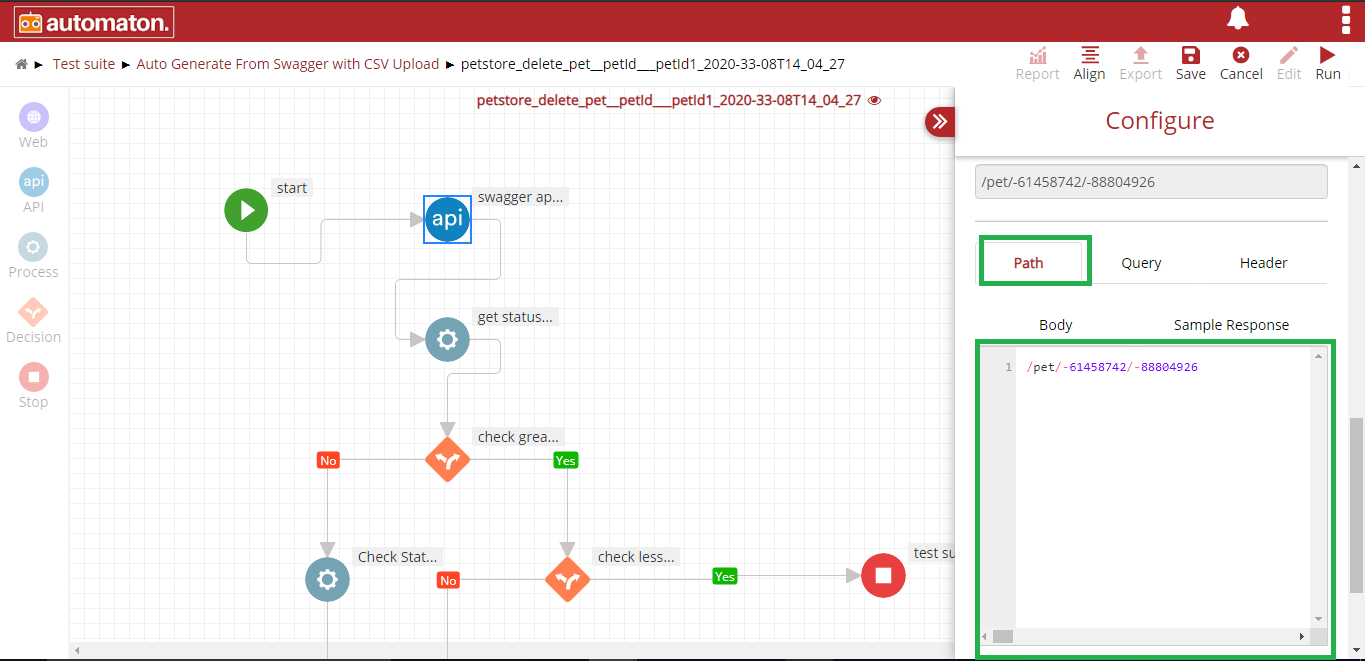
Fig. 6.41 Path Swagger API
- Click on Header to see the details as shown below:.
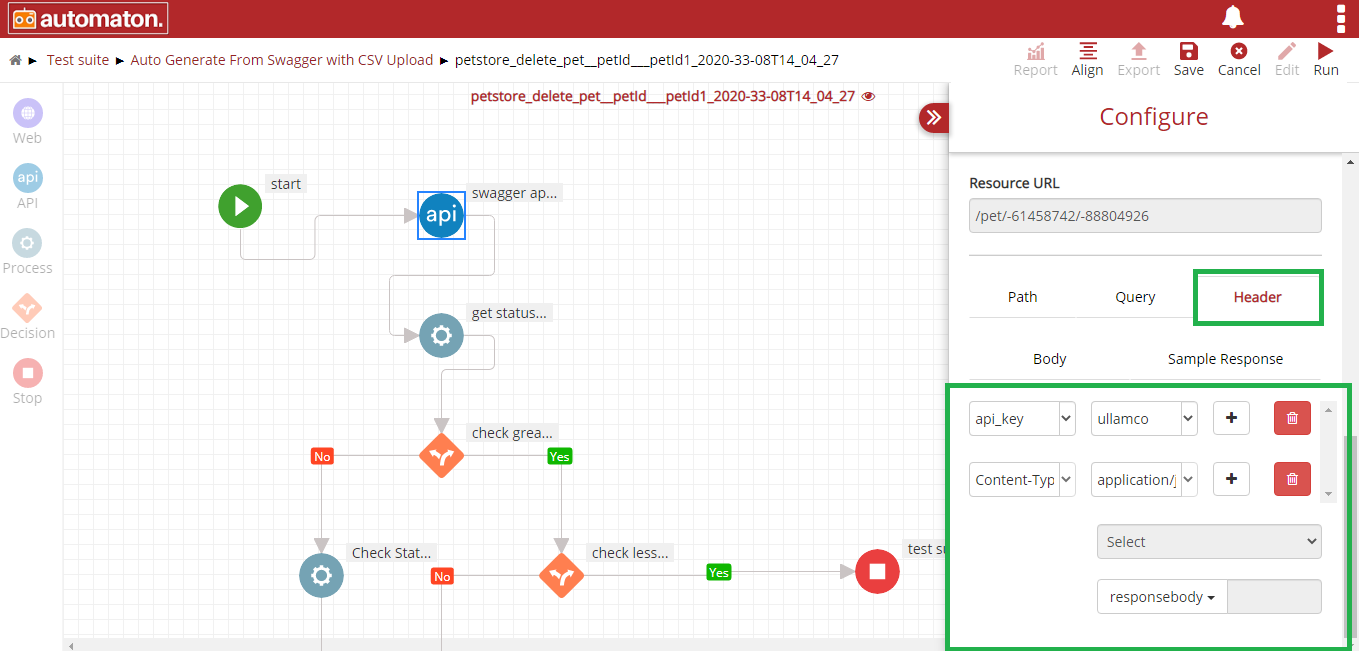
Fig. 6.42 Header of Swagger API
We can view the autogenerated swagger files in the test suite List page with the help of
Autogenerate WSDL
Steps to Autogenerate WSDL:
- Click the plus icon
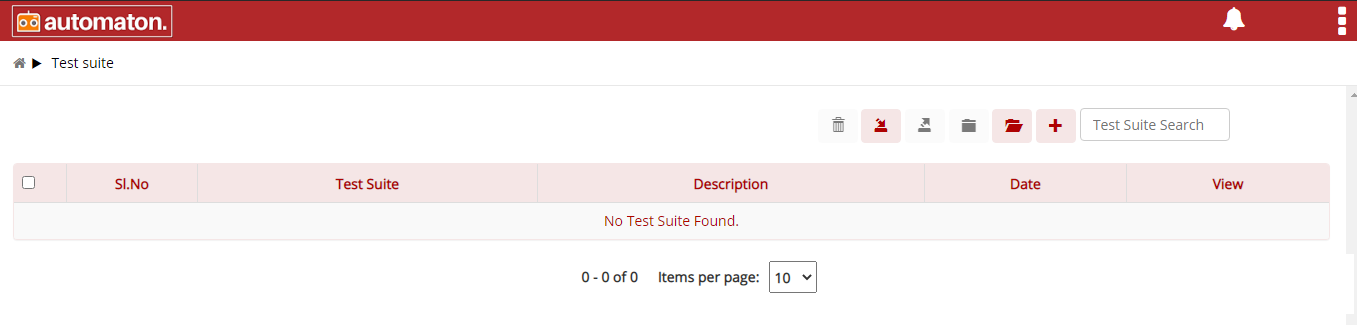
Fig. 6.43 Test Suite Page
- Create Test suite by providing Test suite Name and checking Api in Additional Properties. Click Save&Continue.
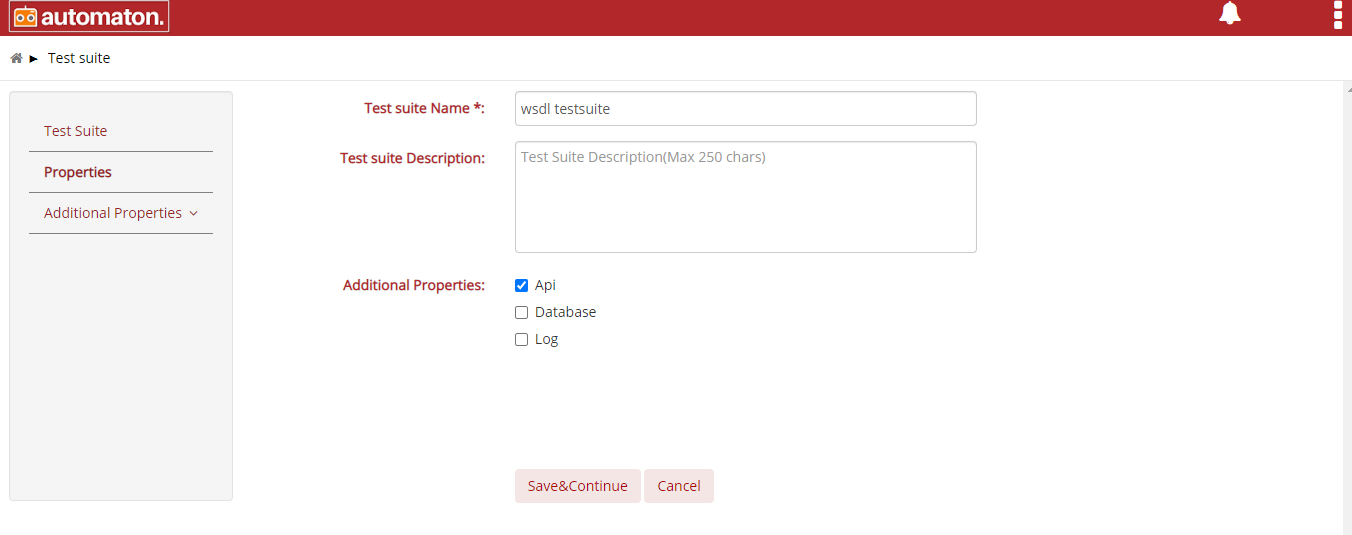
Fig. 6.44 WSDL Test Suite
- Click on Choose file and Select a WSDL file. Users can upload ‘n’ number of files at-once.
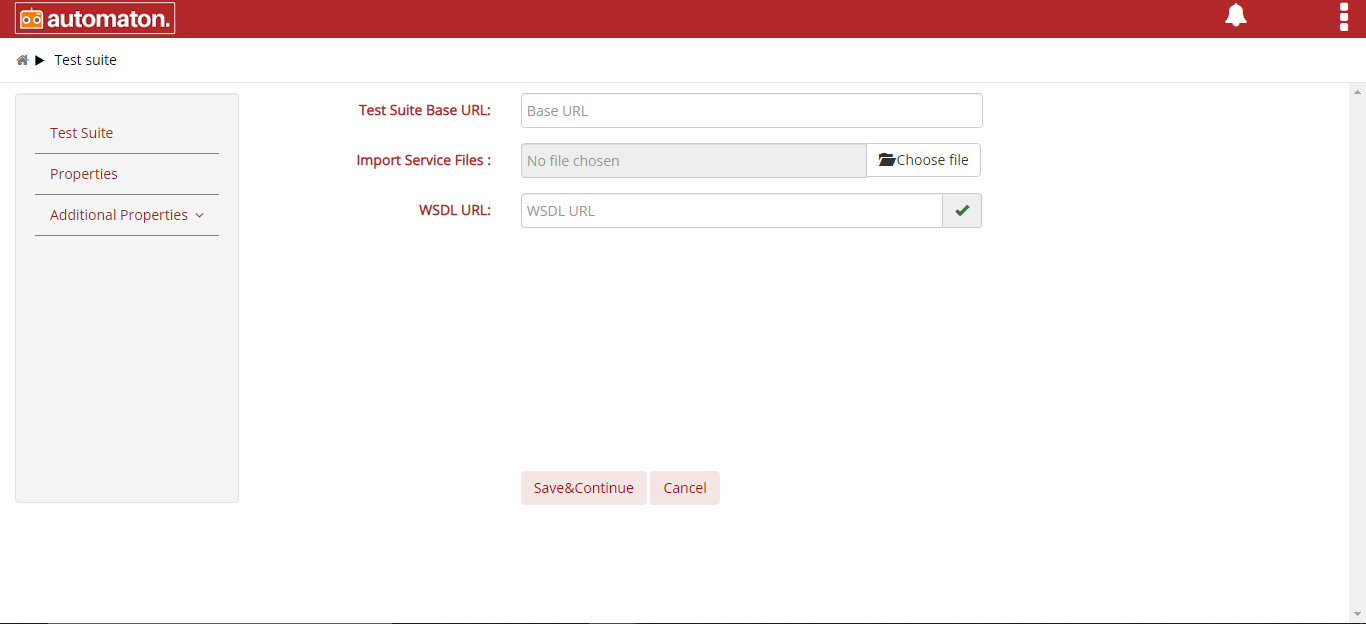
Fig. 6.45 Choose WSDL file
- Once the chosen file is uploaded the WSDL file will be verified and displayed in the File List field along with the Success message. Select the checkbox to enable autogenerate. Click Save&Continue.
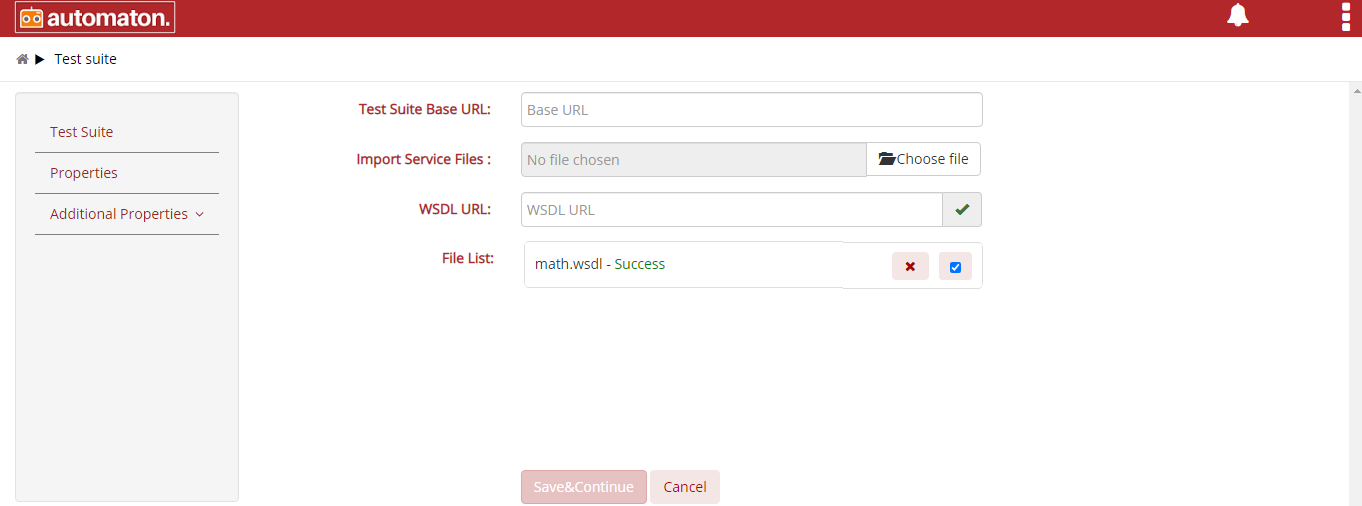
Fig. 6.46 Upload WSDL file
- On clicking Save&Continue WSDL file will start generating and display in the Test case List page.
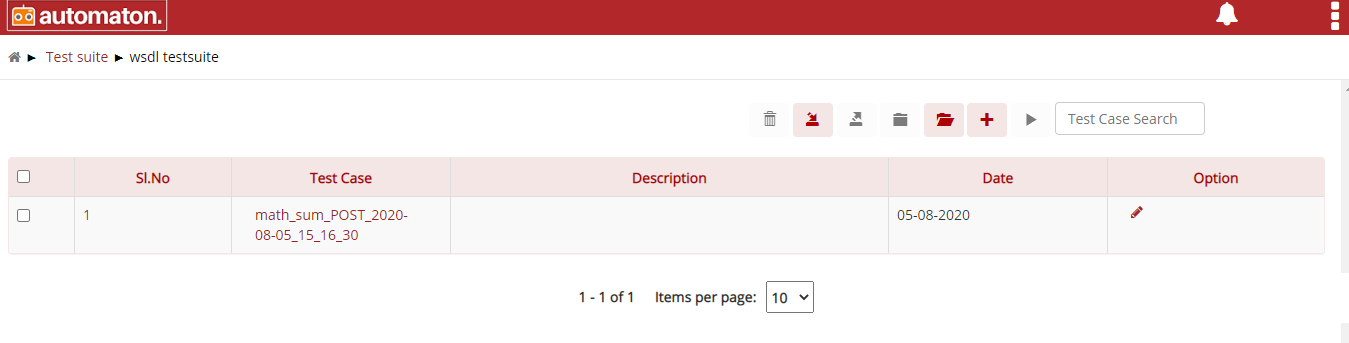
Fig. 6.47 Wsdl Testcase List Page
- Click the test case to display the flow.
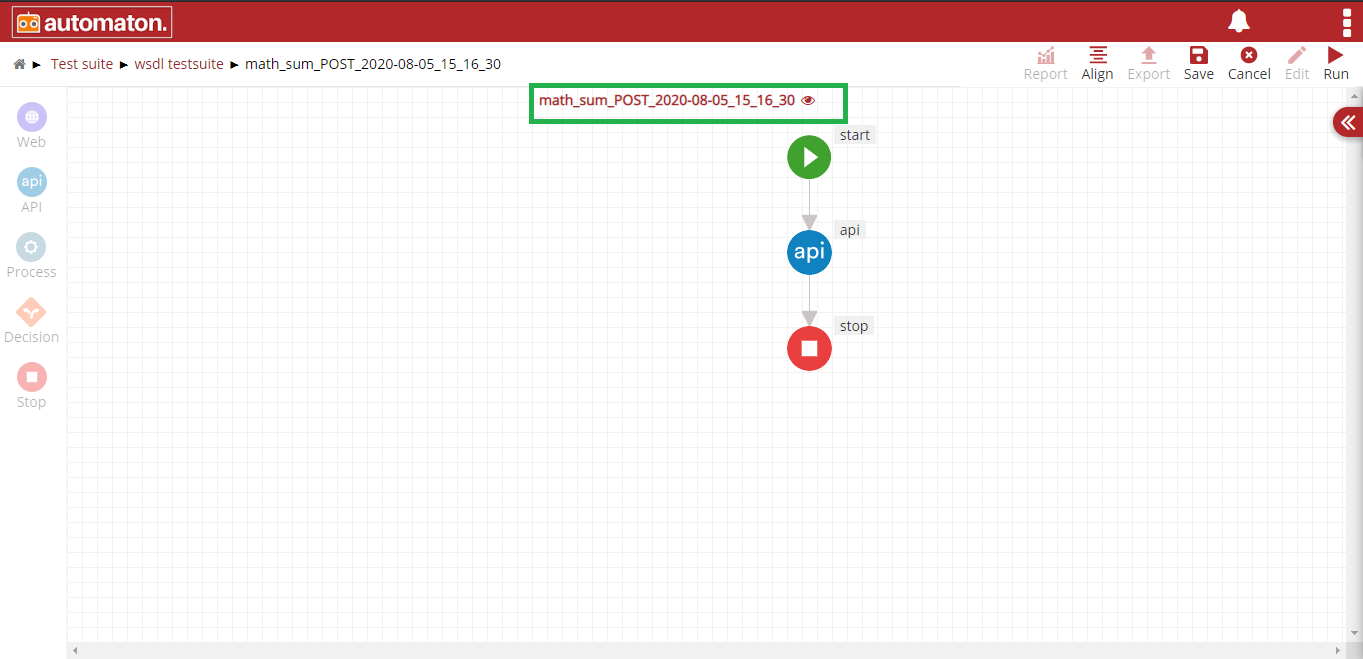
Fig. 6.48 Add API Flow
Note
The format of the test case name be File name, Operation Name, Method, Timestamp
- Click on api element to see the details in the Configure. All the values will be automatically populated.
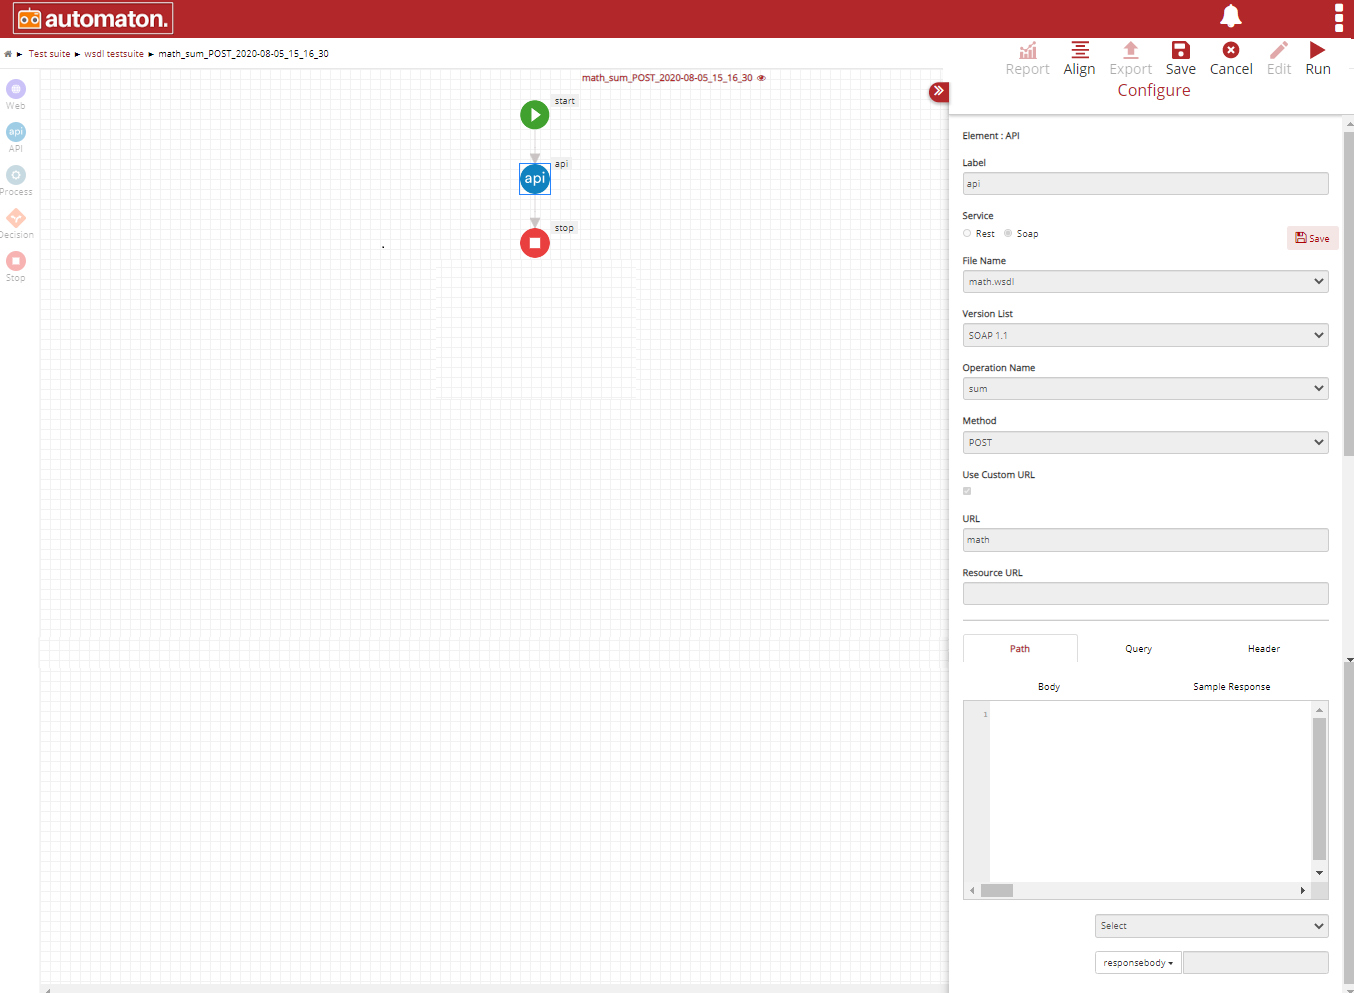
Fig. 6.49 Api Configure Panel
- Click on Body to see the details, here the values will be automatically generated.
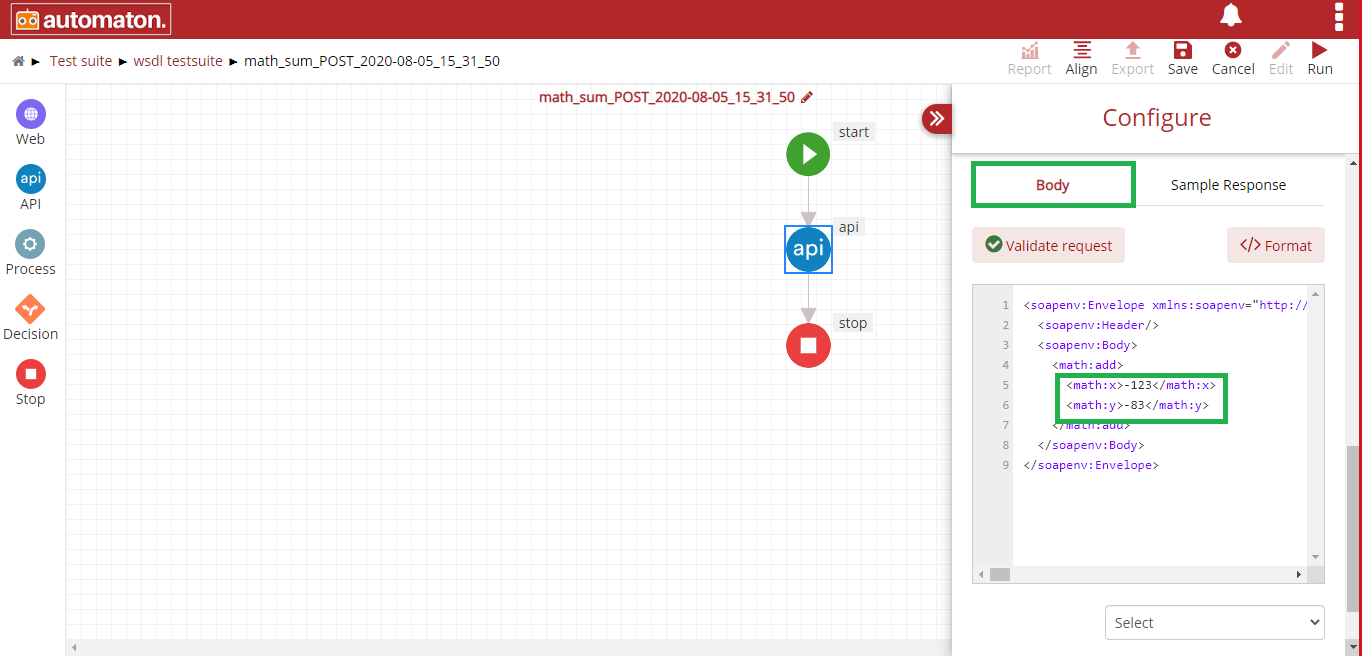
Fig. 6.50 Body of WSDL
- Click on Sample Response to see the result.
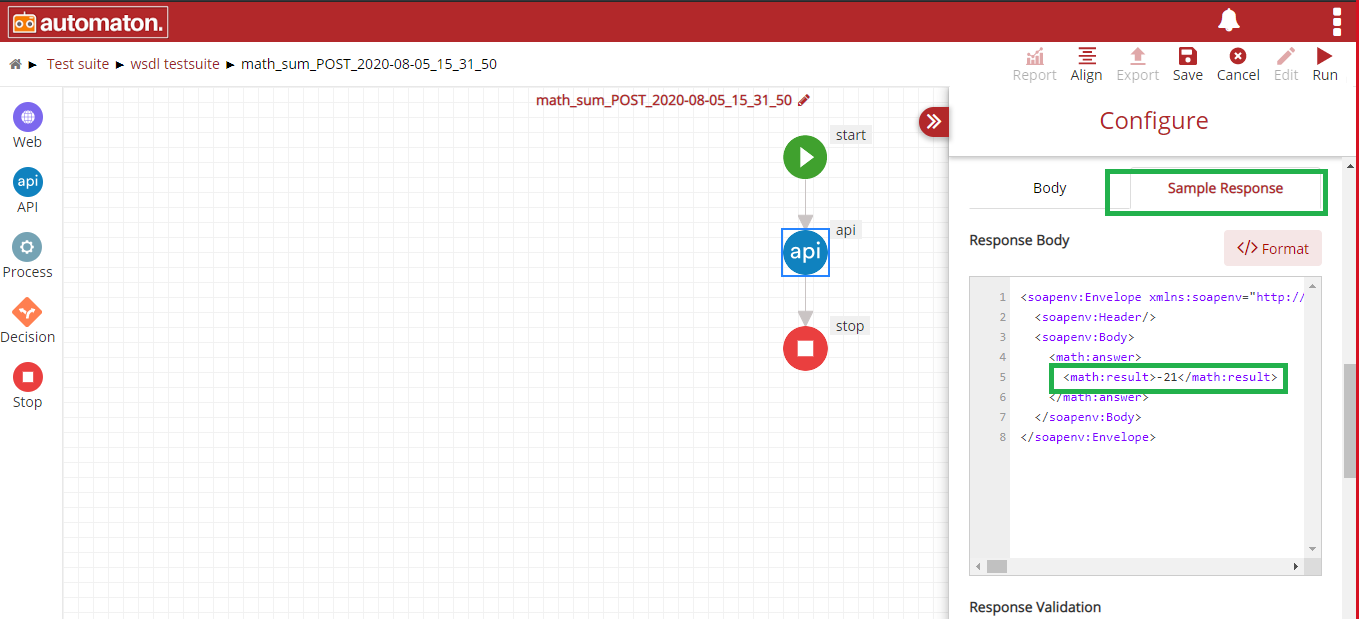
Fig. 6.51 Sample Response of WSDL file
Download Files
User can download the selected service files like wsdl, swagger, yaml, json by clicking on the download icon ![]() in the testsuite page as shown below:
in the testsuite page as shown below:
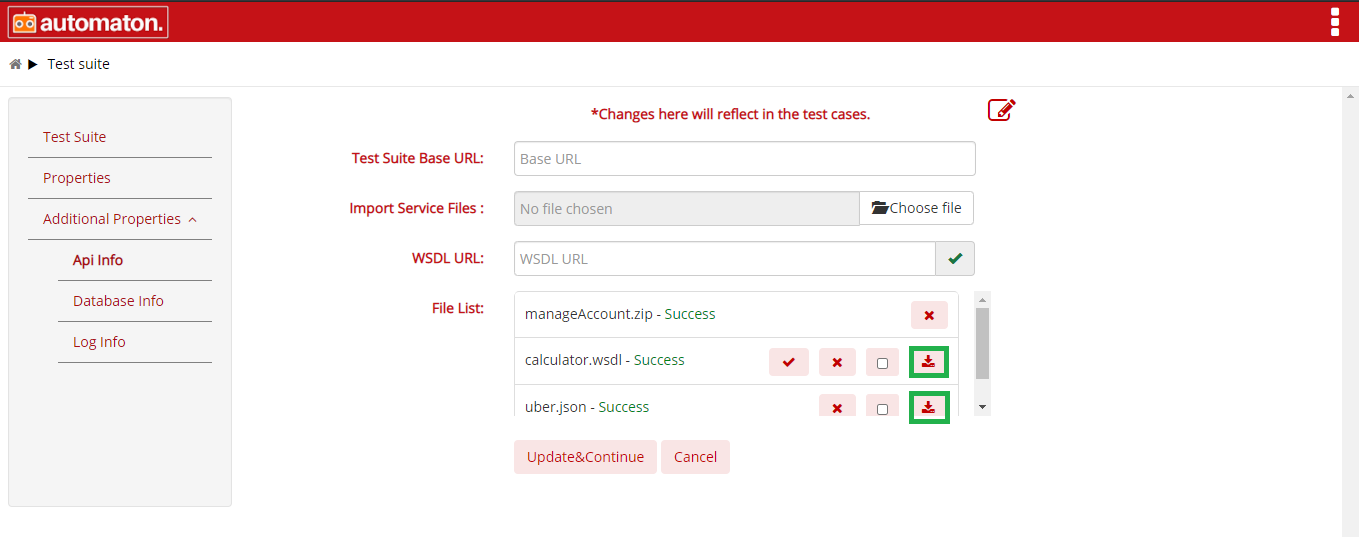
Fig. 6.52 Download Service File
Note
Autogenerate Yaml
- Click the plus icon to create new a Yaml API Test Suite.
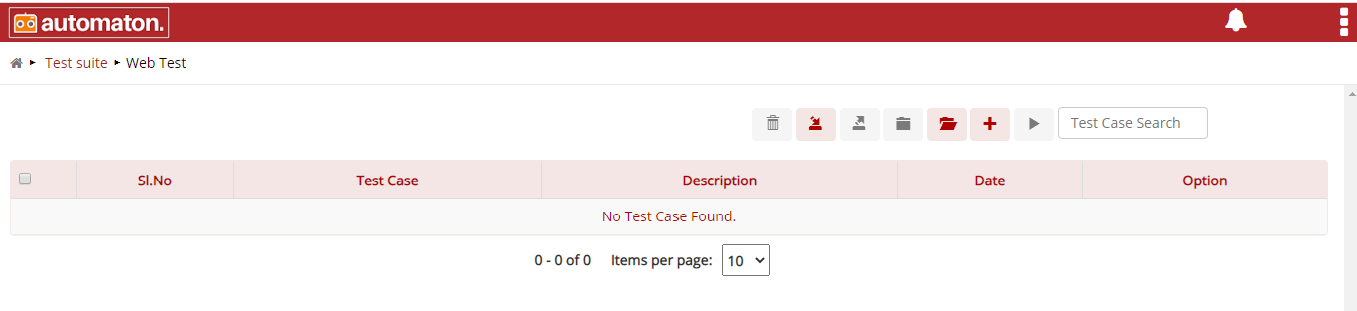
Fig. 6.53 Test Suite
- Create Test suite by providing Test suite Name. Select the option Api in Additional Properties. Click Save&Continue.
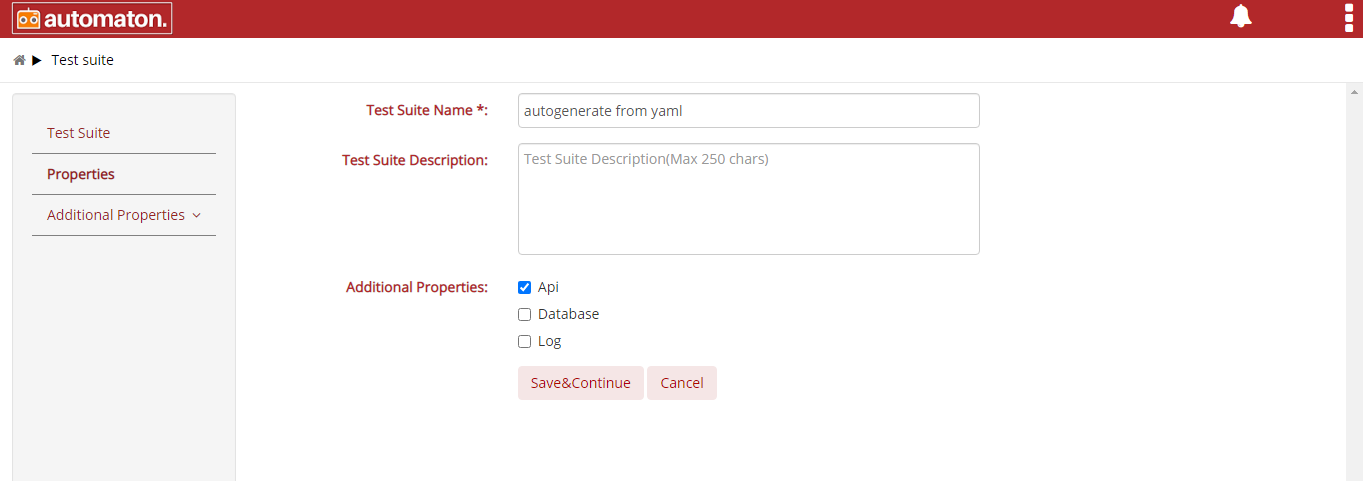
Fig. 6.54 YamlTest Suite
- Click the Choose file and Select a Yaml file. Users can upload ‘n’ number of files at-once.
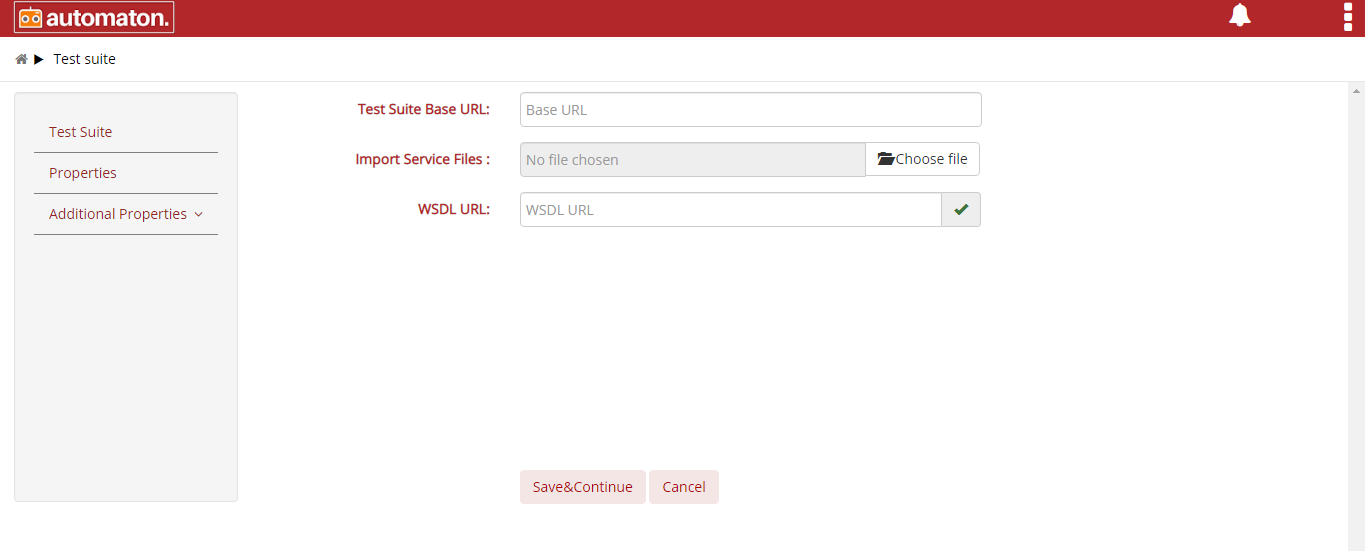
Fig. 6.55 Choose Yaml File
- Once the chosen file is uploaded the Yaml file will be verified and displayed at the File List field along with the Success message. Select the checkbox to enable autogenerate. Click Save&Continue.
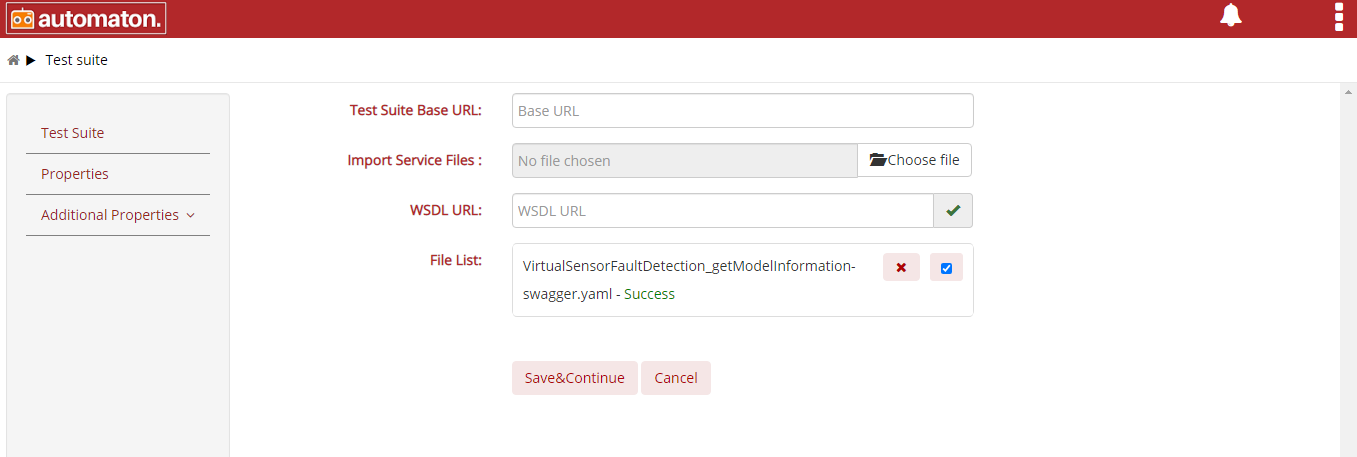
Fig. 6.56 Upload Yaml file
- On clicking Save&Continue Yaml file will start generating and display in the Test case List page.
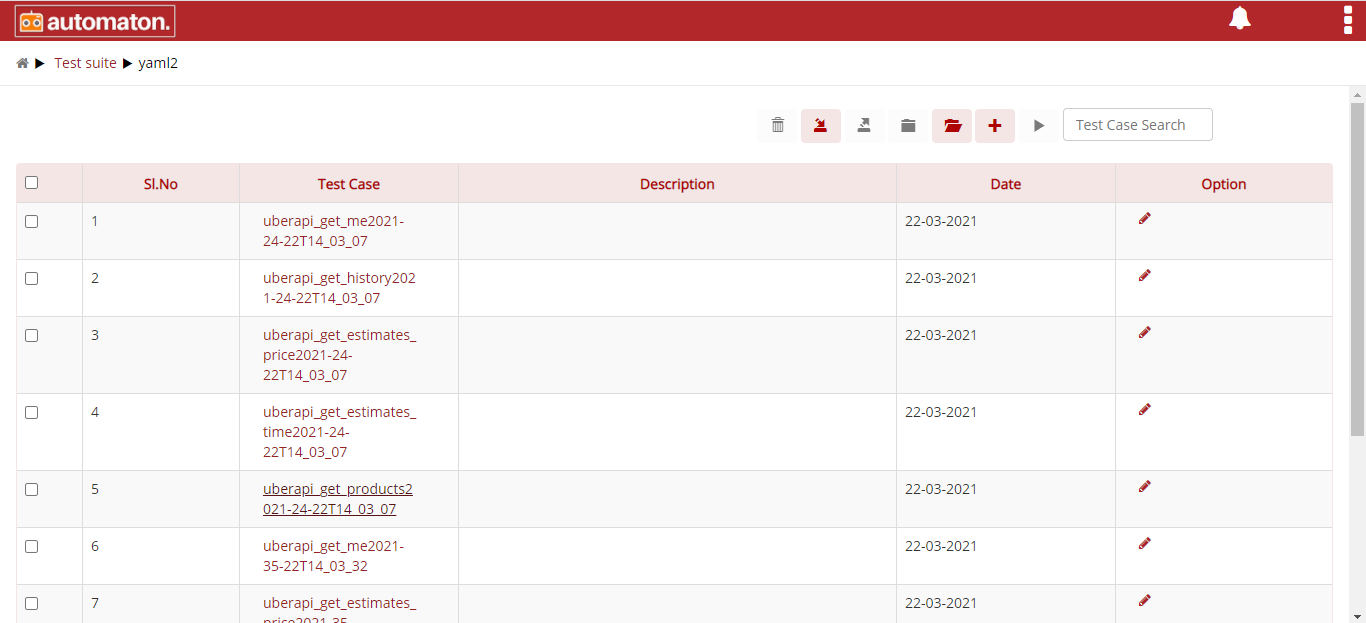
Fig. 6.57 Yaml Testcase List Page
- Click the test case to display the flow.
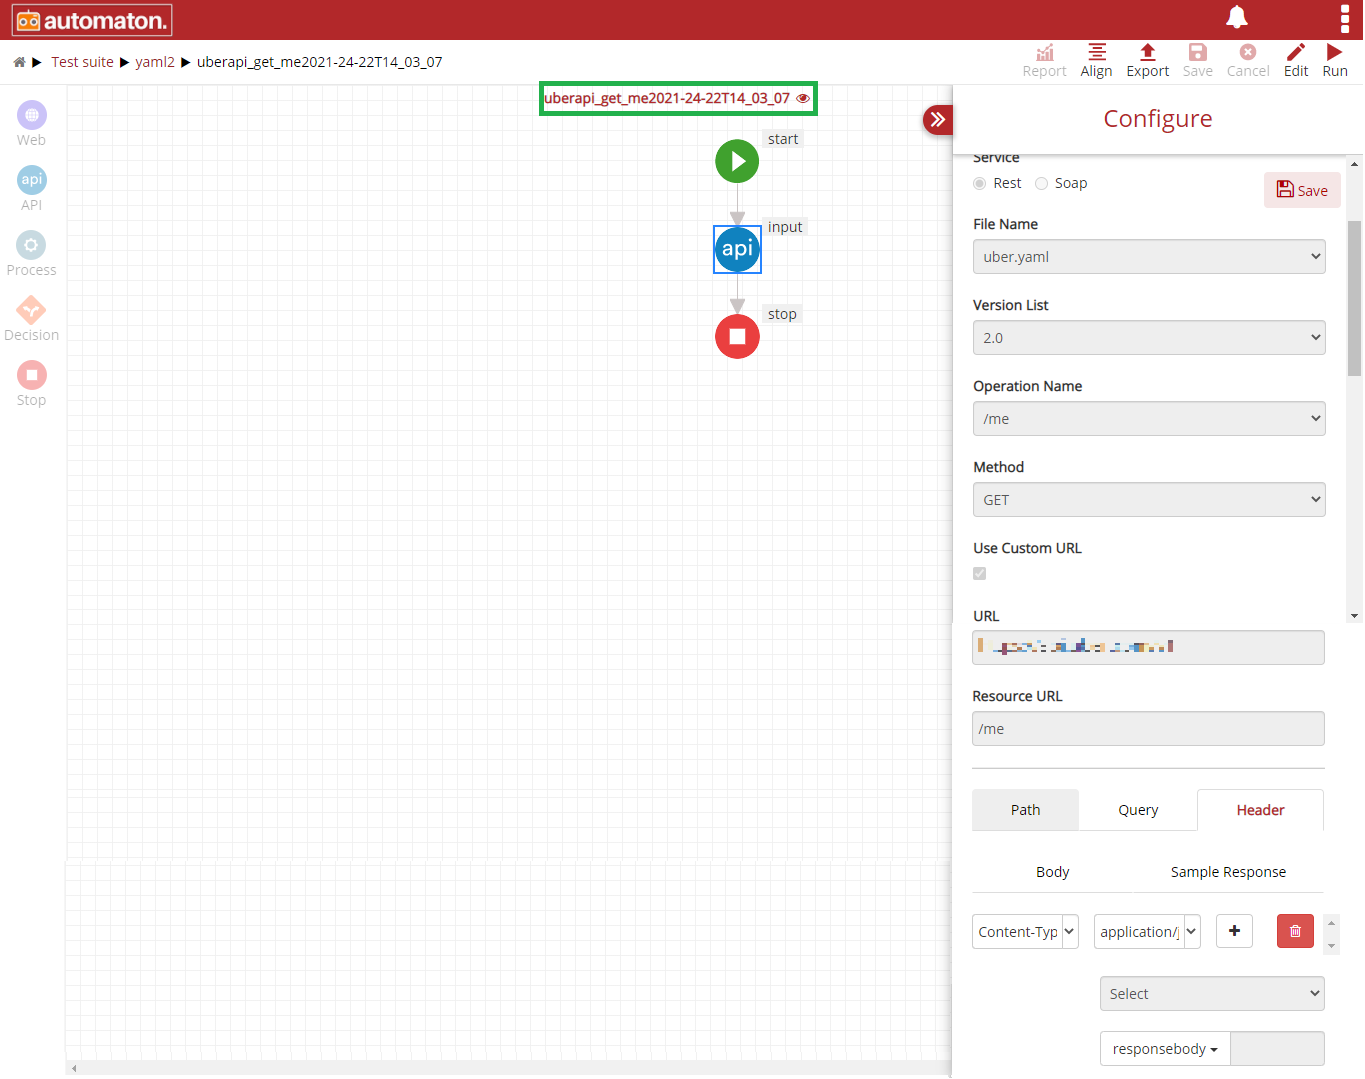
Fig. 6.58 Yaml Testcase Flow
We can view the autogenerated yaml files in the test suite List page
with the help of mark. Autogenerate checkbox is optional
field.
6.2.1. REST API
In this, web service can only be treated as a RESTful service that’s how the name Rest API. Restful service would use the normal HTTP verbs of GET, POST, PUT and DELETE for working with the required components. But the most preferred format for transferring data is JSON.
Creating Rest API test Suite
To execute Rest API related test cases, first we should create a Rest API related test suite.
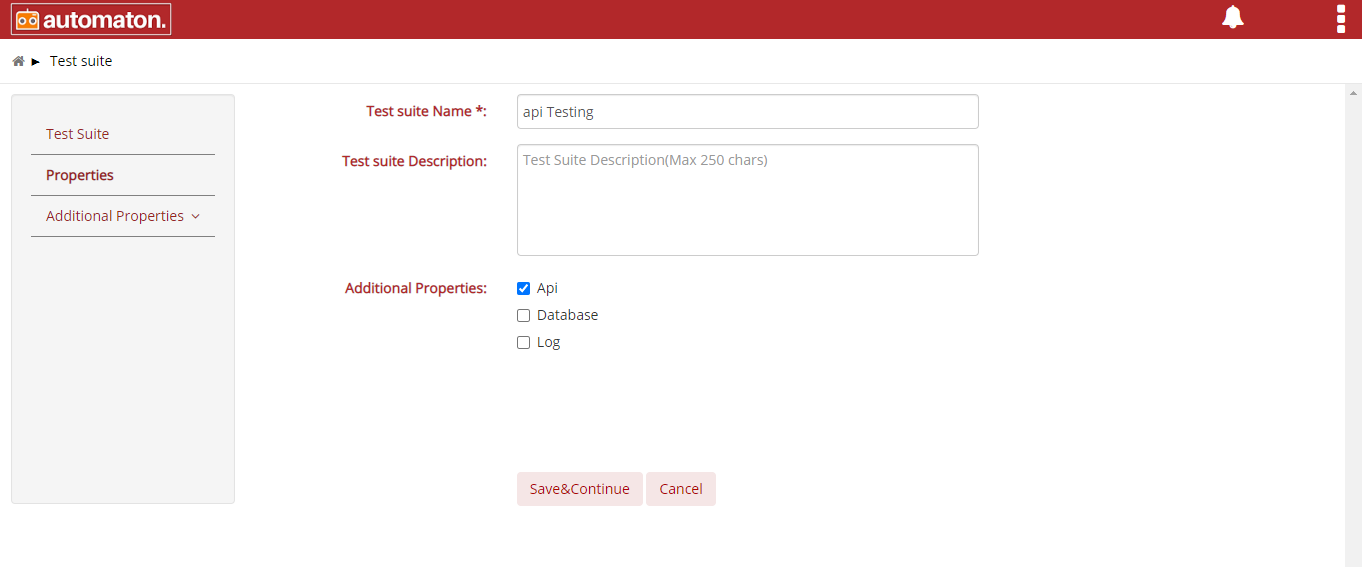
Fig. 6.59 Rest API Test Suite Creation Step 1
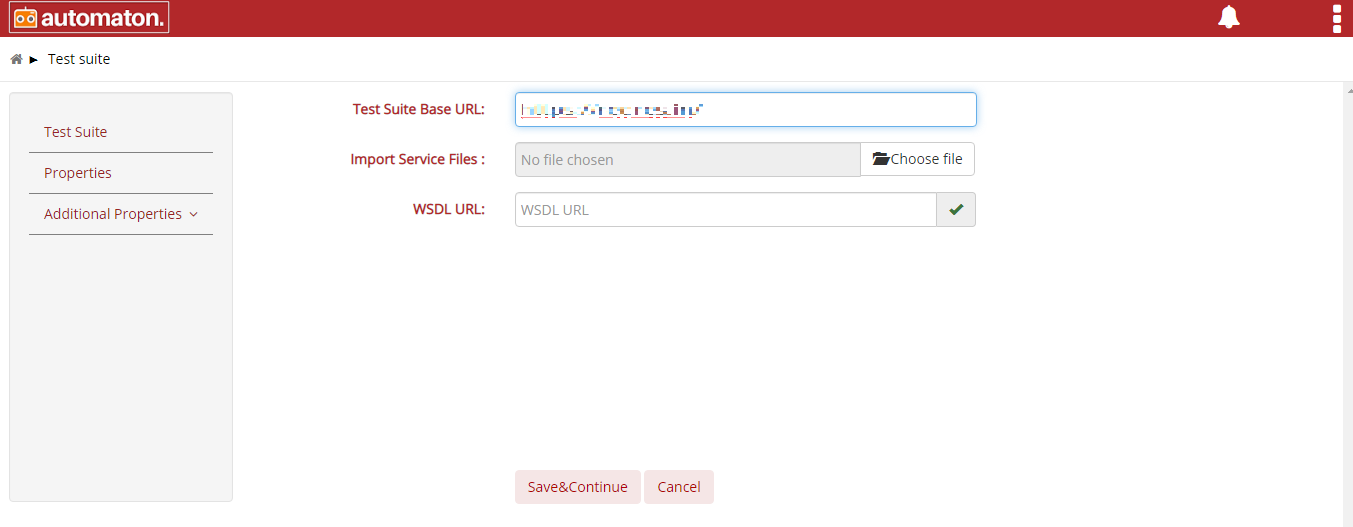
Fig. 6.60 Rest API Test Suite Creation Step 2
Test Suite Base URL: Base URL represents the base location. When the user wants to call multiple API’s the same URL will be taken. This is an optional field.
Import Service Files: This field is to upload service files like wsdl, swagger. This is an optional field.
WSDL URL: This field is to provide an URL or link of wsdl. This is
an optional field.The will validate the wsdl URL.
Note
It is mandatory either one among the first three fields must be filled to create an API test suite.
Rest Api test case we are going to execute a test case which will match the last name with the first name in the name records by configuring respective elements.
Element: Start, Label: Start
On clicking the START icon, a menu will pop-up from the toggle drawer bar. From the menu select the following values for corresponding fields.
Action-Type: Initialize.
Action: Default.
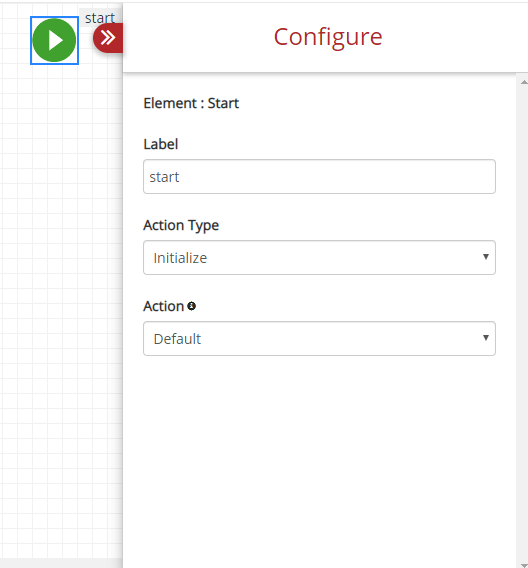
Fig. 6.61 Rest Start
Element: API, Label: API1: To Fetch last name.
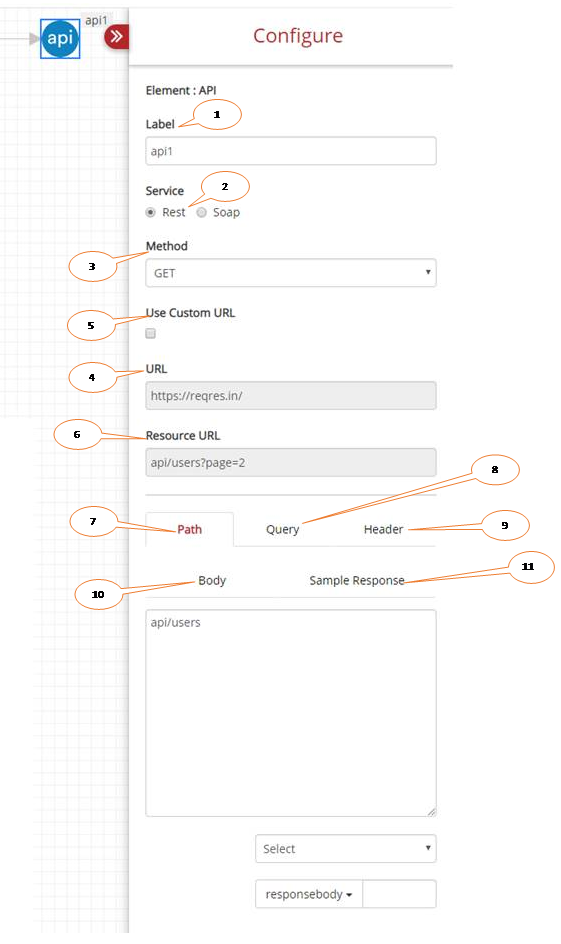
Fig. 6.62 API1
- Label: Name of the action to be performed.
- Service: Select which type of service needed from the radio button, Rest or Soap.
- Method: Select the methods like GET, PUT, POST ,DELETE required
for an api to perform its action. API 1 is to take the data from the
URL, so the method is GET.
- GET: To Read data.
- POST: To Create data.
- PUT: Update/Replace data.
- DELETE: To Delete data
- URL: Base web address of the action performed by corresponding AP1 (API1). It will by default fetching from the API.
- Use Custom URL: Customize the URL on clicking the radio button of Use Custom URL, the URL textbox goes blank where we can enter the required URL.
- Resource URL: Specified webpage address of the action performed by API1.
- Path: This is to specify a part of the URL as a parameter.
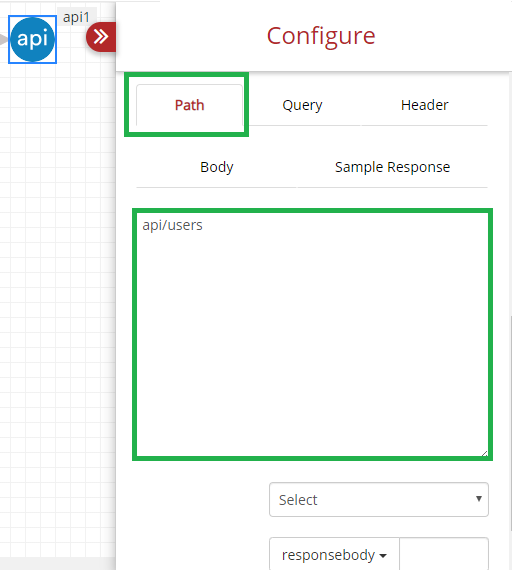
Fig. 6.63 RestAPI Path
- Query: This is to specify the key and value of the URL. Here, the query we have requested for API1 will be displayed.
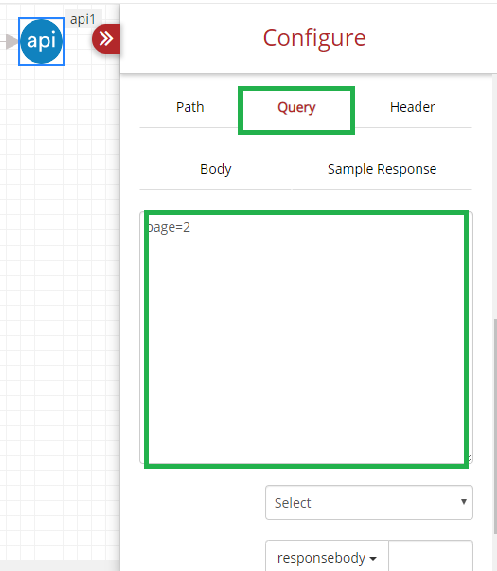
Fig. 6.64 RestAPI Query
- Header: Specify the type of file format needed for request and response. By default, it will take the content type and output file format based on the query. We can add or delete the content type and output file format.
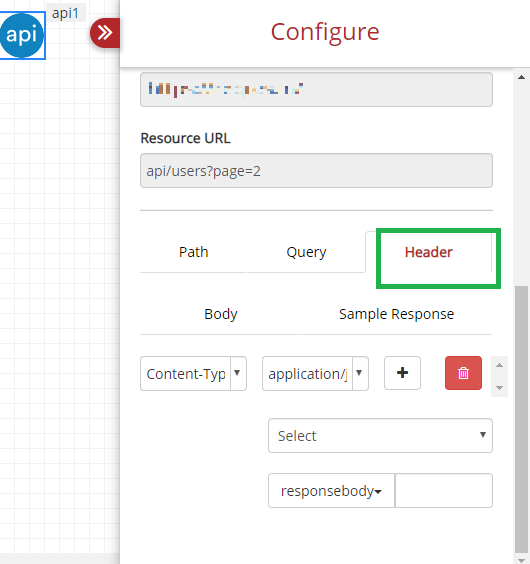
Fig. 6.65 RestAPI Header
- Body: Specify the request body according to action/method of the
respective API to send.
- If user wishes to add a code, he can add on the text area on clicking Body, corresponding code will be displayed in Response Body.
- If the header is chosen as application/x-www-form-urlencoded then user should provide body in JSON format.
- Usually GET method does not need a request body so it is empty.
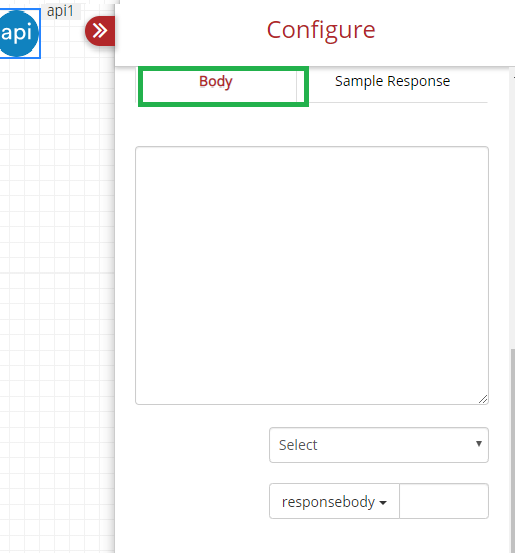
Fig. 6.66 RestAPI Body
- Sample Response: Specify the expected sample response to be received. Sample response was given to API1.
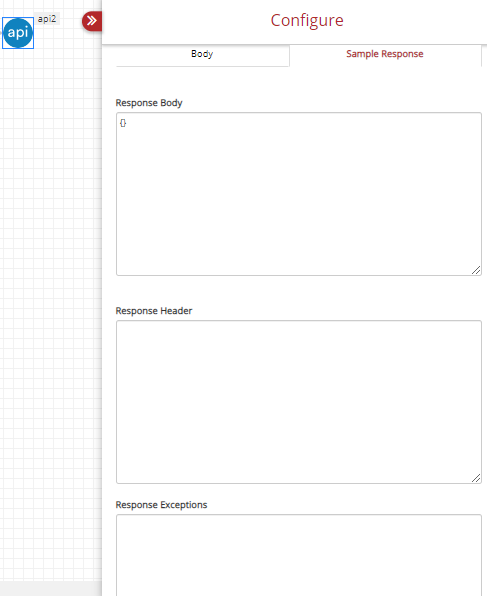
Fig. 6.67 RestAPI Sample Response
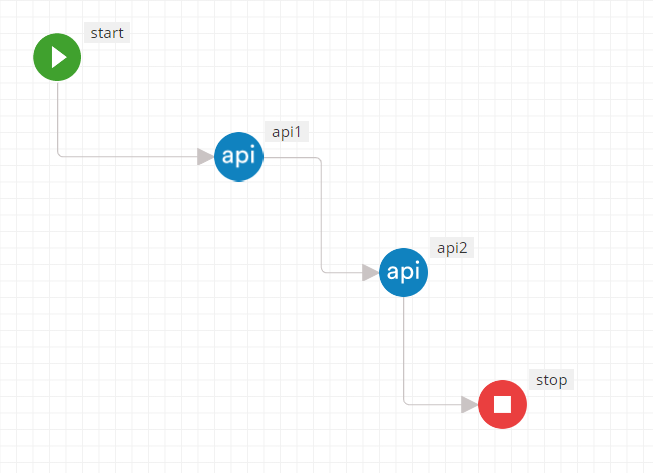
Element: API, Label: API 2
Here we are calling another API (API 2) where the output of API1 is given as input to API2. This means the response data coming from API 1 is the input data to API 2.
- Path: It specifies a part of the URL as a parameter.
- Query: It specifies the key and value of the URL.
- Header: It specifies what type of file format needed for request and response. By default, it will take the content type and output file format based on the query if we want to get more data and we can add or delete the content type and output file format.
- Body: It specifies the request body to send. Usually GET method does not need a request body so it is empty. Usually GET method does not need a request body so it is empty. If the user wishes to add a code, he can add on the text area on clicking Body, corresponding code will be displayed in Response Body.
- Sample Response: Specify the expected sample response to be received.
Element: STOP, Label: Stop
The workflow will be stopped on encountering Stop. On clicking STOP element, a menu will pop-up, which will give you options such as Label, Action Type and Action.
Action Type: Stop.
Action: End Task.
Fig. 6.68 RestAPI Stop
Created Rest API test case is shown below fig.
Rest Api with Uploaded Image
This feature allows the user to call an api by uploading an image. The user must follow the below steps to call an api by uploading an image:
- Creating Api Test suite as shown below:
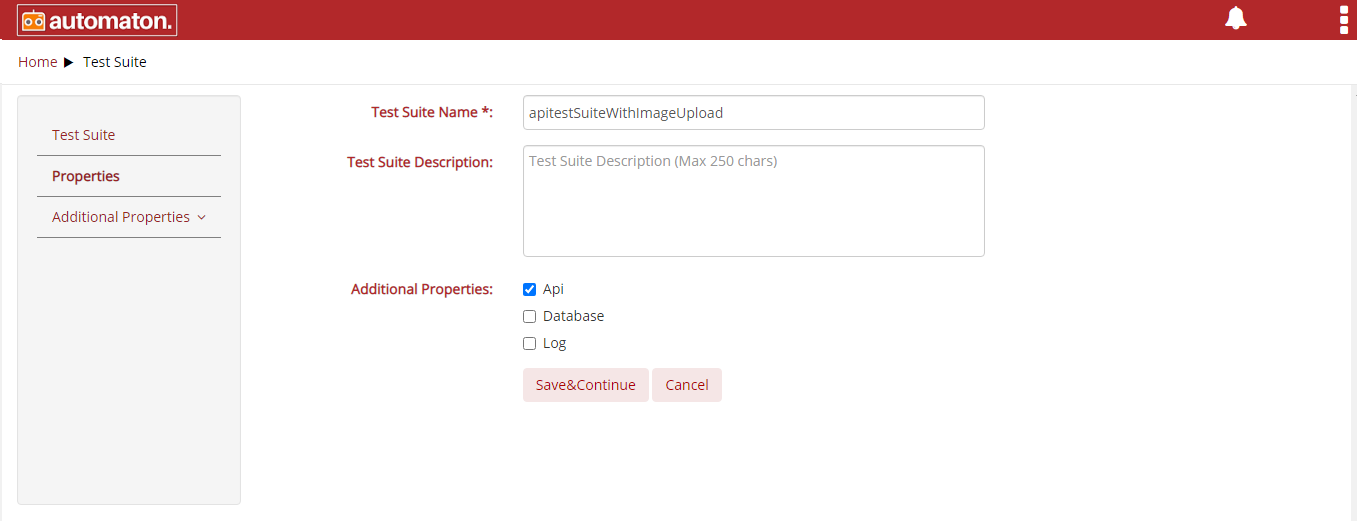
Fig. 6.69 API Test Suite
- Add the base URL for the rest api and click the Save&Continue button as shown below:
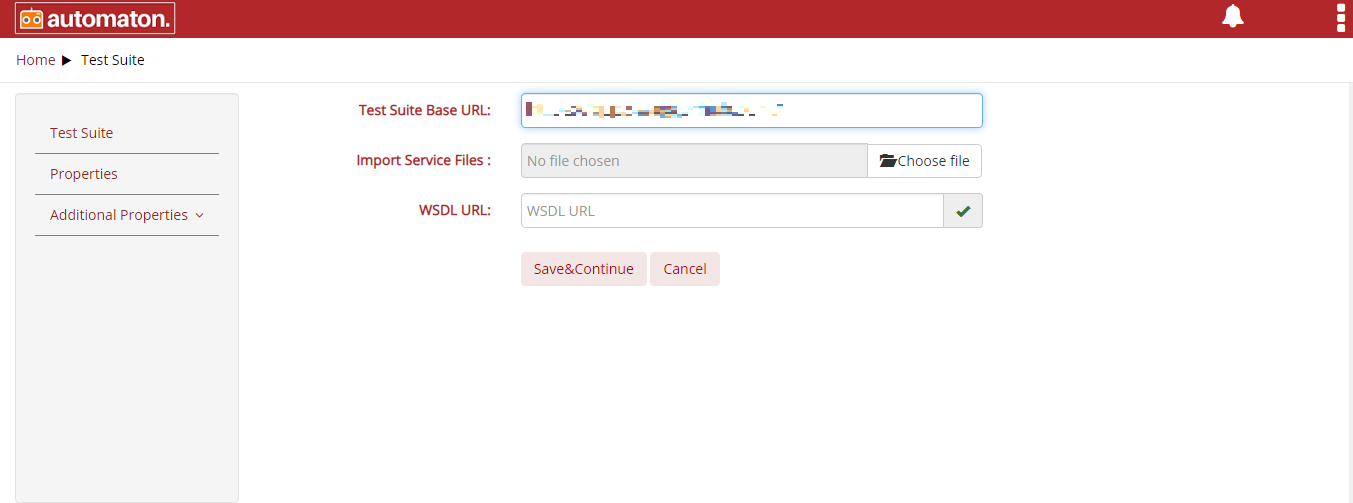
Fig. 6.70 Adding Base URL
- Create an api test case as shown below:
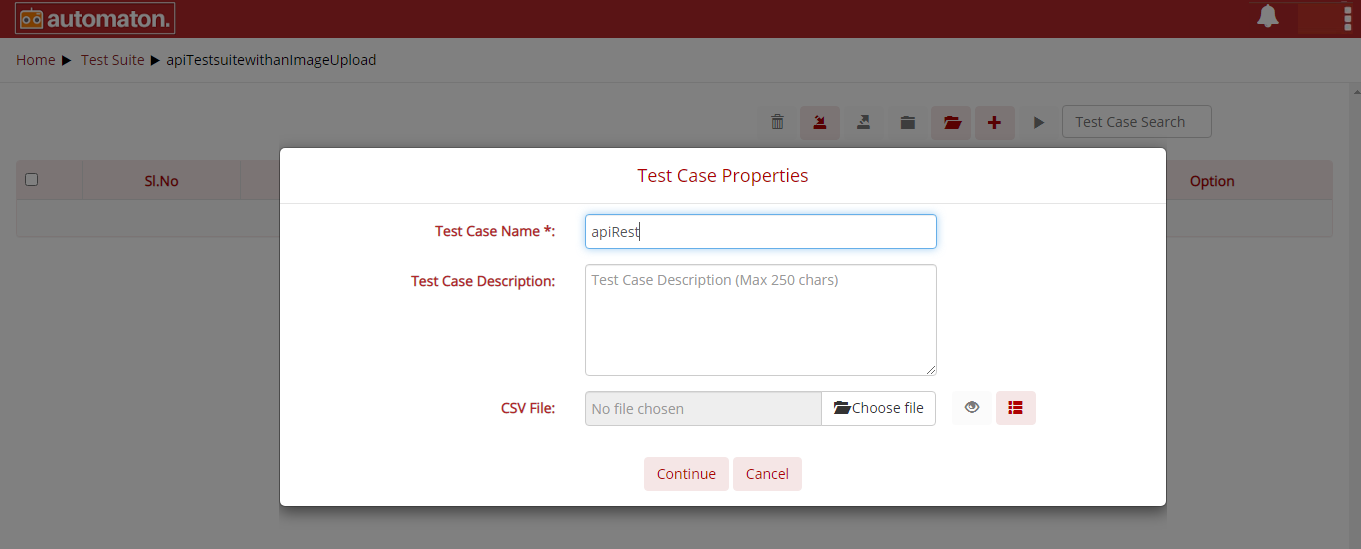
Fig. 6.71 API Test Case Properties
- Create an api test case by giving the following details:
- Select Service: Rest and Method: Post
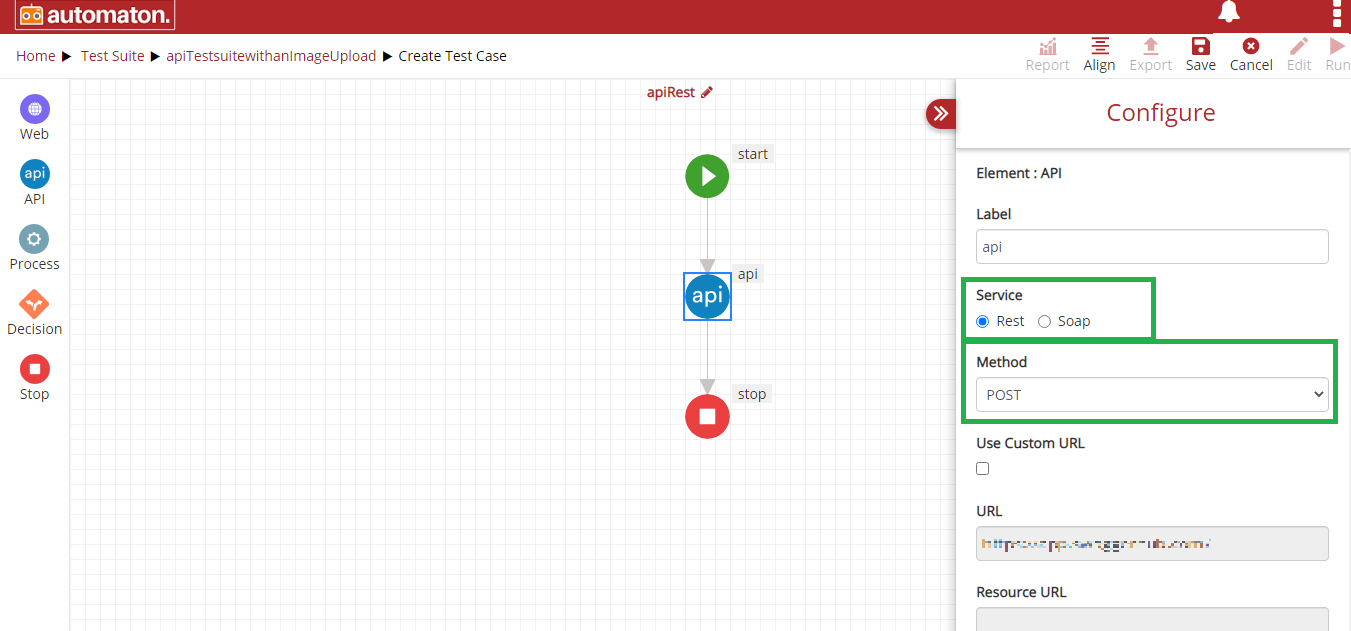
Fig. 6.72 API Test Case
- Users can provide the endpoints in the Path if required. This is not mandatory
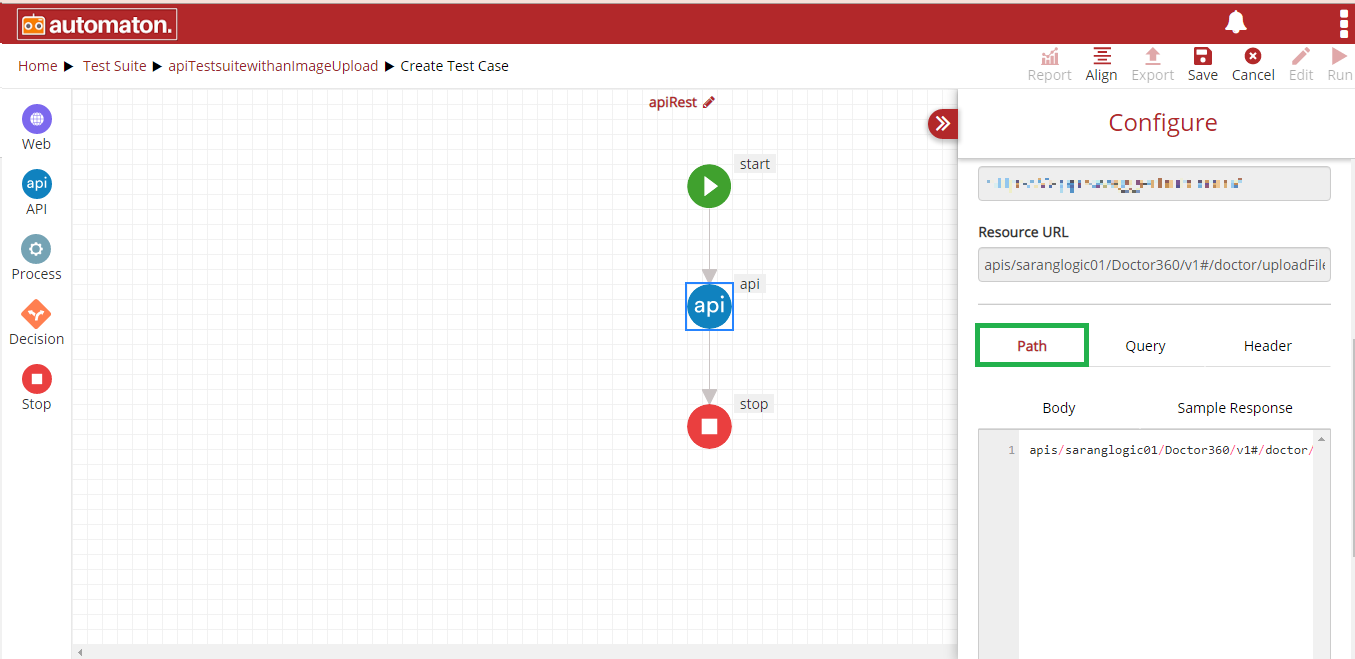
Fig. 6.73 Endpoints in the Path
- Specify the image location in the Body as shown below:
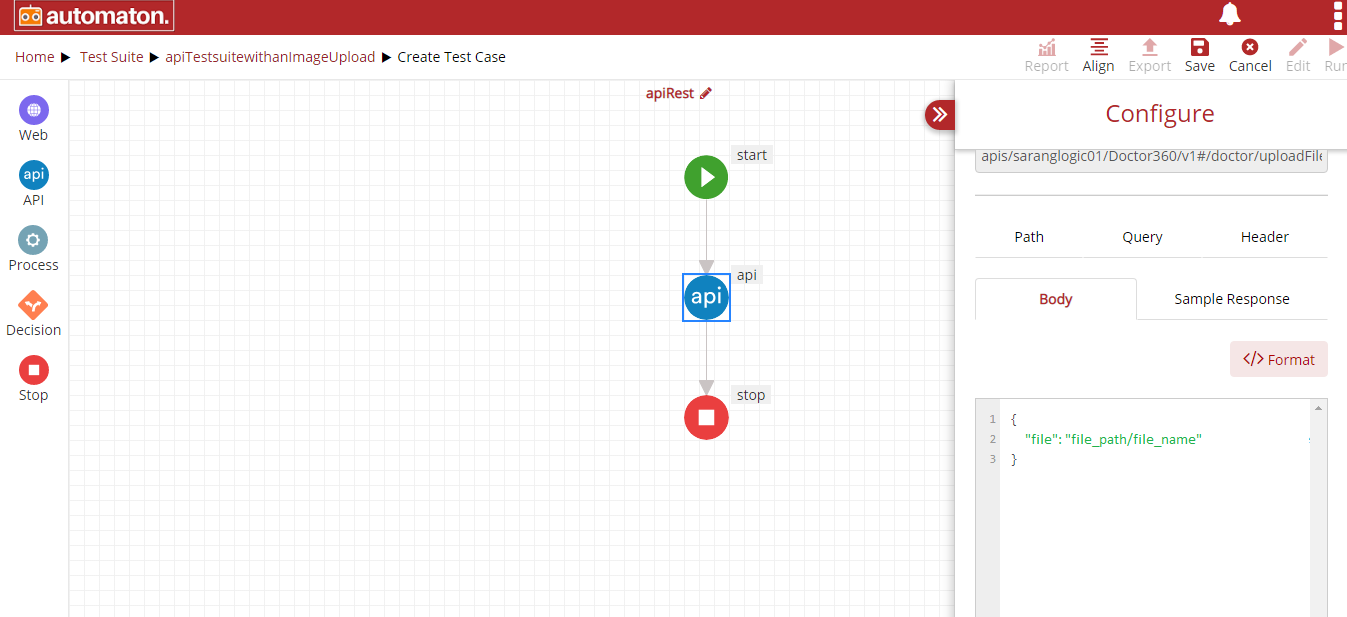
Fig. 6.74 Image Location
Note
It is mandatory to provide image location in the Body
Users must select Content-Type as multipart/formdata set in the header as shown below. Also, the user can specify the type of the result in the Header, for instance: JSON or XML etc.
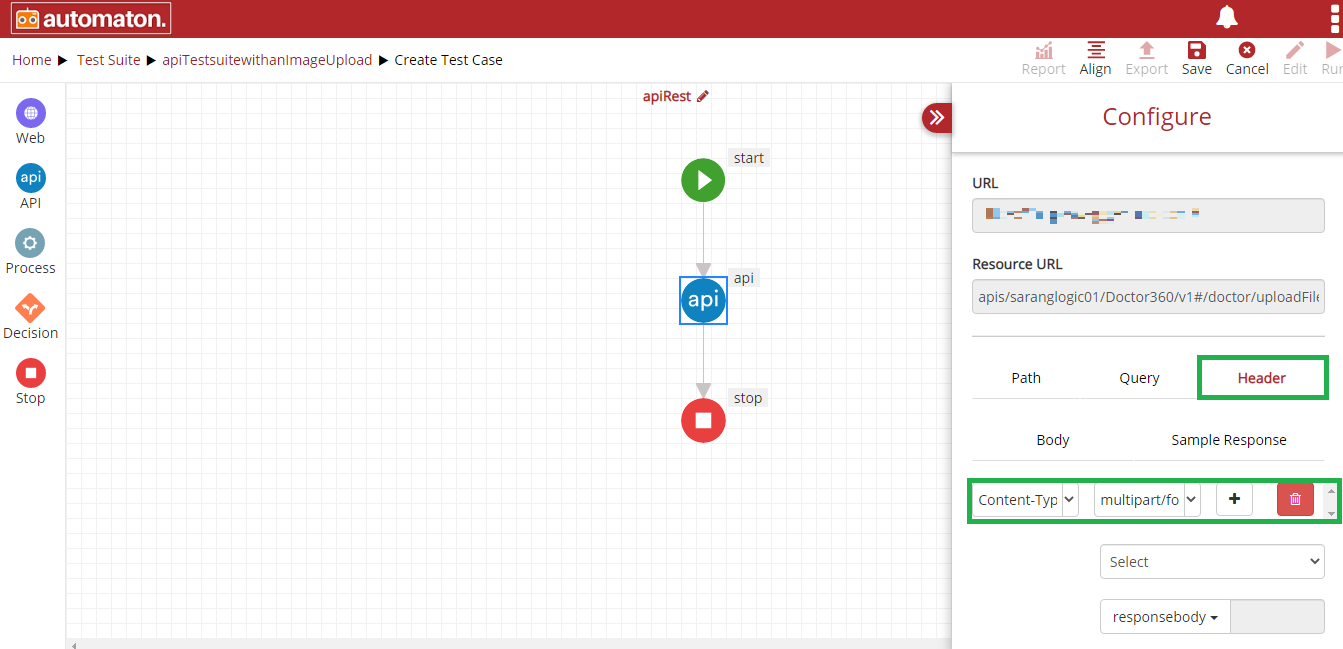
Fig. 6.75 Header
- Click the Save button to save the test case and a success message will be displayed as shown below:
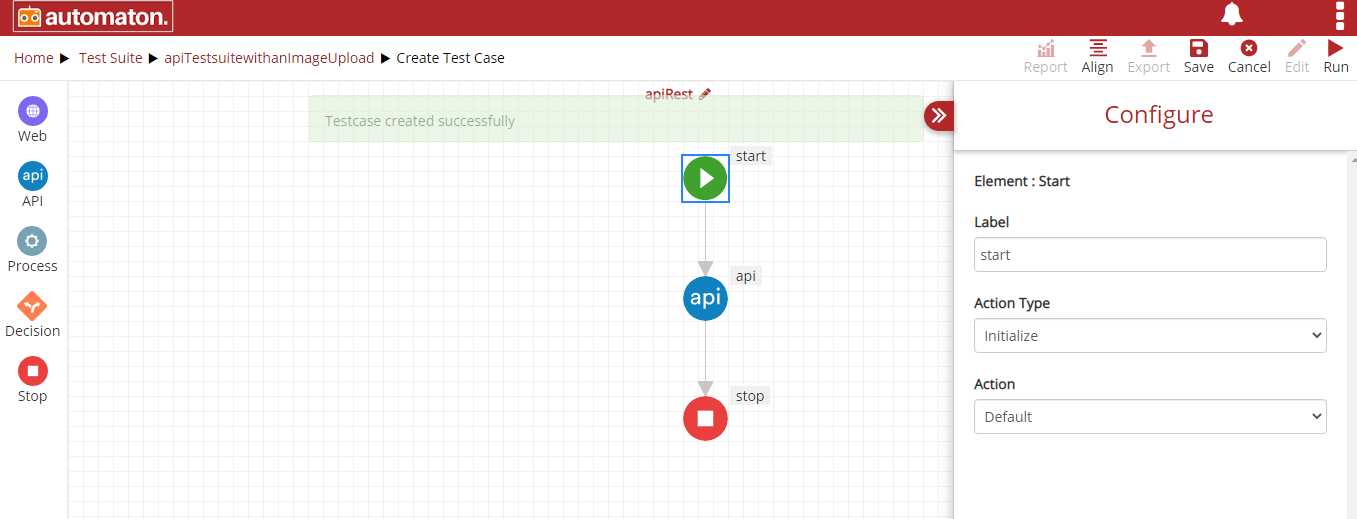
Fig. 6.76 Test Case Created
- Click the Run button to generate the report as shown below:
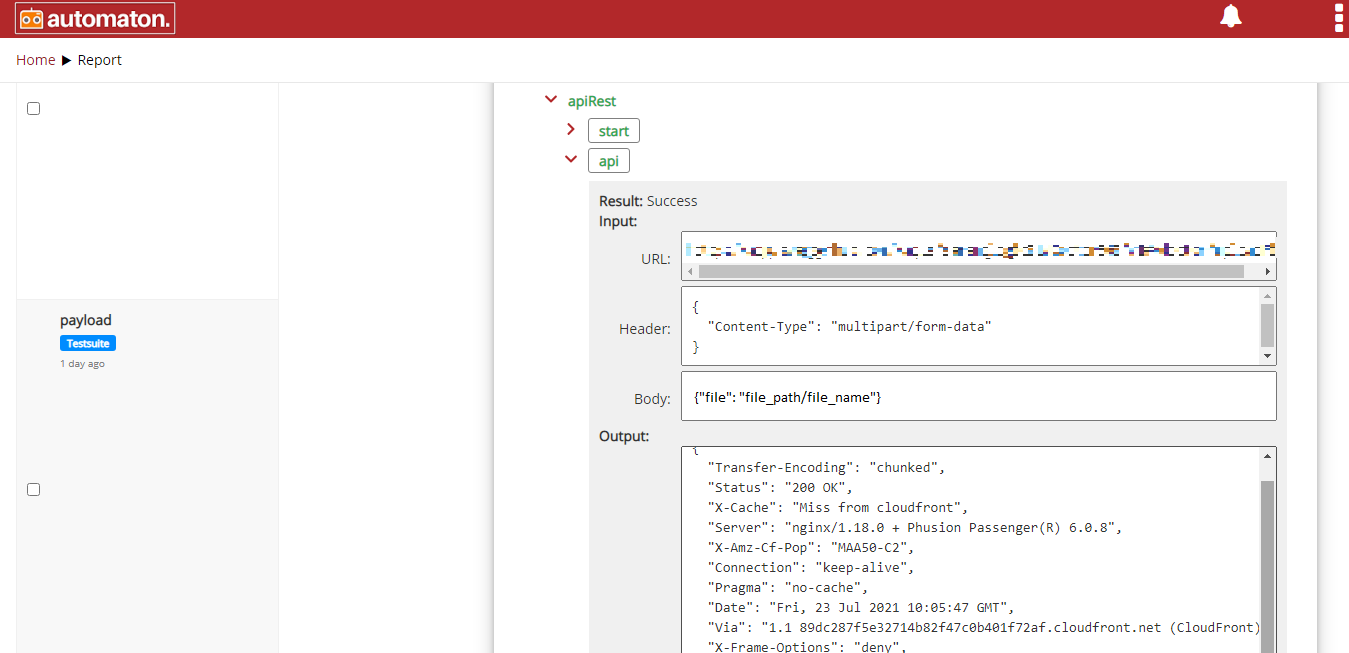
Fig. 6.77 Report Page of the Test Case
6.2.2. SOAP API
SOAP is the acronym for Simple Object Access Protocol is a standard communication protocol system that permits processes using different operating systems like Linux and Windows to communicate via HTTP and its XML.
In SOAP, the WSDL file provides the client with the necessary information which helps to understand the services offered. SOAP can only work with XML format. SOAP based APIs are designed to create, recover, update, and delete records like accounts, passwords.
Creating Soap API test suite
To execute Soap API related test cases, first we should create an Soap API related test suite.
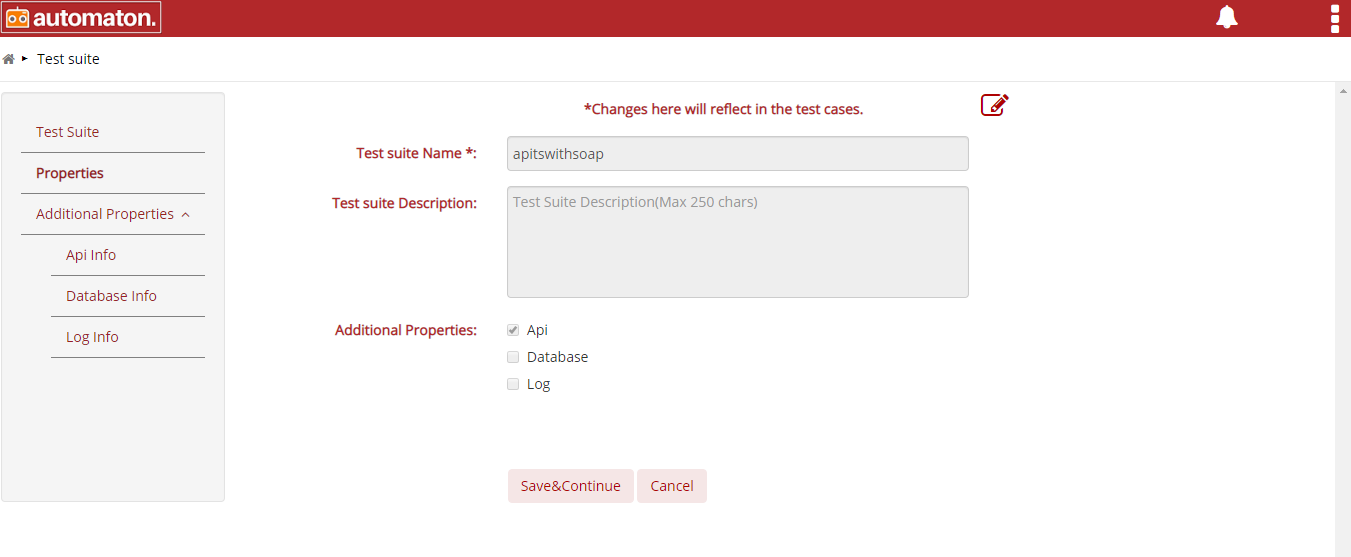
Fig. 6.78 Soap API Test Suite Creation Step 1
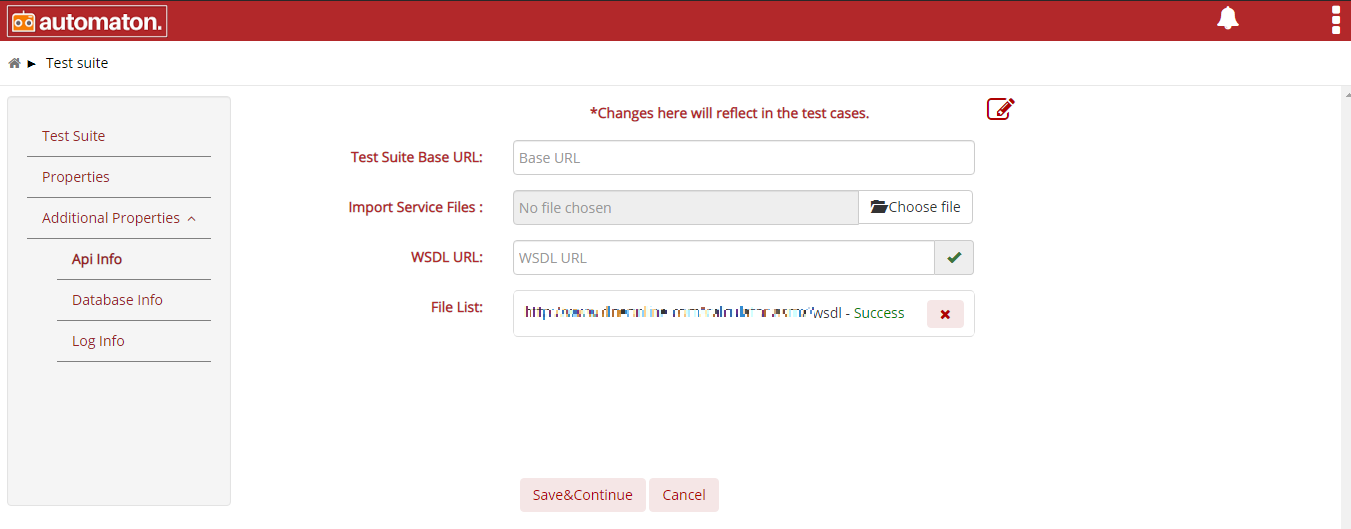
Fig. 6.79 Soap API Test Suite Creation Step 2
Test Suite Base URL: Base URL represents the base location. When the user wants to call multiple API’s the same URL will be taken. This is an optional field.
Import Service Files: This field is to upload service files like wsdl, swagger, yaml. This is an optional field.
WSDL URL: This field is to provide an URL or link of wsdl. This is
an optional field.The will validate the wsdl URL.
File List: It displays the list of files uploaded such as WSDL, swagger. We can delete the uploaded file by clicking on the delete button.
Note
It is mandatory either one among the first three fields must be filled to create an API test suite.
The functionality of the SOAP API is explained based on the sample test case.
Here, our objective is to perform a basic calculator operation (Addition/Subtraction/Multiplication/Division) by calling an API.
Element: START, Label: start
On clicking on the START icon, a menu will pop-up from toggle drawer bar. From the menu select the following values for corresponding fields.
Action-Type: Initialize.
Action: Default.

Fig. 6.80 SoapAPI Start
Element: API, Label: dsee
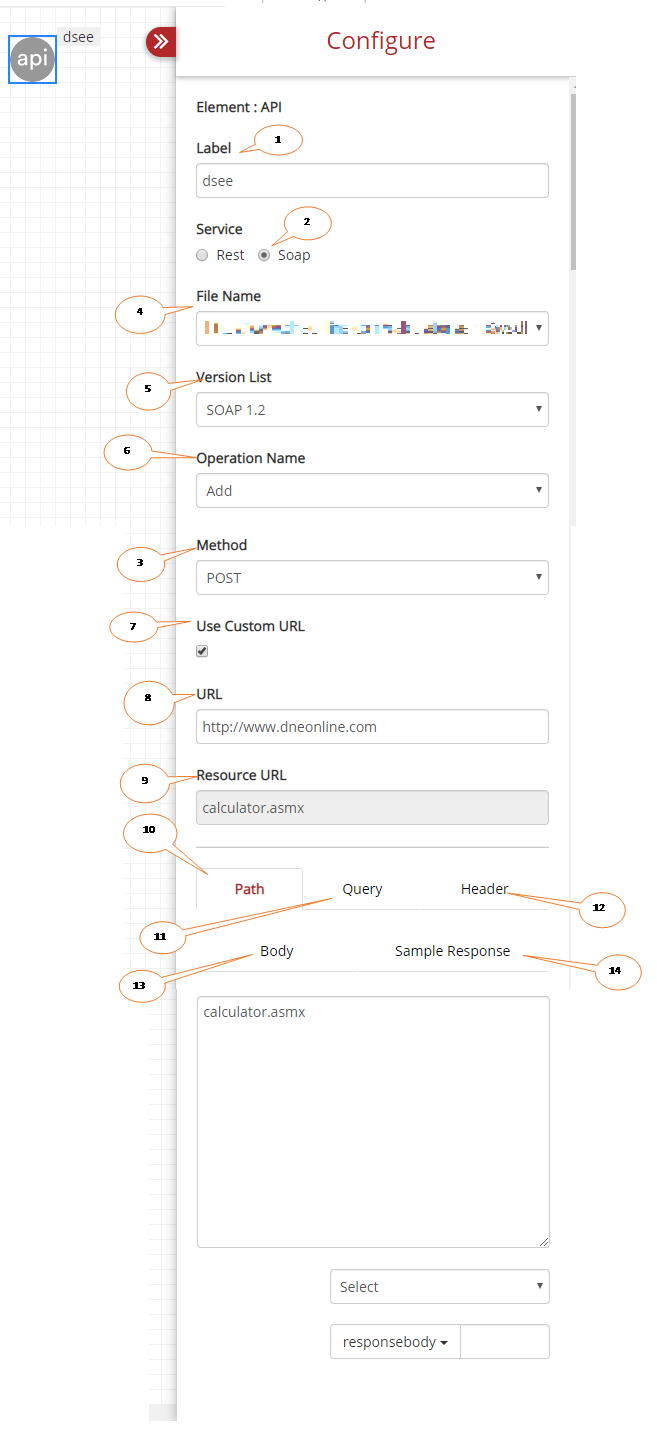
Fig. 6.81 SoapAPI dsee API
- Label: Name of the action to be performed.
- Service: Select which type of service needed, Rest or Soap.
- Method: Select one among the methods like GET, PUT, POST, DELETE
required for an API to perform its action. This element is reading
data and performing basic operations and display its output, so the
method is selected as POST.
- GET: To Read data.
- POST: To Create data.
- PUT: Update/Replace data.
- DELETE: To Delete data
- File Name: This specifies the name of the file. It can be wsdl file, swagger file or the wsdl URL. Here we are using WSDL URL.
- Version List: It displays the version of SOAP we are using. Here the Version List is SOAP 1.2.
- Operation Name: It displays a set of functions the API does. Here it is Add, Subtract, Multiply, Divide.
- Custom URL: Customizing the URL is not possible in SOAP, so the checkbox is always checked.
- URL: This specifies the base location. Here from the wsdl URL, “http://www.dneonline.com/calculator.asmx?wsdl” the base location is http://www.dneonline.com which is considered as URL.
- Resource URL: Specified webpage address of the action performed by Label, dsee. It is the part of the URL. Here it is calculator.asmx.
- Path: Specifies the path of URL as a parameter. On clicking Path tab, the path to the specified action will be displayed.

Fig. 6.82 SoapAPI Path
Query: This is to specify the key and value of the URL.
The query we have requested for API (dsee) will be displayed in SOAP we can give manually.
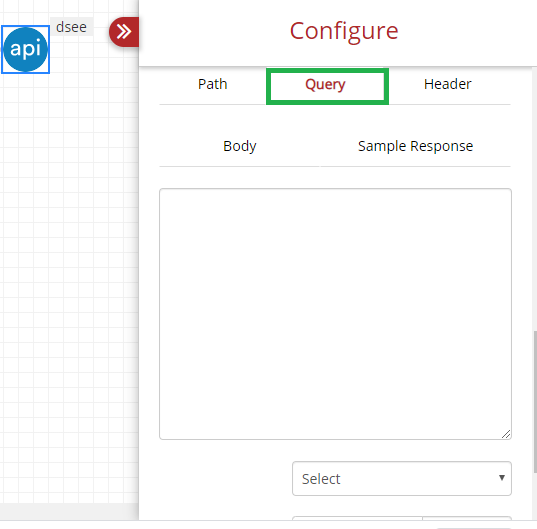
Fig. 6.83 SoapAPI Query
- Header: Specify the type of file format needed for request and response. By default, it will take the content type and output file format based on the query. We can add or delete the content type and output file format.
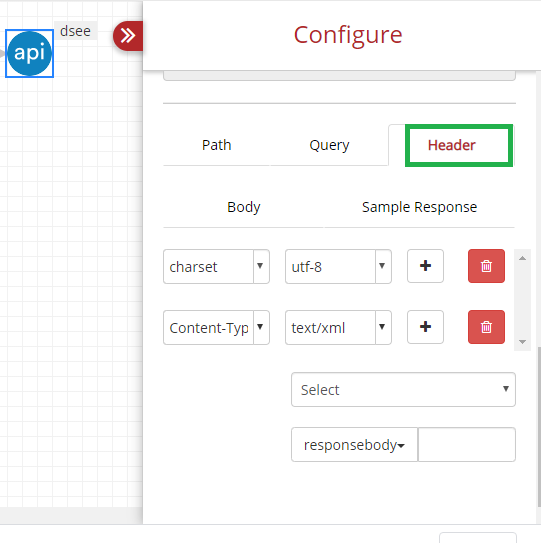
Fig. 6.84 SoapAPI Header
Body: Sample body we expect to send. Again, this will be based on the method we are selecting. Here in Label,dsee is using POST method hence Response Body and Body has a corresponding body.
Sample code will be based on the method we are calling mostly GET method will not have a body. Here API (dsee) is using the POST method hence Response Body is having code corresponding to the operation we have selected.
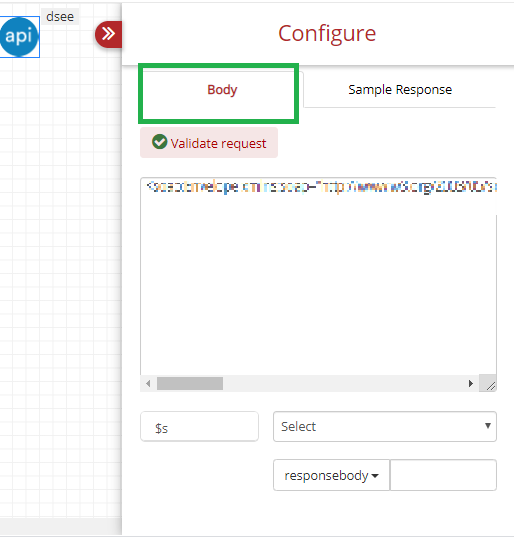
Fig. 6.85 SoapAPI Body
Sample Response: The response we expect to receive.
Response code of the function API (dsee). It will have Response Body, Response Header, Response Exceptions.
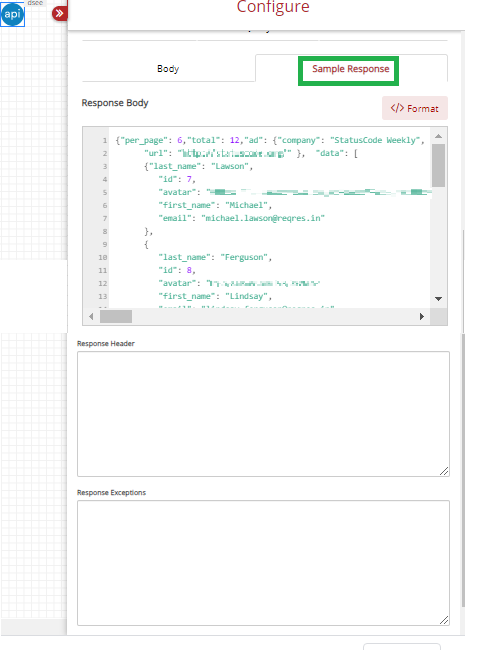
Fig. 6.86 SoapAPI Sample Response
Users can click the Format button to display the content in a better way as shown below:
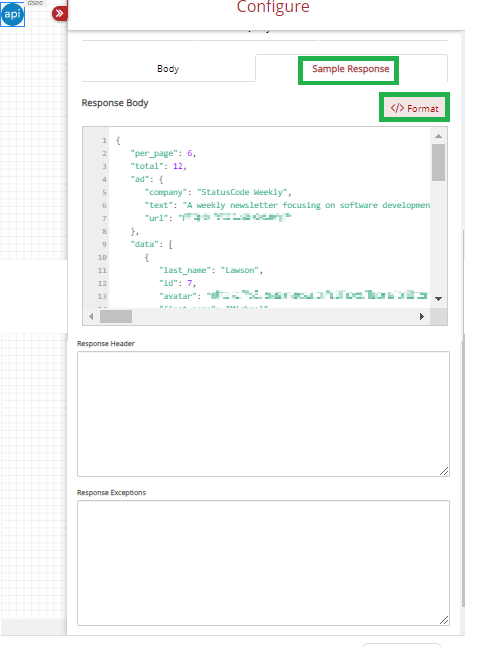
Fig. 6.87 SoapAPI Sample Response with Format
STOP
The workflow will be stopped on encountering Stop. On clicking the edit button on STOP a menu will pop-up, will give you options such as Label, Action Type and Action.
On clicking Start edit symbol its Pop-Ups a List.
Label: Stop.
Action Type: Stop.
Action: End Task.

Fig. 6.88 SoapAPI Stop
Here is the Soap Test Case
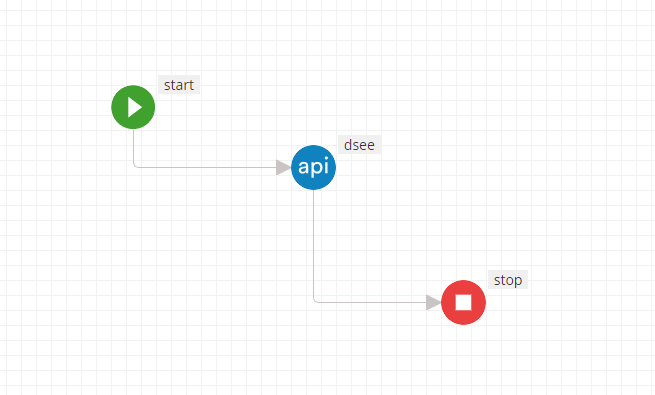
Fig. 6.89 Soap Test Case
SOAP Api with Uploaded Image
This feature allows the user to call an api by uploading an image. This also has the same functionality as Rest API’s except, the Service must be selected as SOAP as shown below:
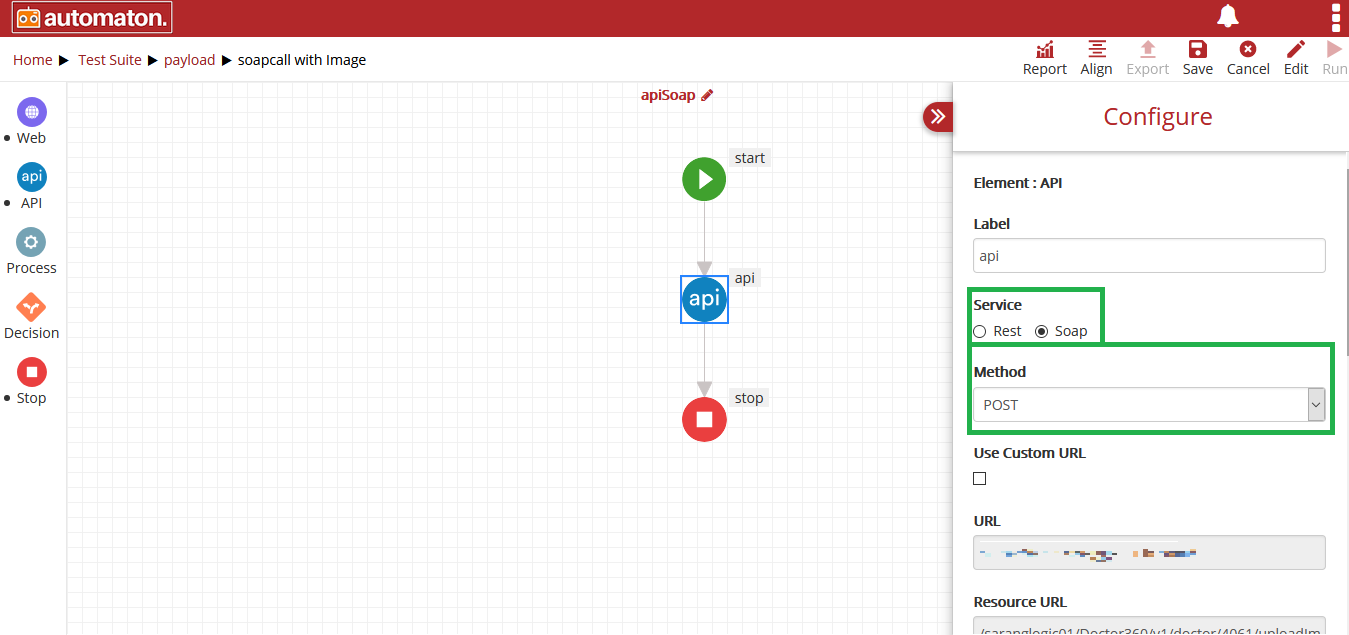
Fig. 6.90 Soap API
Click the steps to see the details.
6.3. Database Testing
Automaton supports database testing which includes MySQL, Oracle, MongoDB and MariaDB.
Below steps shows how to create database-related test case. We will be selecting Mongo dB to create a test case.
To do, we will be creating a test suite related to db.
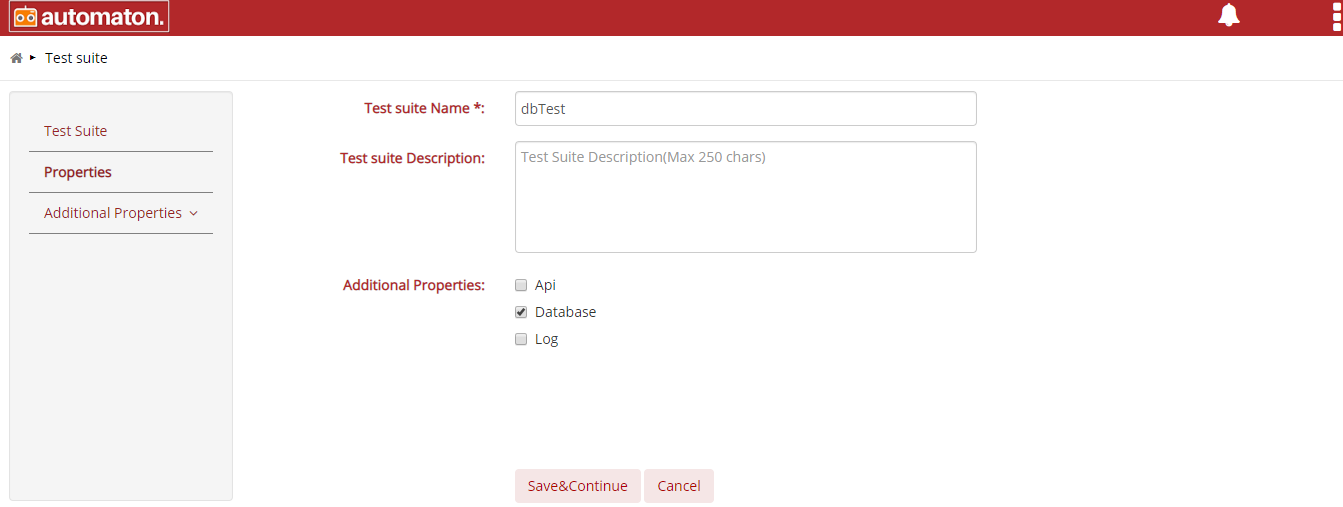
Fig. 6.91 DB Test Suite Creation Step 1
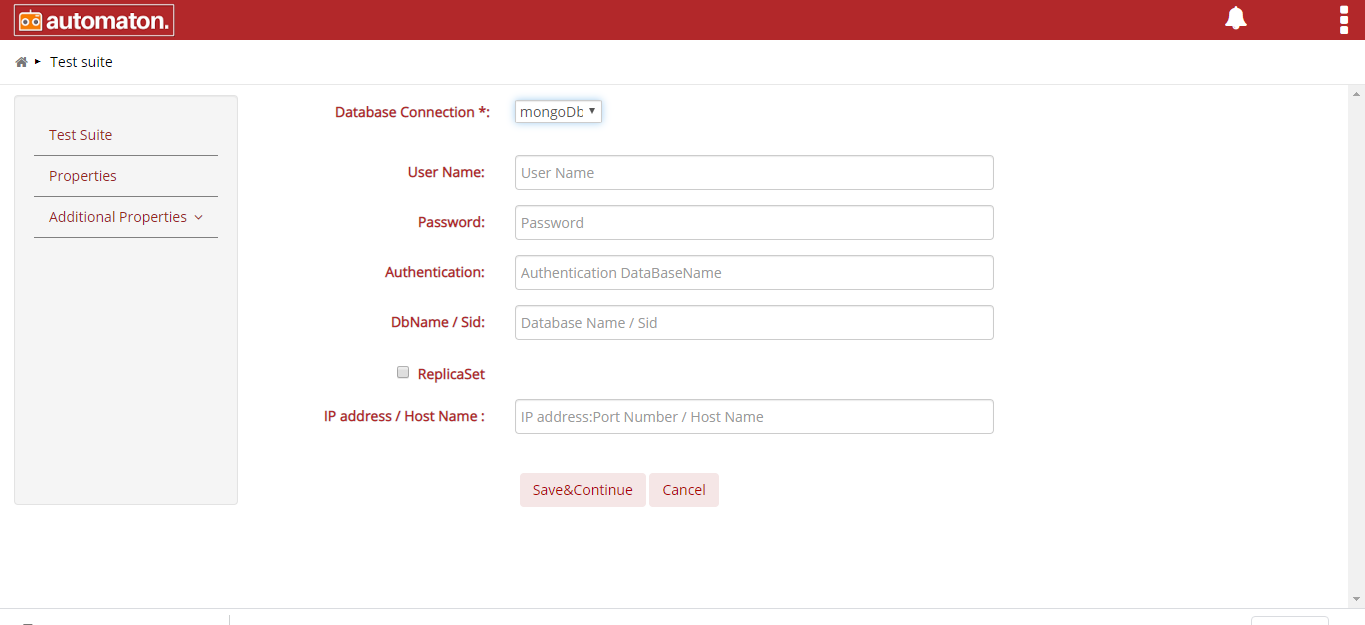
Fig. 6.92 DB Test Suite Creation Step 2
Above figure shows the details for connection to MongoDB.
Database Connection: This dropdown is to select which database to connect.
Username: Username required for the database connection.
Password: Password required for the database connection.
Authentication: Authentication Database Name required for database connection.
DbName /Sid: Database Name required for database connection.
Replica Set: Replica Set required for database connection. This is optional.
IP address/ Host Name: IP address required for database connection.
Note
The connection fields will differ based on the selected database. For mongo DB Connection, these fields must be filled.
Element: start, Label: start
To start a MongoDB test case, you need to select:
Label: Start.
Action Type: Initialize from the drop-down.
Action: Default.
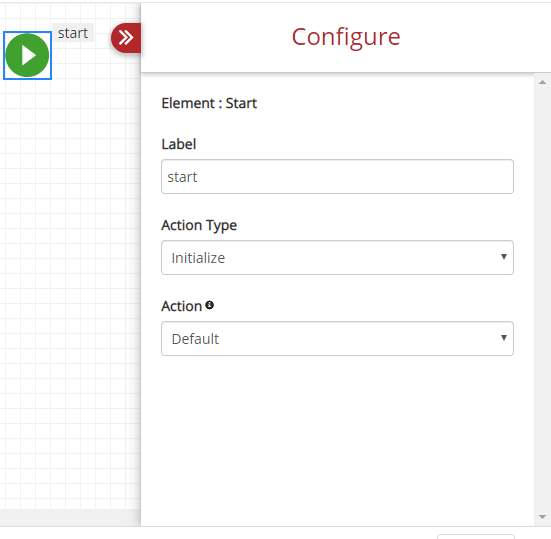
Fig. 6.93 Start DB
Element: Process, Label: database
The next step is connecting to the database. Figure Database Connect explains how this is done. We select the PROCESS element to make a database connection. The element is labelled database for quick identification.
Action Type: Database Operations.
Action: Connect to Mongo Database
Once you select this, the MongoDB Connection URL option will pop up. The URL for your mongo DB connection will be displayed on the textbox.
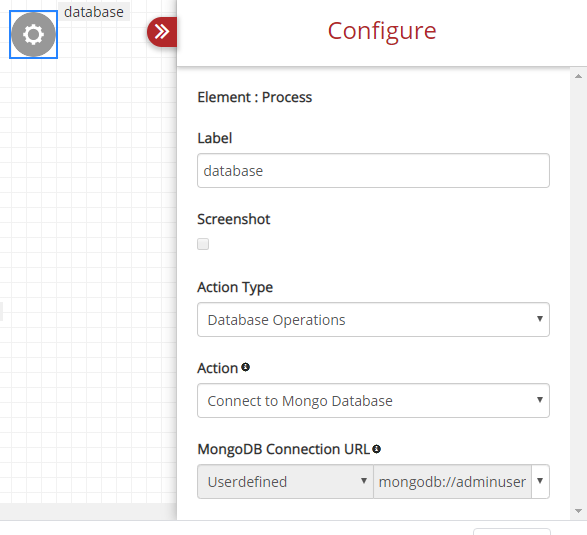
Fig. 6.94 Database Connect
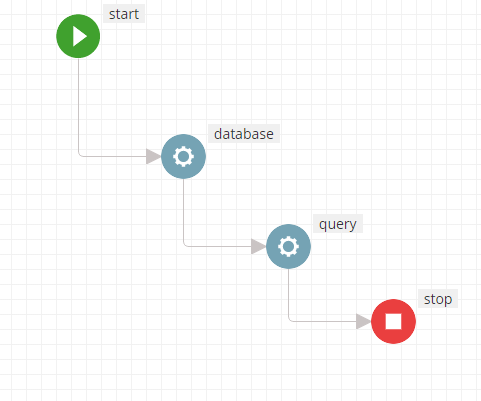
Element: Process, Label: query
Once we made a successful connection to the database, we are ready to perform any database related operation. In this example using MongoDB, we are making a query to the table. Figure DB Query explains how this is done.
After selecting the PROCESS element, select:
Action Type: Database Operations.
Action: Query the Table
Query: User-defined here and enter your query in the box.
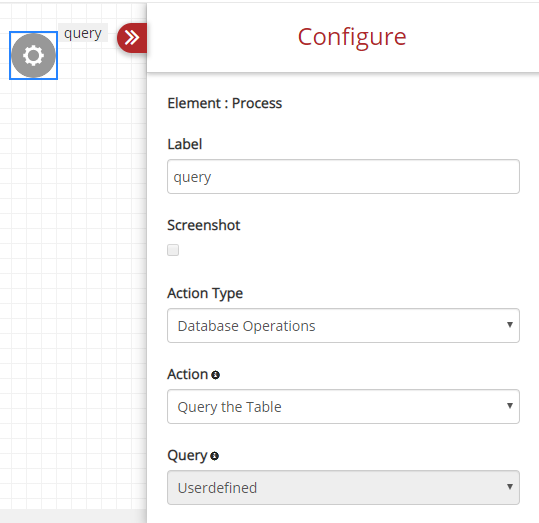
Fig. 6.95 DB Query
Element: STOP, Label: stop
START and STOP are mandatory elements in Automaton. We add a STOP to end the test case.
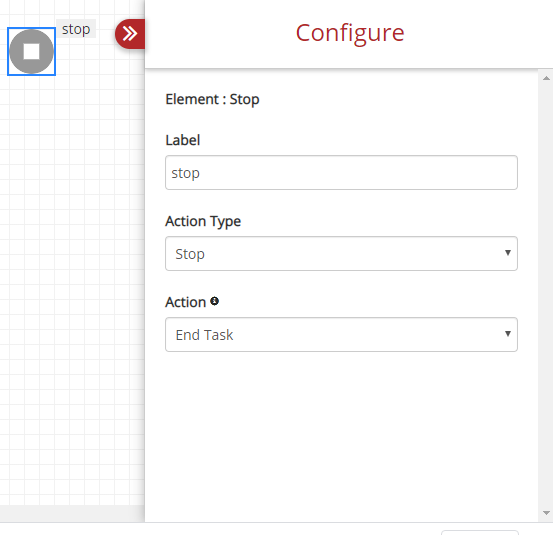
Fig. 6.96 Stop
Once the test case is filled, execute the test case using Run Button.
6.4. Log Testing
Logs contain details and information of the various test operations which includes source of issues, reasons for failed operations. We can test using these logs for various purpose.
To do log Testing, we first create Test Suite related to log.
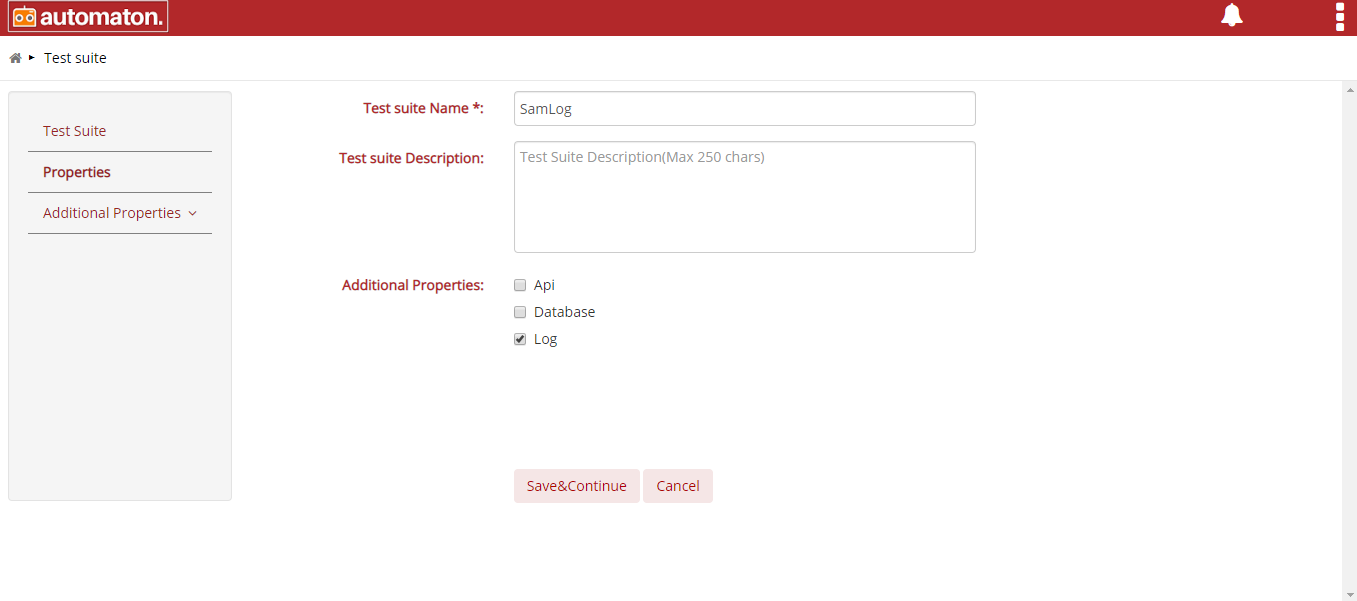
Fig. 6.97 Log Test Case
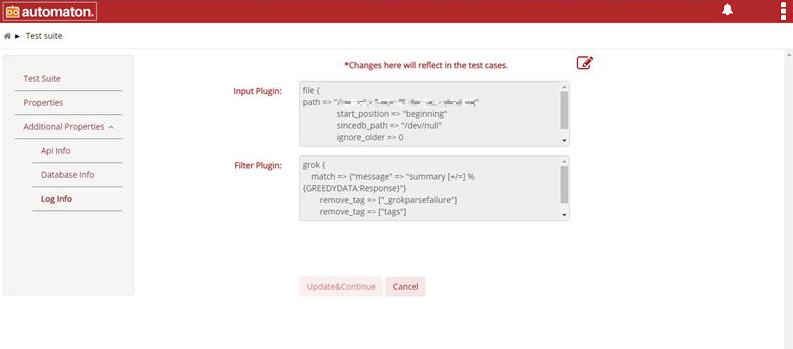
Fig. 6.98 Log Info
Input plugin: The input plugin must be written in a specific pattern which instructs the use of the log file? It also contains the path of the log file present.
Filter plugin: Filter plugin contains a grok pattern. User can be able to create a grok pattern for any log line by executing a Grok Generator jar. The response will be in a grok pattern. This field is optional.
Here we are going to create a test case to search using the phrase in the logs given.
START and STOP are mandatory test elements.
Element: Start, Label: start
Select START
Action Type: Initialize.
Action: Default.
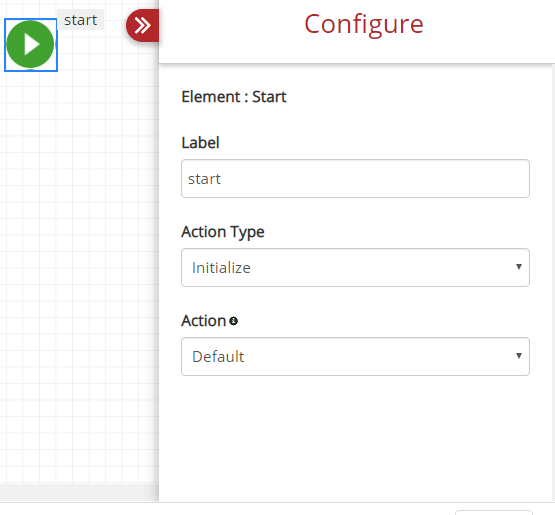
Fig. 6.99 Log Start
Element: Process, Label: search phrase
We named the PROCESS element search phrase. We are searching for a phrase in this test case.
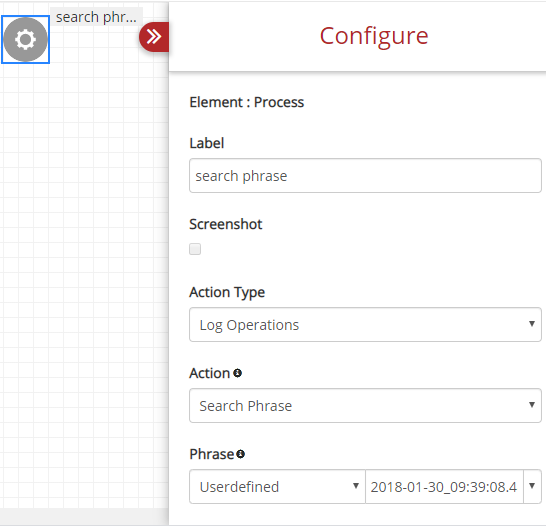
Fig. 6.100 Search Phrase Process
Action Type: Log Operations.
Action: Search Phrase.
This will expand the options and Phrase box will appear. Here is where you enter the phrase you are planning to search.
Once the action is performed, the STOP element is used to stop the test case.
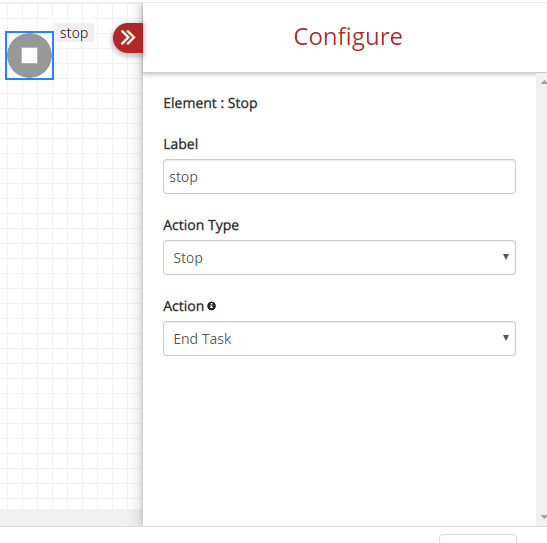
Fig. 6.101 Log_Stop
The completed test case is as shown in Figure below
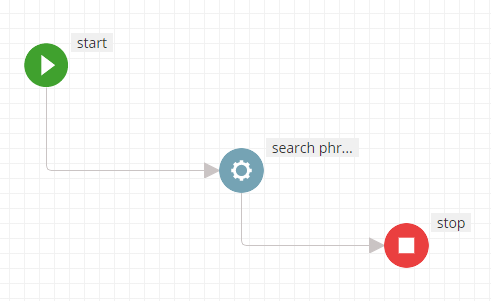
Fig. 6.102 Search Phrase Log Testing
Search Key Value
Also, we can search an item in the log by using the key-value concept. Here we are creating another test case using key-value pair in process Element.
Element: Process, Label: search key Value.
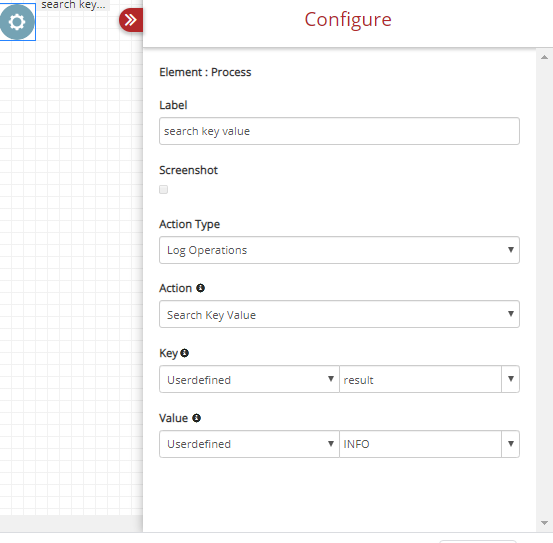
Fig. 6.103 Search key Value 2
Action Type: Log Operations.
Action: Search Key Value.
The completed test case will look like as shown below:
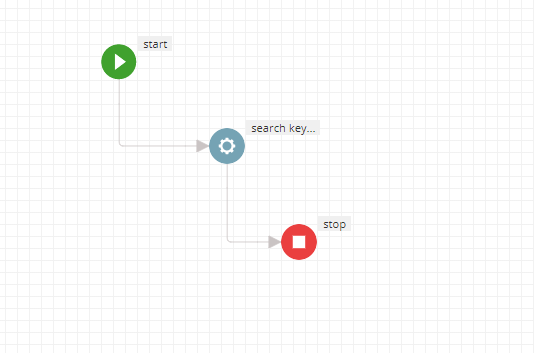
Fig. 6.104 Search Key Value
6.5. Mobile Testing
Automaton’s mobile testing interface makes bug fixing and testing new features an uncomplicated and easy to understand process. Automaton’s mobile testing is quite handy because new features and bug fixes need to be released with short intervals. New features are released often so that users do not lose interest, but new features should not bring new bugs. Therefore, testing becomes vital for an app’s survival.
Automaton supports testing of both Android and iOS platforms.
Configuring Automaton for Mobile Testing
Connecting to Appium Server
To use Automaton on your system for mobile testing, first, you need to install Appium. Appium is an open-source tool for testing mobile applications. It supports the testing of various types of mobile applications such as Native, Hybrid and Mobile Web using the standard WebDriver library. Appium can run automated tests on tablets and mobile phones. The first step to use Automaton for mobile testing is installing Appium.
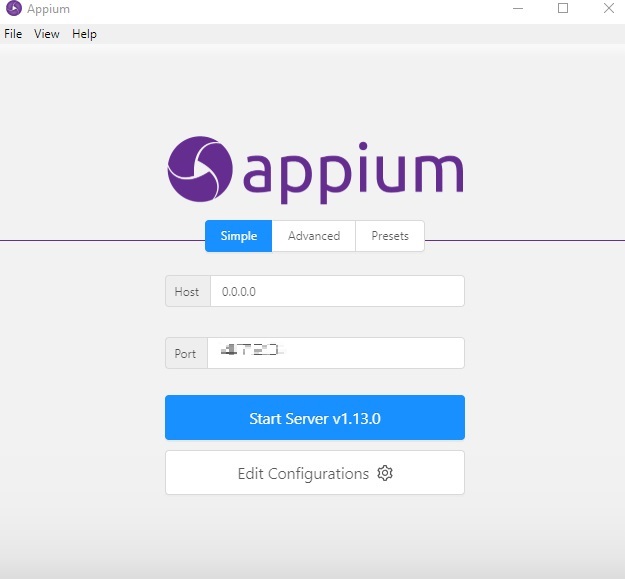
Fig. 6.105 Appium
Open the Appium homepage.
To use Automaton, we use Appium’s simple mode.
Now you need to enter the hostname under Host. The host will be the IP address of your system.
The next step is to enter the port number in Port.
Once the Host and Port boxes are populated, click on Start Server v1.13.0 (we are using Appium’s 1.13.0 version).
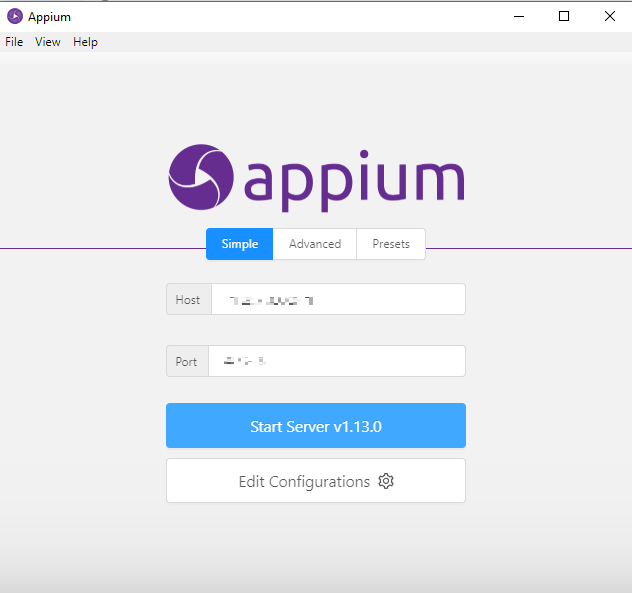
Fig. 6.106 Entering Host and Port
In this example, the host system’s IP address is ‘127.0.0.1’. The same is entered in Host. The port number ‘4723’ is entered in Port.
Once you enter the Host IP and port number, click on Start Server v.1.13.0. The Appium server will connect now and the following screen will appear.
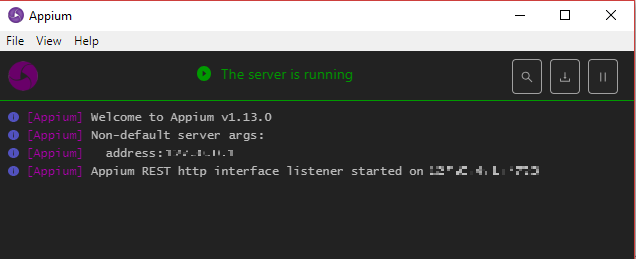
Fig. 6.107 Appium Server Running
You can see that the Appium test server is connected to the system with the IP address and host number we entered by reading the description Appium REST HTTP interface listener started on 127.0.0.1:4723.
Android SDK
Android SDK is required to run the android applications for mobile testing. Many parameters required for testing is fetched from the Android SDK. For example, information such as UDID (Unique Device Identifier), app package and app activity are fetched through Android SDK.
AppData/Local/Android/SDK/platform-tools is the command used to fetch the values such as UDID,app package,app activity etc.
Connecting Your Mobile Device
To connect your mobile device to the Appium server, you need to run a search first so that Appium will find all the mobile devices that are connected.
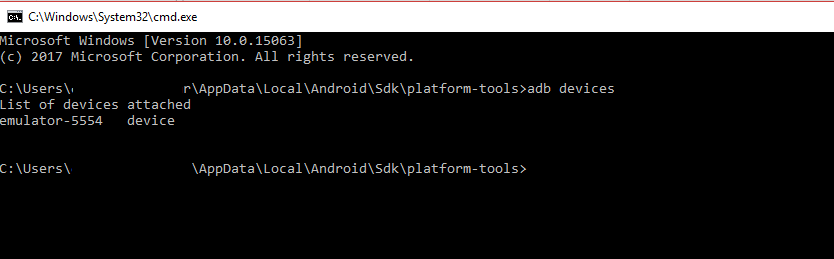
Fig. 6.108 Searching For Mobile Devices
To find the devices attached, you need to run the command adb devices.
The command will display all mobile devices that are attached to your system. After running the adb devices command, the following information is displayed on the screen.
List of devices attached
emulator-5554 device
In our case, we have connected an Android emulator and it is successfully displayed. If you connected a physical mobile device, the same would have been displayed with its model number given by the manufacturer.
Testing a Mobile App
We are testing the Calculator app in this example. To do this, we need to find some information using UI Automator Viewer.
Using UI Automator Viewer
Method 1:
UI Automator Viewer is a part of Android SDK and it’s an integral part for mobile testing. App package details are fetched using UI Automator Viewer but that is not the only job it does. It has multiple applications in mobile testing using Automaton.
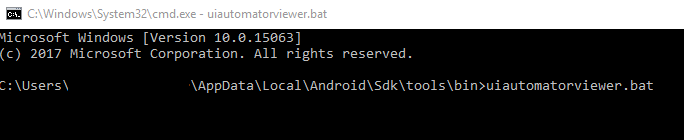
Fig. 6.109 Running UI Automator
Enter the command C:Users*yourpcname*AppDataLocal|Android|Sdk|tools|bin.uiautomatorviewer.bat and UI Automator will be started.
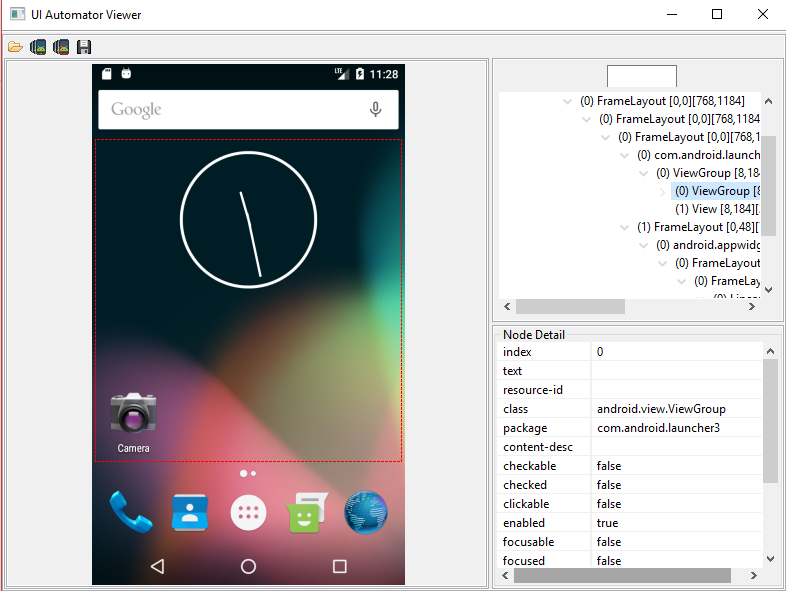
Fig. 6.110 UI Automator
The home screen of UI Automator will display the android device you selected. In our case, we are using an emulator so the same will be displayed.
We are testing the Calculator app in this example.
To open the app, you need to follow the steps that you would follow on a regular Android device. Open the apps menu, locate the calculator app and then click on it. The app will be opened.
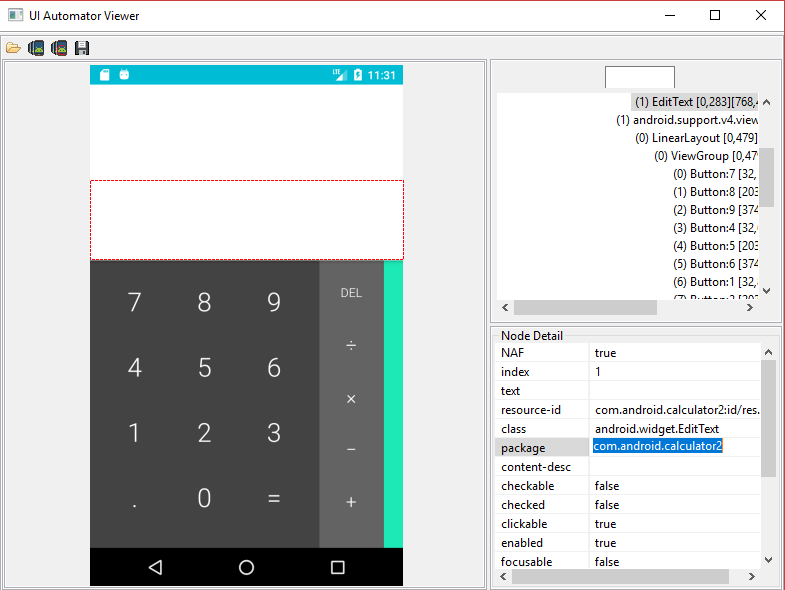
Fig. 6.111 Calculator App
Check the above figure: Calculator app. You can see that the calculator app is opened.
Now we need to identify the package. Many details along with the package details are displayed in UI Automator. Hover your mouse to the right side and select package and package will be displayed.
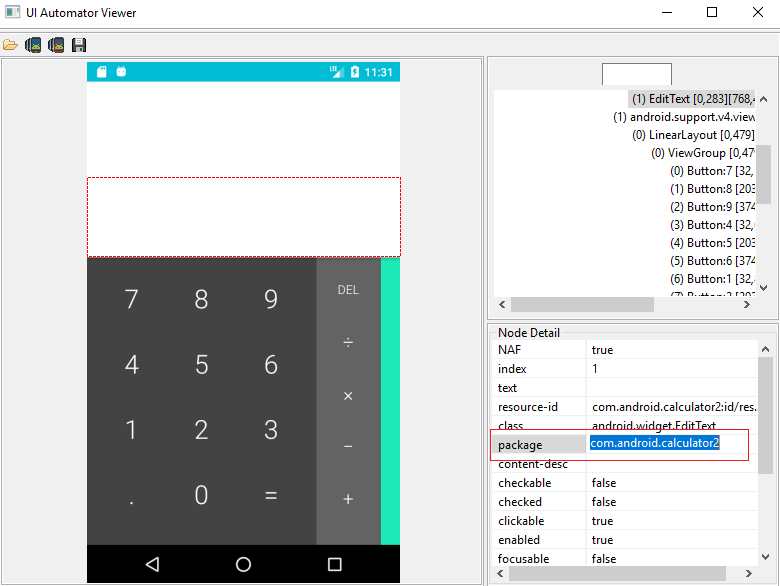
Fig. 6.112 Calculator App 2
Package details are displayed in the rows on right along with many other values such as resource-id, index, and test. As shown as highlighted in the above figure you can see the package details.
Fetching App Package Details from UI Automator Viewer
UI Automator Viewer is used to fetch the package details of an app. To do this, first, we need to find the package ID and run a command using the package ID.
Figures Calculator app and Calculator app 2 explains how to find the package ID. Copy this information to find the package details of an app.
In figure Calculator app 2, we learned how to copy the package ID of an app. In this example, com.android.calculator2 is the package ID. Copy this information and run the package ID command as shown in figure package ID command.

Fig. 6.113 Package ID command
The command is
C:Users*usernameAppDataLocal|AndrodSdk|platform-tools>adb shell dumpsys window windows | find str com.android.calculator2*
The app package details will be displayed
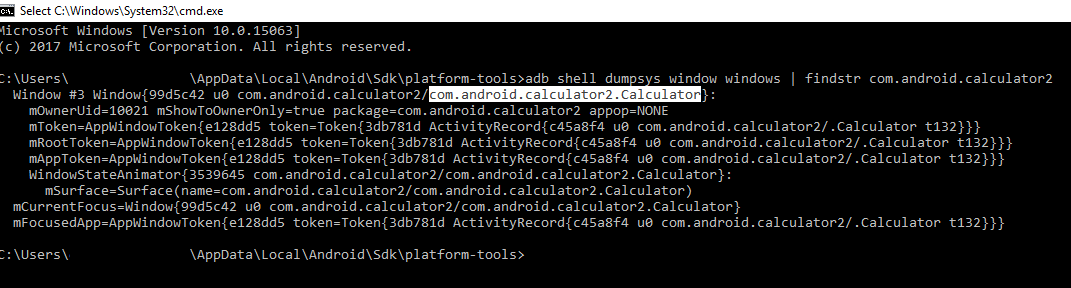
Fig. 6.114 App Package Details
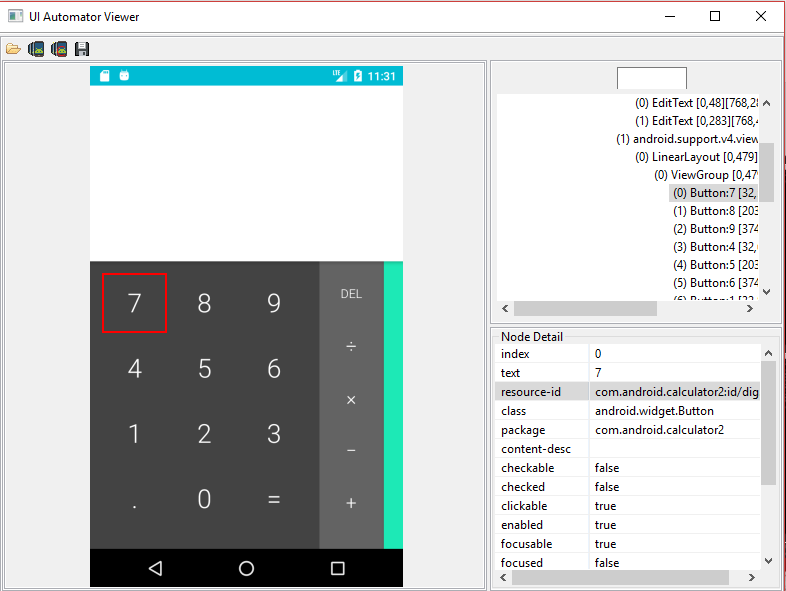
Fig. 6.115 UIAV Finding ID Of the Element
Method 2:
Users can install the UI Automator Viewer mobile application. This tool allows users to find the id’s of elements available on the screen(It can be any application), with the help of which the user can create a test case in Automaton.
Using Appium to find element ID
UI Automaton Viewer fetches all the data required for testing Android devices. This is because it is a part of the Android SDK and packs many features to support the Android ecosystem. However, this has one limitation. Android SDK is an exclusive ecosystem for the Android ecosystem. To test iOS products, UI Automaton Viewer is of no help because it cannot fetch various application details. Therefore we use Appium for iOS testing. However, Appium is flexible, and you can use it to fetch the details from an Android device as well.
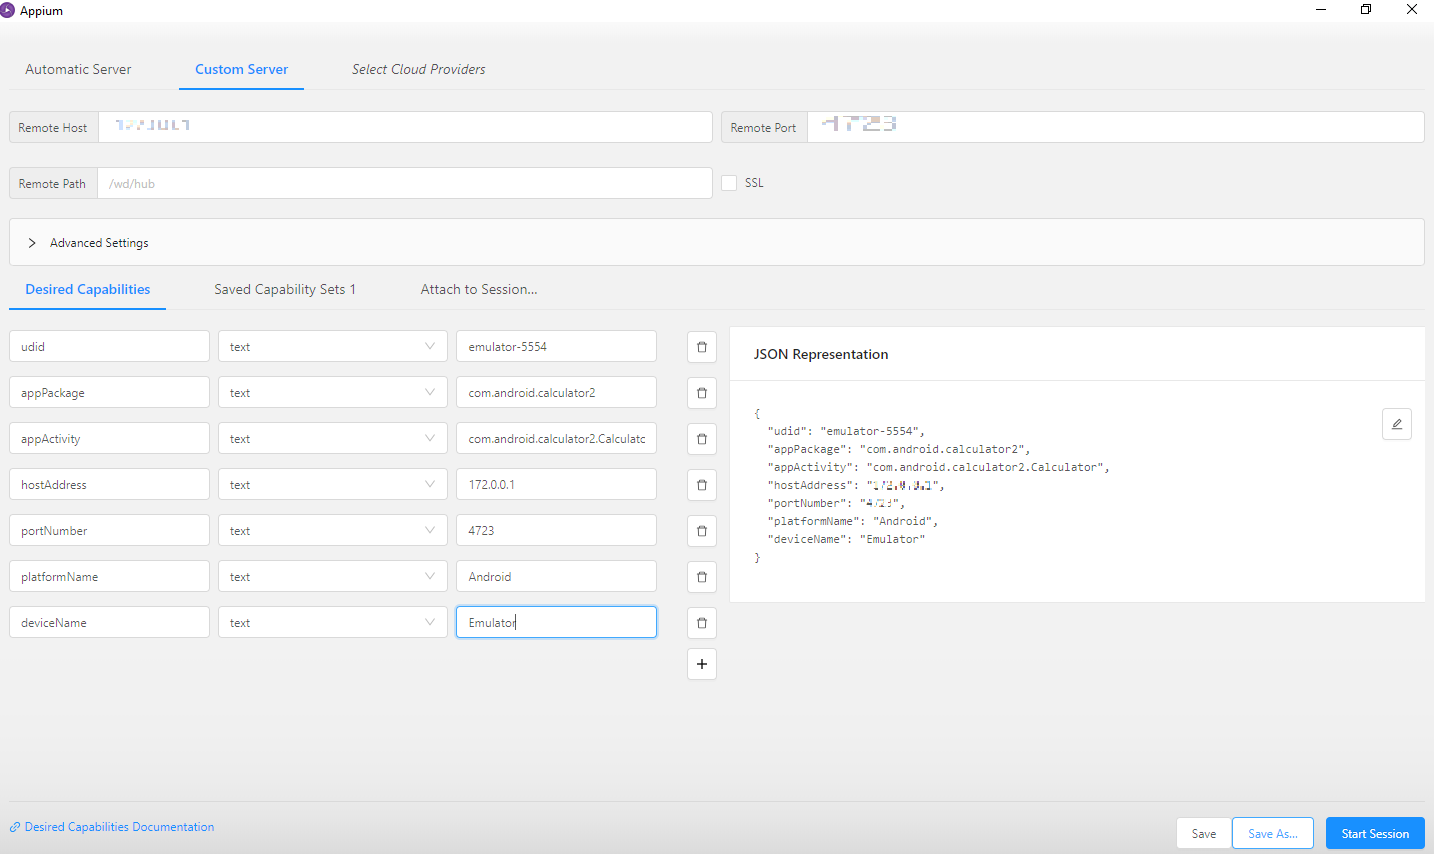
Fig. 6.116 Populating Details in Appium
Refer figure populating details in Appium. This is how your Appium page will look like once you filled the required information correctly. Let us explore each column separately.
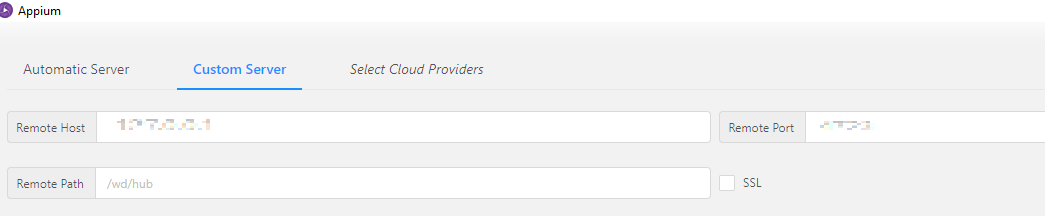
Fig. 6.117 Custom Server
Step 1: Select the Custom Server. This gives you the option to fill in Remote Host and Remote Port. Remote Host is your system’s IP address and Remote Port is your designated port number. We enter our system details here. Our system IP address, 127.0.0.1 and port number 4273 are entered.
Step 2: To fill our device details. To do this, click on Desired Capabilities and fill in the details.
UDID

Fig. 6.118 udid details
The first row is udid. udid stands for Unique Device ID. We are testing an Android emulator so its ID, emulator-5554 is entered. If it’s the product (eg: a Motorola phone) you should enter the manufacturer’s ID for that particular model.
App Package

Fig. 6.119 App Package Calculator
Once udid is filled, you need to fill in the app package details in the appPackage row. We already know how to find the app package details (refer figure app package details). Paste com.android.calculator2 in the appPackage row.
App Activity (Launcher Activity)

Fig. 6.120 App Activity Calculator
appActicity is nothing but the launcher activity. This information can be found in Appium. Fill that info in the appActivity row. In our example, it is com.android.calculator2.Calculator
Host Address and Port Number

Fig. 6.121 Host Address And Port Number
Next two rows are to enter your host address and port number. Enter this info in the hostAddress and portNumber rows.
Platform Name and Device Name

Fig. 6.122 Platform Name and Device Name
The platform we use is Android and the ‘device’ is an Emulator. Fill in the details in the platformName and deviceName rows.
Once all the info is populated, click on the Start Session box refer figure as shown below.

Fig. 6.123 Start Session
Appium – Finding the ID of the element
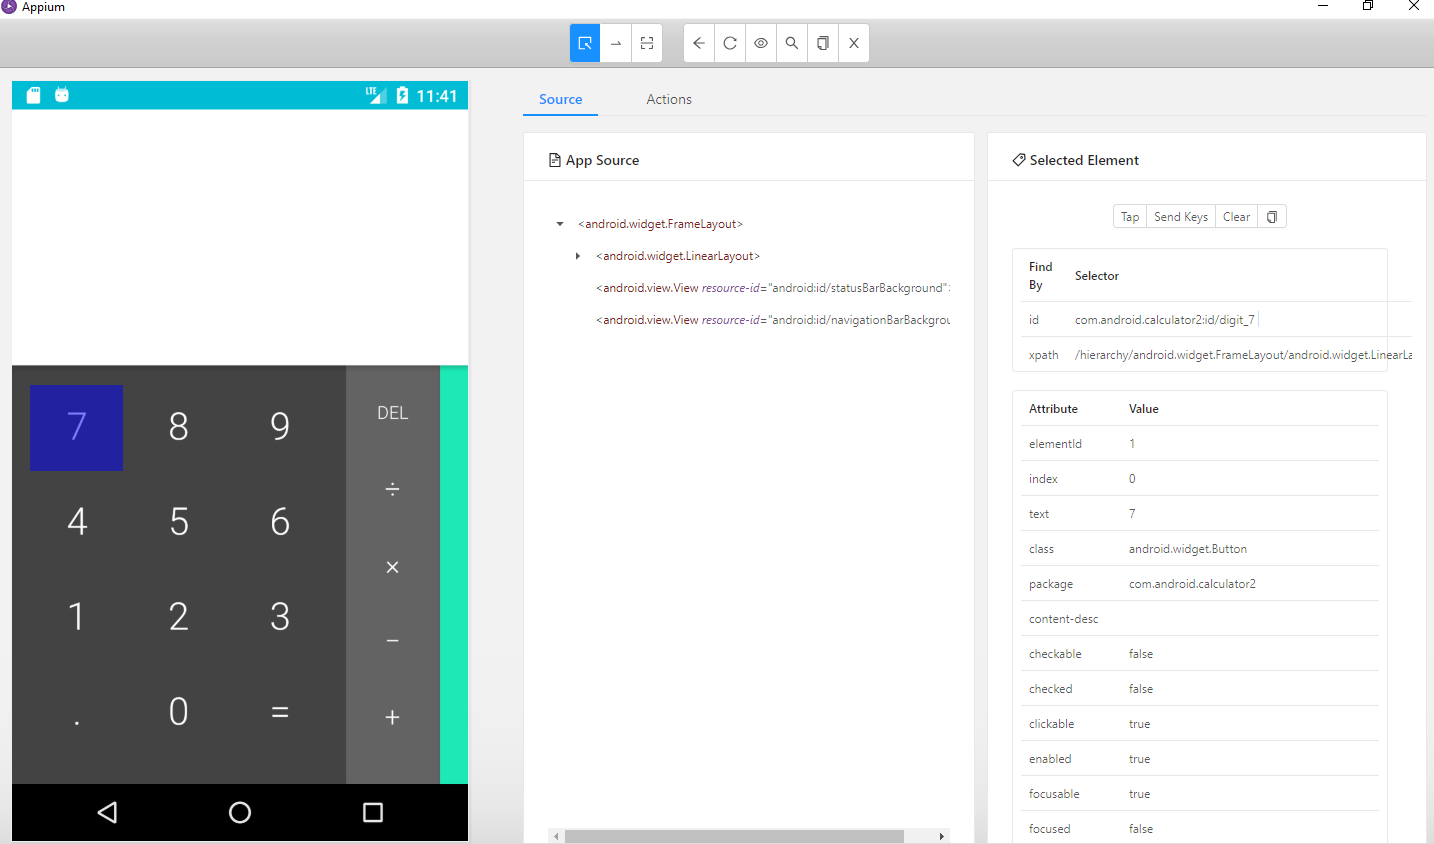
Fig. 6.124 Appium Finding Element id
Once you start your session, all you need to do to find the id of an element is to hover your mouse over that element. The mouse is kept on digit 7 (as shown in the above figure appium finding element id)Under the column Selected Element on the right side, you will see the values associated with the selected element.
Summary
This is how you configure your system for mobile testing for the Android and iOS ecosystem. Although most information and configuration requirements for Android testing can be fulfilled with the help of Android SDK and UI Automaton Viewer, Appium is a must-have for iOS testing. Now that your system is configured for mobile testing, we will see how to run a test case on Automaton.
Running a mobile test case – Android
Below is an example test case where we access the Gmail app on an android device and perform some tasks. The first task is to open the Gmail app on the Android device and then search for a query in the search box (the query can be anything. It could be an email ID, subject line or the content of an email). After finding this info, we click the back button of the app to access the Gmail app’s main menu and compose an email using the app’s compose button (the ‘+’ icon).
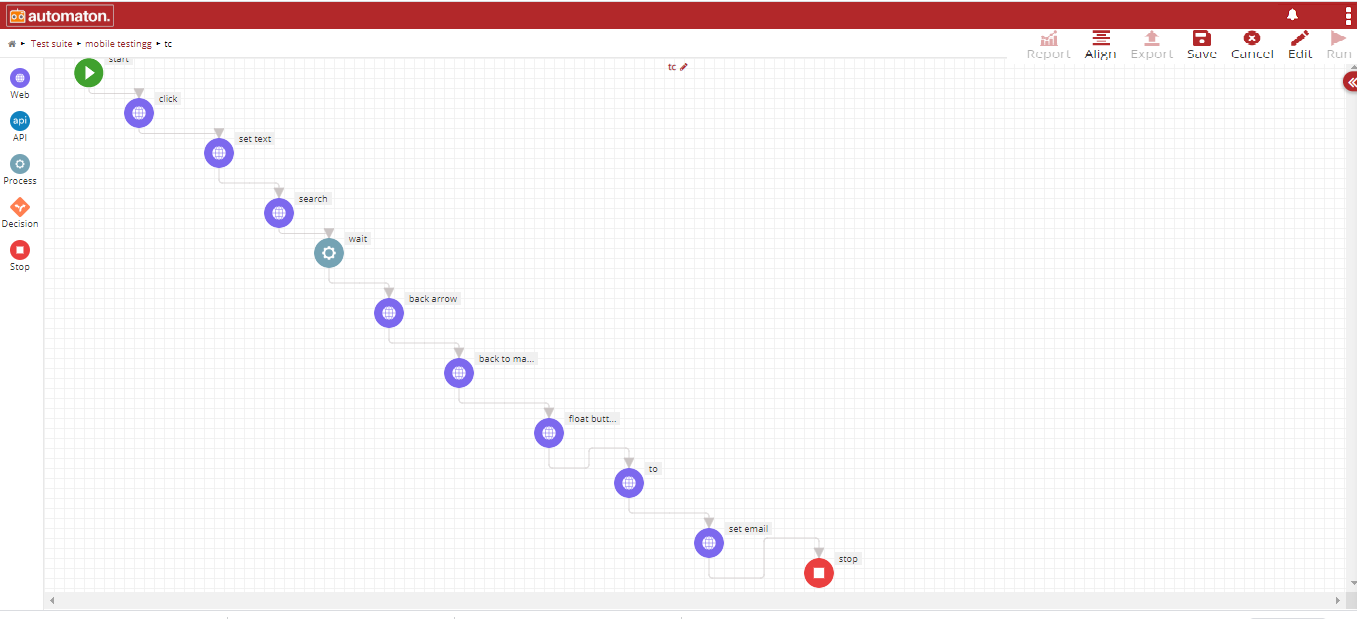
Fig. 6.125 Android Test Case
Our test case will look like figure Android test case. As we have discussed already, START and STOP and mandatory elements in Automaton and requires minimal configuration. We will see how each element is configured to achieve a successful test result.
Configuration of START element
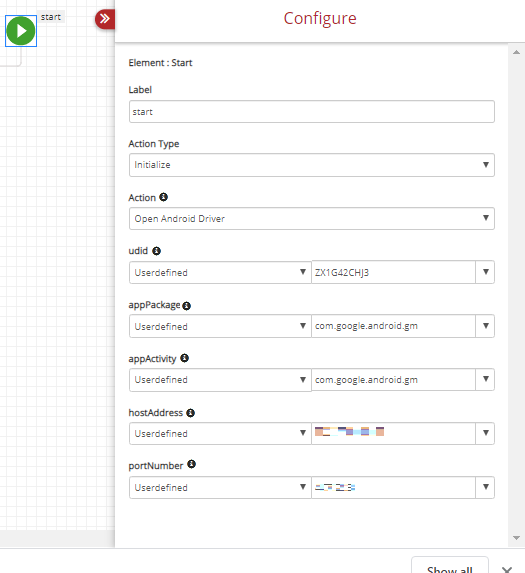
Fig. 6.126 Start Element Configuration
The first box is Label which allows you to enter a custom name. Since START is mandatory and self-explanatory, the Label is named ‘start’.
Action Type only gives you one option, which is Initialize. Initialize is used to initialize a web driver.
UDID is the unique device ID. You need to enter the ID of the device or emulator here. UDID dropdown only has the User-defined option.
AppPackage dropdown also comes with the User-defined option only. Here you need to enter the application package that you are testing. We are testing the Gmail sign-in package so, we have entered its name as – com.google.android.gm – here. This is because Gmail is a part of the Google application package (other examples include YouTube, Google Sheets etc).
AppActivity is where you mention the specific application that you are testing. Since we are testing Gmail, we will enter com.google.android.gm.ConversationListActivityGmail here.
We have discussed what is HostAddress and PortNumber is. The former is the system IP address, and the latter is your port number.
Note
The dropdown only has User-defined option because everything from udid to port number is custom values that need to be set by the User.
Action has both Android and iOS testing options and multiple browser launch options. Since we are testing an Android application, select Open Android Driver as shown in the below figure
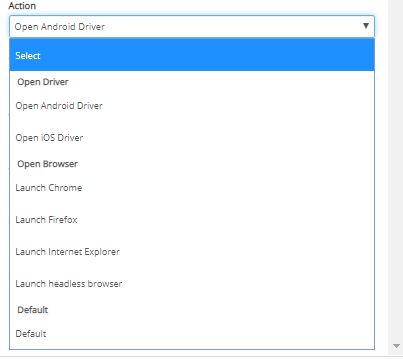
Fig. 6.127 Open Android Driver
Once we set up Action to open the Android driver, the configuration of START is completed.
Click
After START, we use a WEB input element that is labelled click. Let’s see how click is configured.
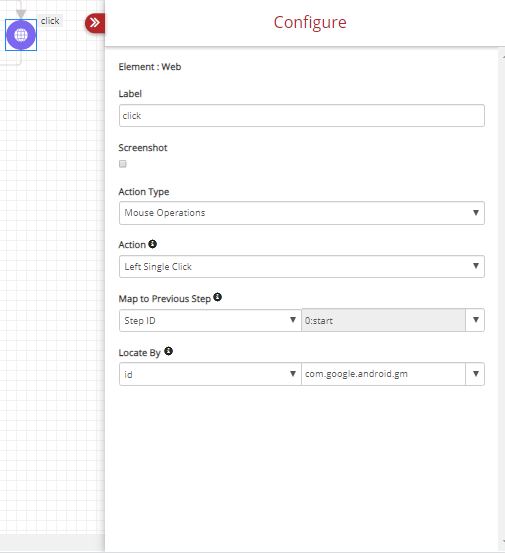
Fig. 6.128 Click
Click is configured to make a single left click on the mouse.
Under Action Type, Mouse Operations is selected (refer below figure).
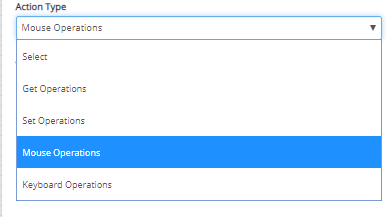
Fig. 6.129 Mouse Operations
Next is the Action drop-down. Under Action, drop-down menu Left Single Click is selected.
Map to the Previous Step is where the Step ID should be entered. The start is selected as Step ID. Locate By has options like XPath and ID to locate an element. In this case, the element is located by its ID, com.google.android.gm:id/search
Set Text
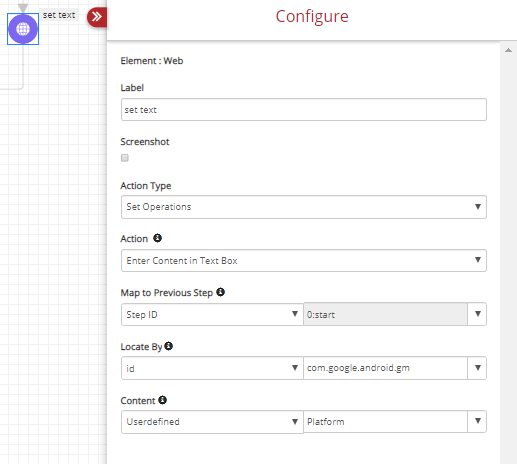
Fig. 6.130 Set Text
We are setting custom text so the Label is named set text. Select Set Operations under the Action Type.
Under Action drop-down, select Enter Content in Text Box.
Next option to populate is Map to the Previous Step. Choose start from the drop-down.
We are locating the element by its ID so select id under the Locate By drop-down. Id in this example is com.google.android.gm:id/search_actionbar_query_text
Select Platform in the Content option.
Search
Next, we are going to search for a keyword. To do this, we should make a left click with the mouse in the search box.
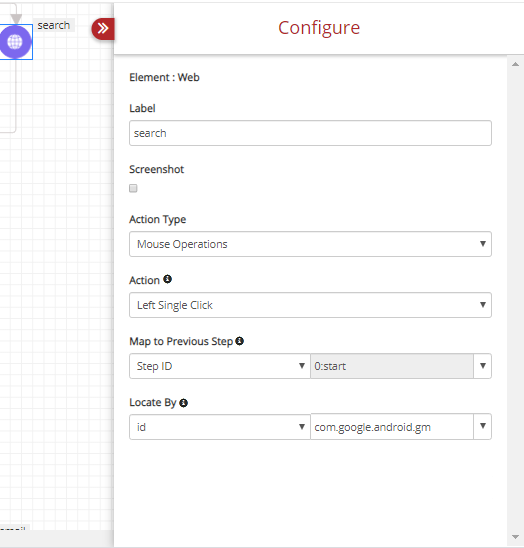
Fig. 6.131 Search Text
Search is a WEB Input element and the process is the same as Click option we used as the second step. The only difference is that it is labelled search to relevant and the Locate By option has a different ID (com.google.android.gm: id/compose_button).
Wait
When you want to ensure that the system got sufficient time to respond, you use the waiting element so that the system will wait for a designated time before moving to the next step.
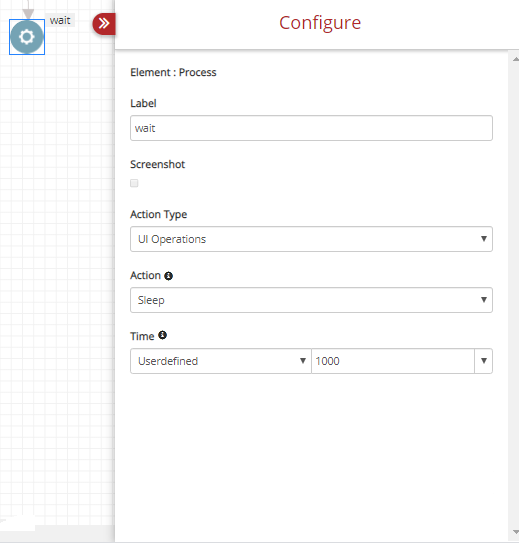
Fig. 6.132 Wait
The Label is set ‘wait’ . Select UI Operations from the Action Type drop-down menu and select Sleep under Action drop-down. Time is set to Userdefiend. In this example, we used 1000 milliseconds as the wait time.
Back Arrow
So far, our test case performed two actions: locating the search box and searching for a keyword/term. Now we need to compose an email from the Gmail app. To do this, we need to exit the search box and get back to the inbox. To do this, we must click the back button.
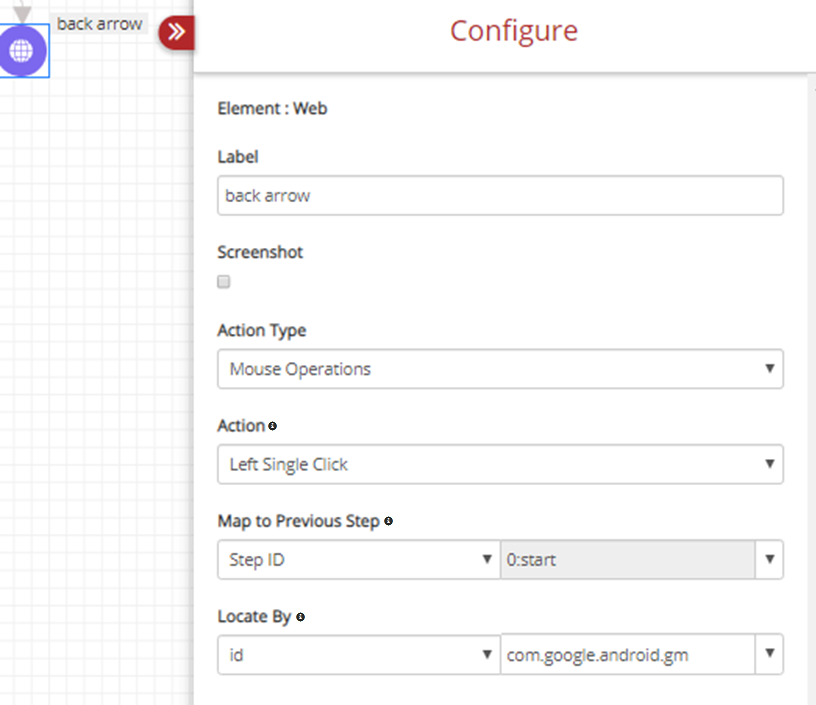
Fig. 6.133 Back Arrow
We set the Label as a back arrow to indicate that we want to click the back button. This is performed by a single left click on the mouse so, in Action Type, Mouse Operations is selected, and Action is configured to Left Single Click. Map to the Previous Step is set to start and we can locate the element by the id. So, we choose id under Locate By and copy the element id (com.google.android.gm:id/search_actionbar_back_button).
Back To Main Menu
You need to press the back button twice (depending on your Android version) to get back to your inbox. The below figure shows how to configure the same in the Automaton.
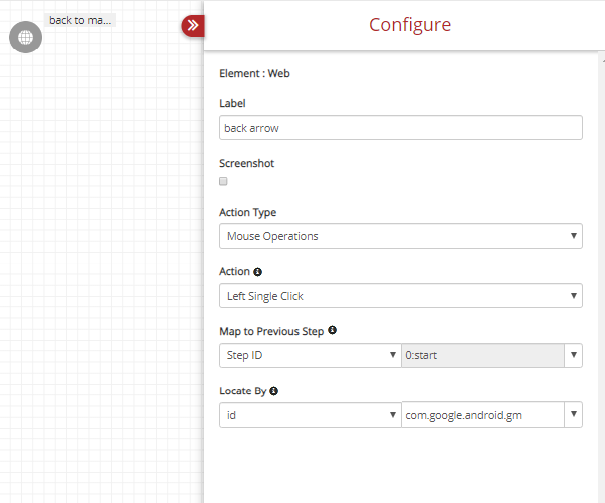
Fig. 6.134 Back To Main Menu
The Label is set to back to the main menu for quickly recognizing the action, we intend to perform. Select Mouse Operations under Action Type and Left Single Click under Action. The start is selected under Map to the Previous Step and you need to enter the element location (com.google.android.gm: id/compose_button) under Locate By.
Float Button
To compose an email, we need to press the floating action button of Gmail as shown in the below figure. The steps followed are the same as Back to the main menu except that the Locate ID element is different (com.google.android.gm: id/compose_button).
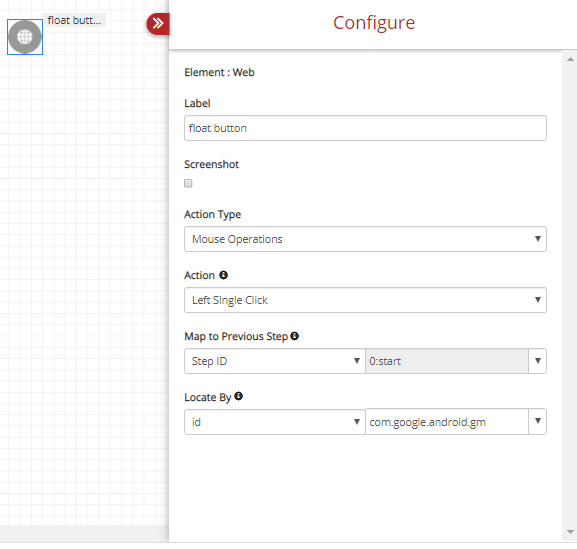
Fig. 6.135 Floating Button
To
To option is used here to enter the receiver’s email ID. Gmail’s Android version automatically fills the sender’s email ID (pretty much like every webmail service) so you only need to enter the receiver’s email ID.
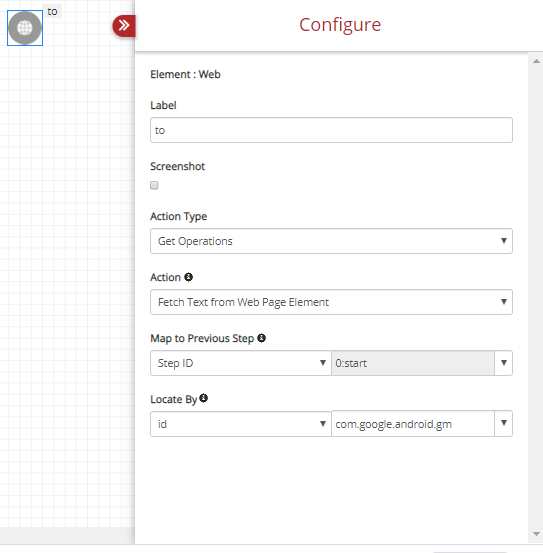
Fig. 6.136 To
The label is set to for easy understanding. To here means the receiver’s email ID. From the Action Type drop-down, select Get Operations and select Fetch Text from Web Page in the Action drop-down. Select start in Map to the Previous Step. Enter the Locate By option to identify the web element. We are locating the web element here by ID so id is selected from the drop-down and the value com.google.android.gm: id/from_account_name is entered.
Set Email
Next, we are composing the email message. Set Operations is selected under Action Type. Under Action, Clear and Set Content in Text Box is selected.
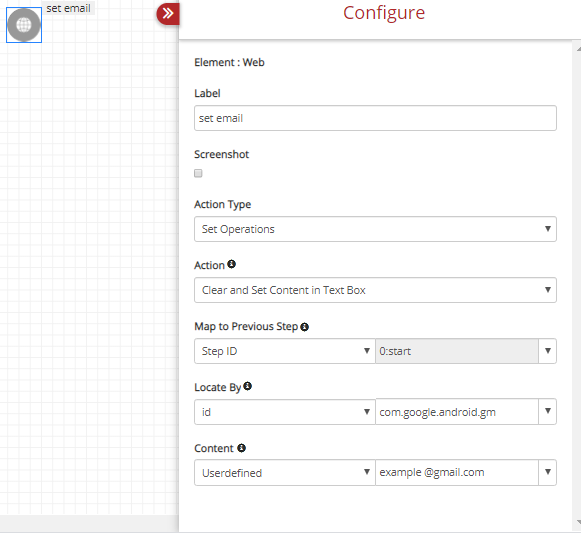
Fig. 6.137 Set Email
Stop
After successfully executing a test case, you need to use STOP to stop that test case. The stop is used here for the same purpose.
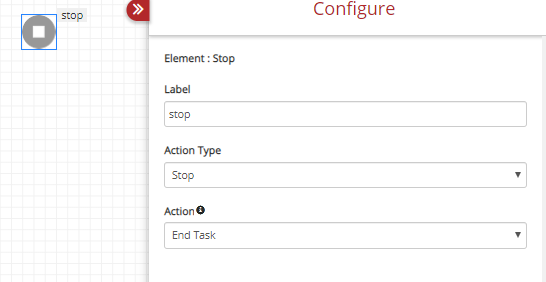
Fig. 6.138 Stop
6.6. Performance Testing
6.6.1. Web Load testing
Load testing is a software testing technique used to examine the behaviour of a system(application) when subject to both normal and extreme expected load conditions.
We can perform load testing in any application by executing test case. Here is a sample test case
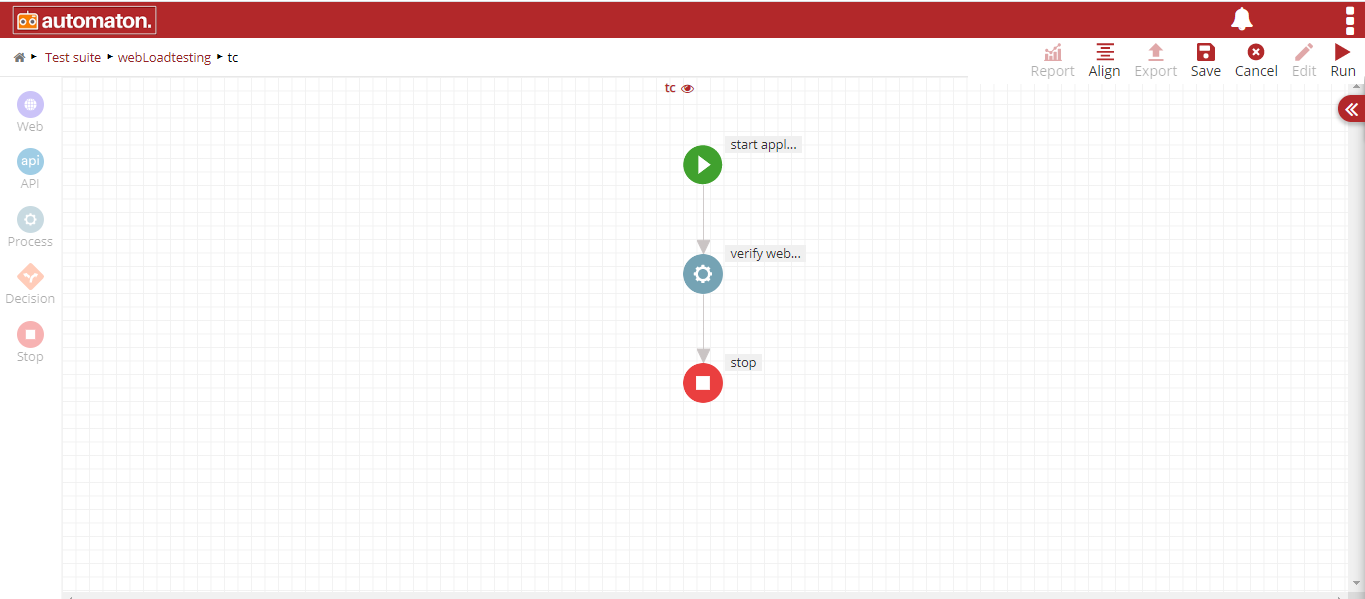
Fig. 6.139 Web Load Testing
Element: start, Label:start application
Start element is to start the application(thread). Label can be defined on user’s choice. Here the following fields are populated with:
Action Type: Initialize.
Action: Launch Headless browser.
URL: User Defined.
(If hub and node are not connected, user can choose Launch Headless browser)
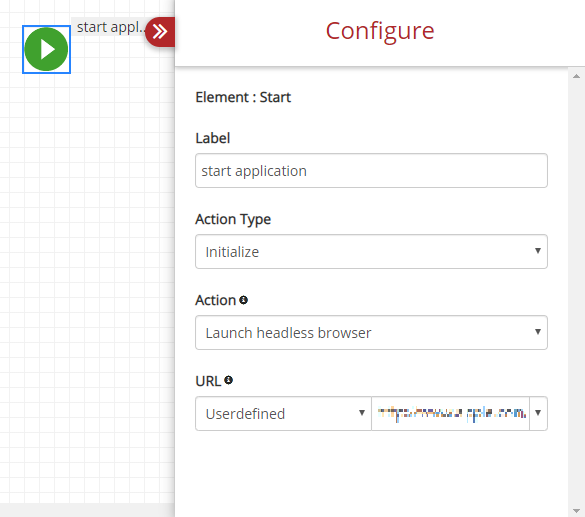
Fig. 6.140 Web Load Testing Start
Element: process, Label: verify web load performance
To perform load testing, the user must select:
Element: Process.
Label: User-defined.
Action Type: jMeter.
Action: Load Testing.
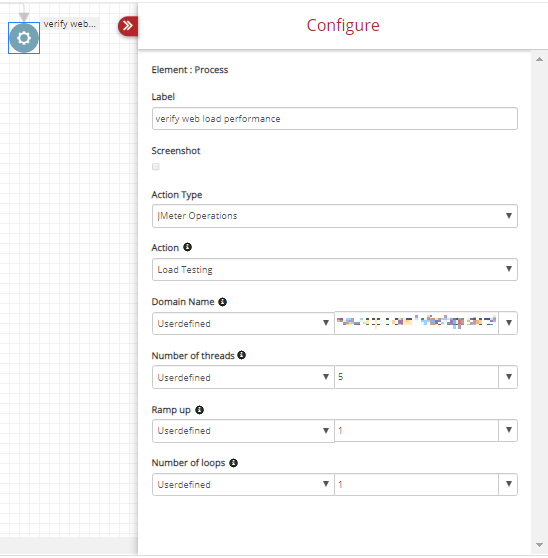
Fig. 6.141 Web Testing Verify Webload
In above figure, there are three properties on selecting action:
Domain Name: Specify which application to use.
Number of Thread: This represents number of users to hit application.
Ramp up: Ramp up period is in second. This represents how long it takes for each thread to hit application.
Number of loops: This is to show number of times each thread will execute the test.
Element:stop, Label:stop
This element is to stop the task.
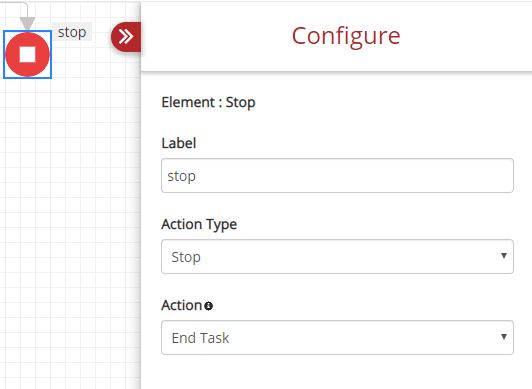
Fig. 6.142 Web Load Testing Stop
There are other Actions for Load testing in Api.
Action Type: jMeter Operations.
Action: jmx file.
Jmx File path: The value will be the path of the file which contain test plan that contain all test element for performance testing.
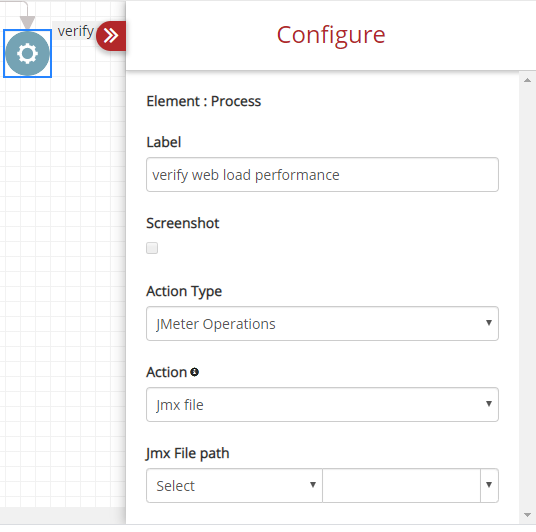
Fig. 6.143 JmX file
6.6.2. API Load testing
Load testing is a software testing technique used to examine the behaviour of a system (application) when subject to both normal and extreme expected load conditions.
We can perform load testing in any application by executing the test case. Here is a sample test case.
Element: start, Label: Start
Start element is to start the application(thread). The label can be defined on users’ choice. Here the ActionType is Initialize. Action is Default.
Element: process, Label: Process
To perform load testing user must select the process element. The label can be defined on users’ choice.
Action Type: JMeter Operations.
Action: Load Test.
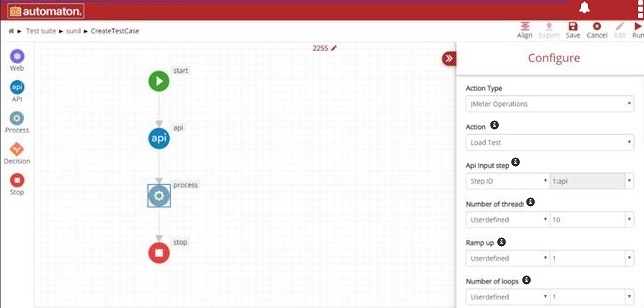
Fig. 6.144 Jmeter Operations
On above figure, there are three properties on selecting action:
API Input setup: This is to map to the previous element.
Number of Thread: This represents several users to hit application.
Ramp-up: Ramp up period is in second. This represents how long it takes for each thread to hit application.
The number of loops: This is to show the number of times each thread will execute the test.
Element:stop, Label:stop
This element is to stop the task.
There are other Actions for Load testing in API.
Action Type:JMeter Operations.
Action: is jmx file.
Jmx File path: The value will be the path of the file which contains a test plan. The test plan has all the test elements for performance testing.
API Jmx file
Fig. 6.145 Jmx