5. Creating the First Test Suite
This section details the creation of Test Suite.
Irrespective of the type of testing, User must create a Test Suite and Test case. Upon creating a test suite, the user must select by checking the checkbox corresponding API, Database, Log accordingly.
There are two ways to create Test Suite:
Method 1: You can create a new Test Suite by pressing the Create Test Suite icon as shown below from the homepage. You will be redirected to the Test Suite creation page.
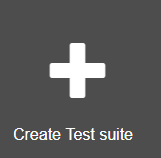
Fig. 5.1 Create Test Suite
Method 2: Click the Test Suite icon.

Fig. 5.2 Test Suite
User will be navigated to the Test Suite page as shown below:
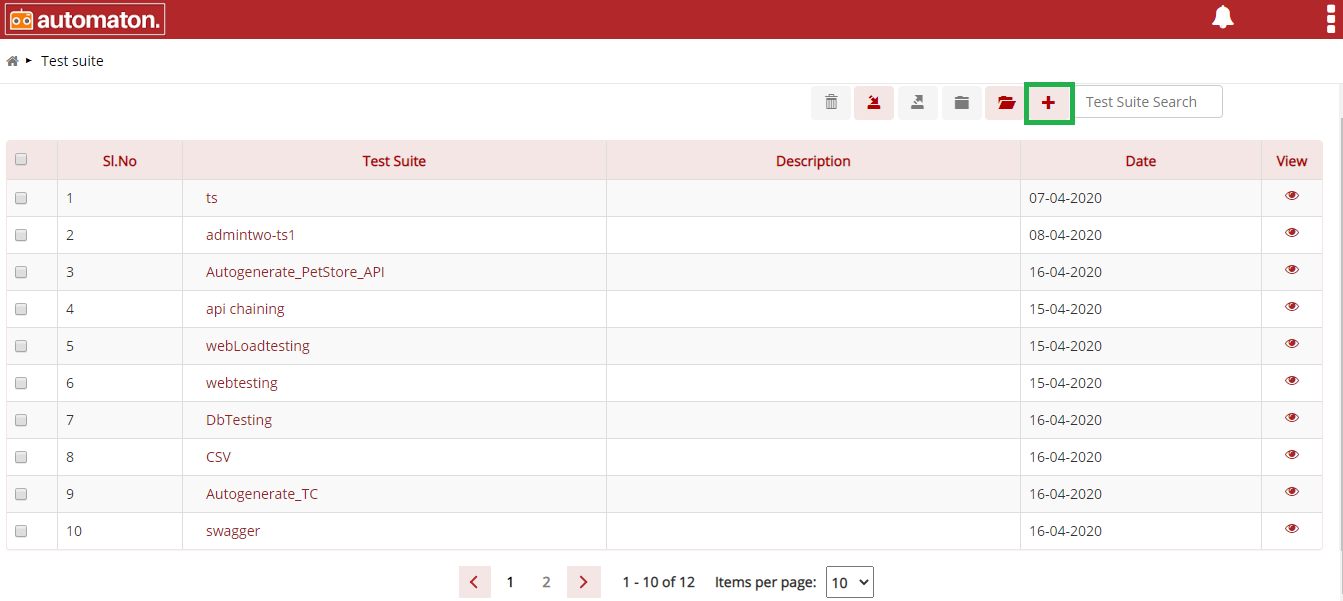
Fig. 5.3 Test Suite Page
Click the plus icon
on the top right corner, allows the user to create a test suite as shown below:
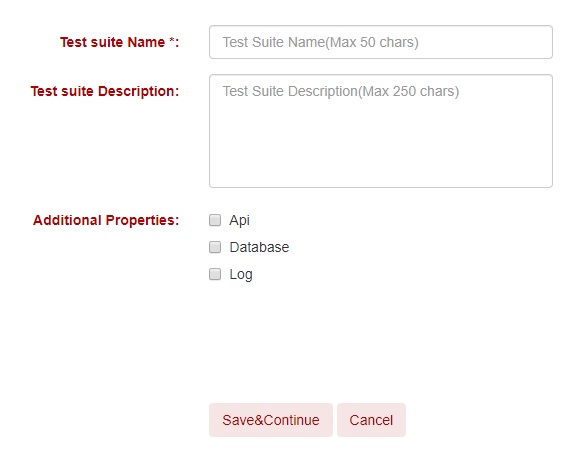
Fig. 5.4 Test Suite Creation Page
Here, user needs to enter the Test Suite name, Test Suite Description and you can select Additional Properties.
Test Suite Name is the name of your test case. Ensure that you are using relevant keywords.
Note
Test Suite Name is a mandatory field and should not exceed 50 characters.
Test Suite Description is an optional feature, but it is recommended populating this field with relevant information and supporting keywords so that locating your test suite through a search will be quicker.
Additional Properties allows you to select the type of testing you are performing. You can select API, Database and Log options here.
Once the relevant fields are filled in and the test type is selected, you can click on the Save&Continue button to save your test suite. If you want to cancel creating a Test Suite, press the Cancel button.
Click the delete icon on the test suite page to delete the test suite.
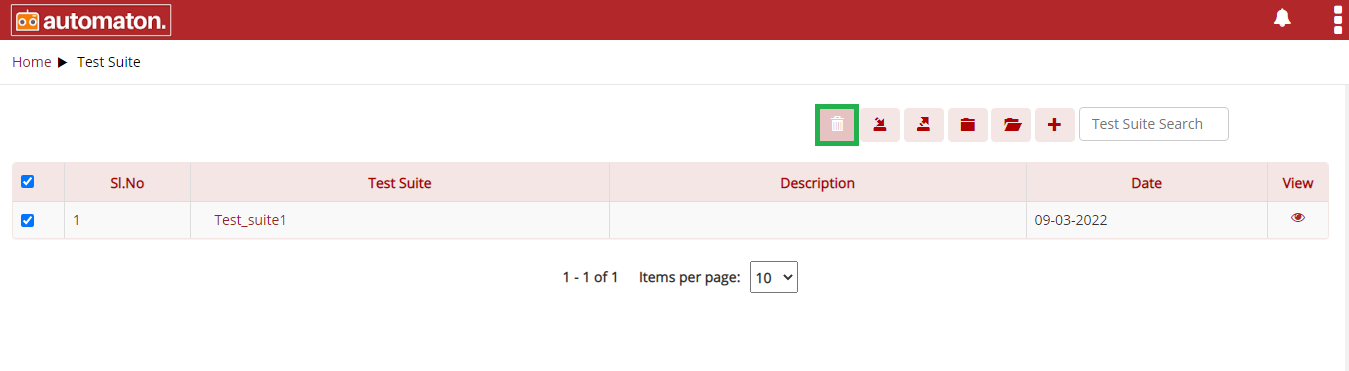
Fig. 5.5 Delete Test Suite
The Delete Test Suite dialog will be displayed click the Delete button to soft delete the test suite or restore from Trash. Click here to see the details.
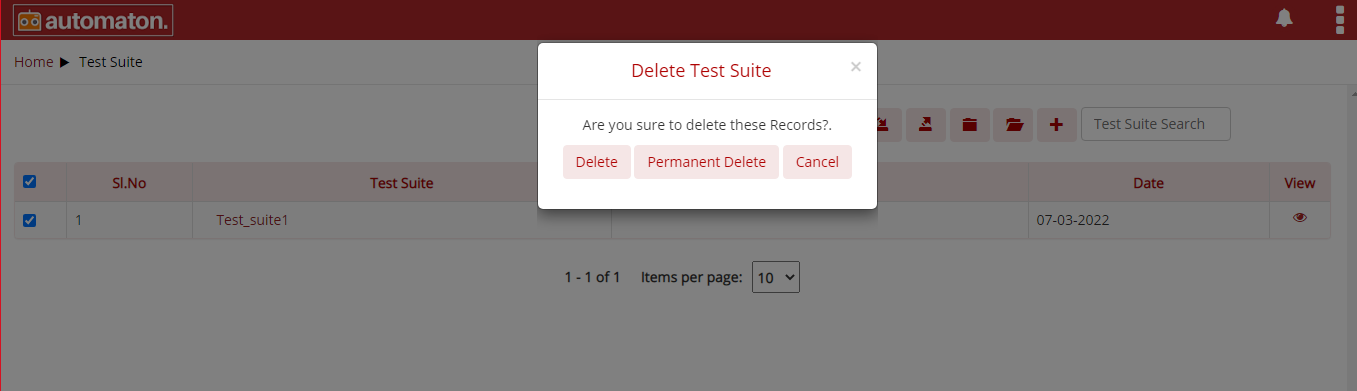
Fig. 5.6 Delete Test Suite
Permanent Delete Test Suite
Click the Permanent Delete button to delete permanently or click Cancel to exit. The items clicked by permanent delete cannot be restored from the trash page.
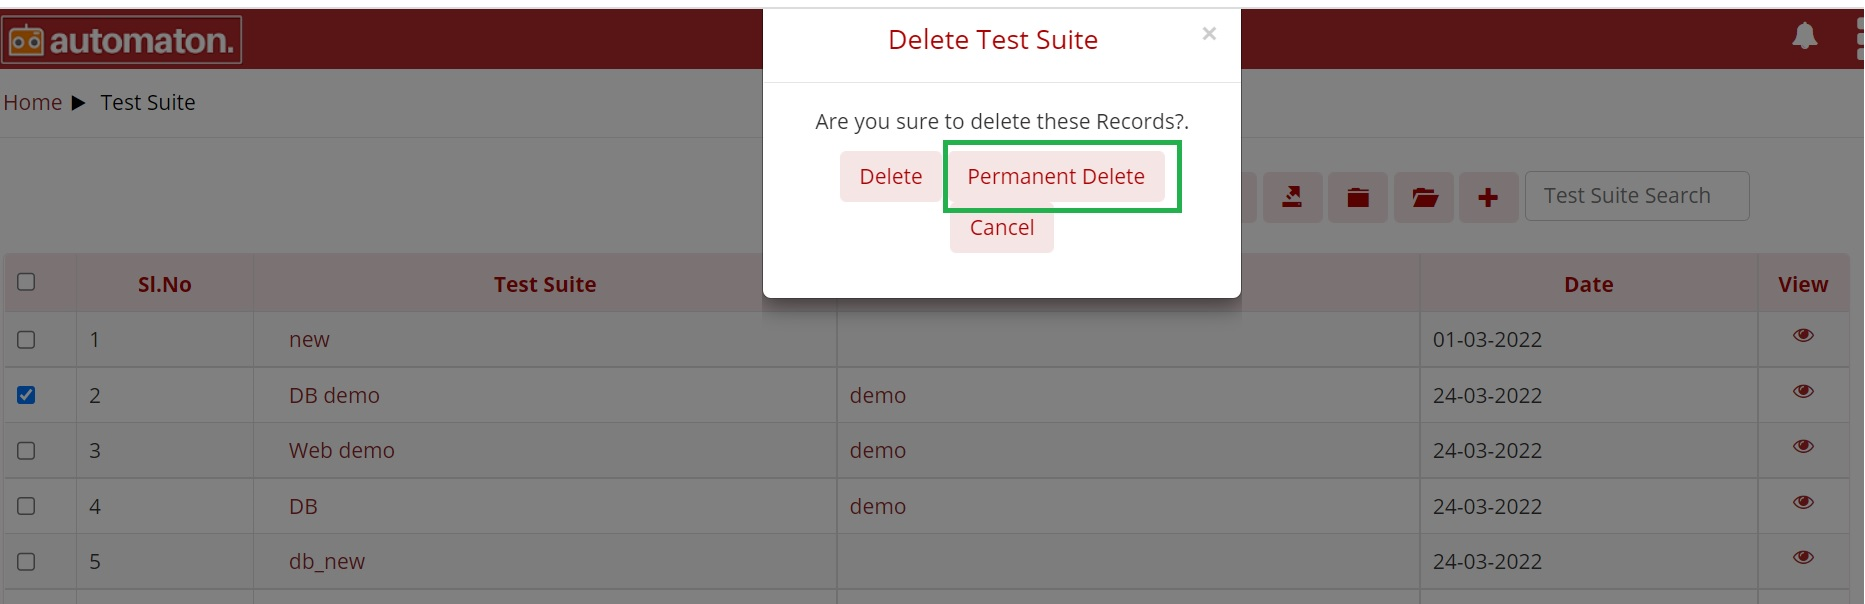
Fig. 5.7 Permanent Delete Test Suite
Permanent Delete Test case
Click the Permanent Delete button to delete permanently or click Cancel to exit. The items clicked by permanent delete cannot be restored from the trash page.
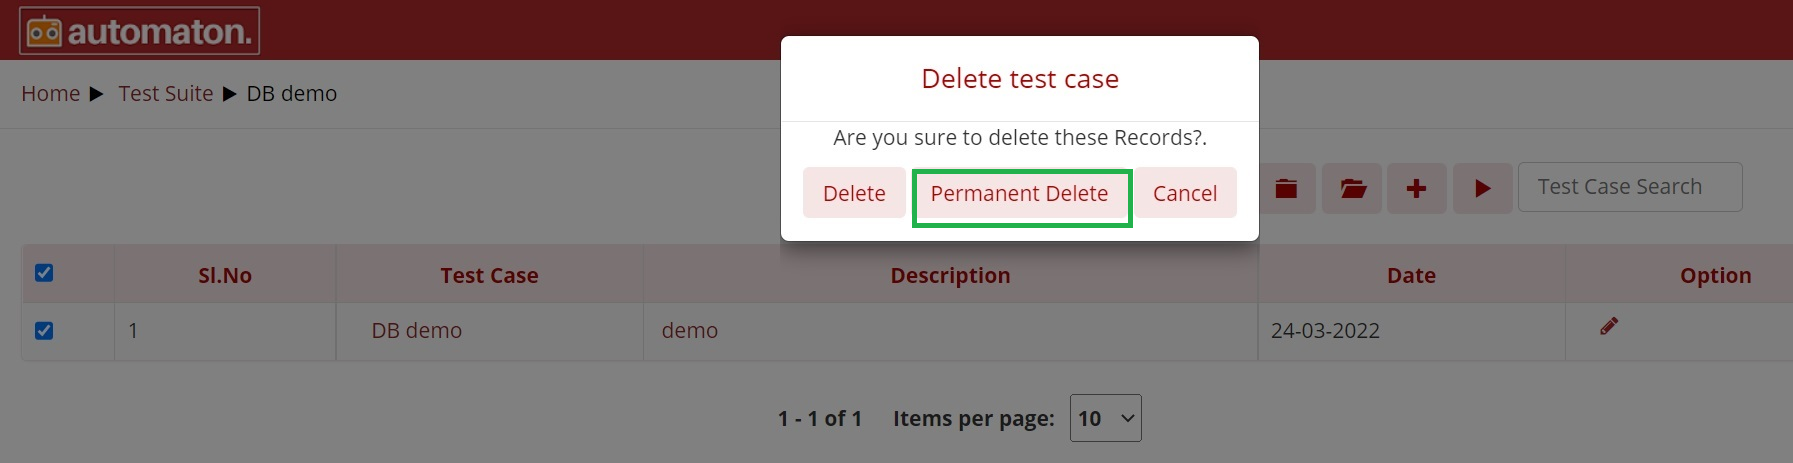
Fig. 5.8 Permanent Delete Test Case
5.1. Elements and Actions

Fig. 5.9 Web Test Automaton Menu
Automaton has the following elements:
- Start
- Web
- API
- Process
- Decision
- Stop
In addition to these elements, Automaton has options such as:
- 1 Align: Positioning the elements in the use case in an appealing way
- without disturbing the flow
2 Export: To export the Test case
3 Save: Retain for future use
4 Cancel: Navigate to create test case page
5 Edit: To modify already created test case
6 Run: To execute the test case
7 Report: To view the report page
After selecting an Element, user has to select an Action Type and Action for better execution.
For each Element, there is a specified set of Action Type and for each Action Type, there are multiple Actions to define the respective properties.
Once the user selects an Action, info icon ![]() will be displayed and on the hover of the info icon
will be displayed and on the hover of the info icon ![]() ,
the selected Action name will be displayed and if there are any Sub Actions and once the user selects the Sub Action,
info icon
,
the selected Action name will be displayed and if there are any Sub Actions and once the user selects the Sub Action,
info icon ![]() will be displayed and on the hover of the info icon, the selected Sub Action name will be displayed.
will be displayed and on the hover of the info icon, the selected Sub Action name will be displayed.
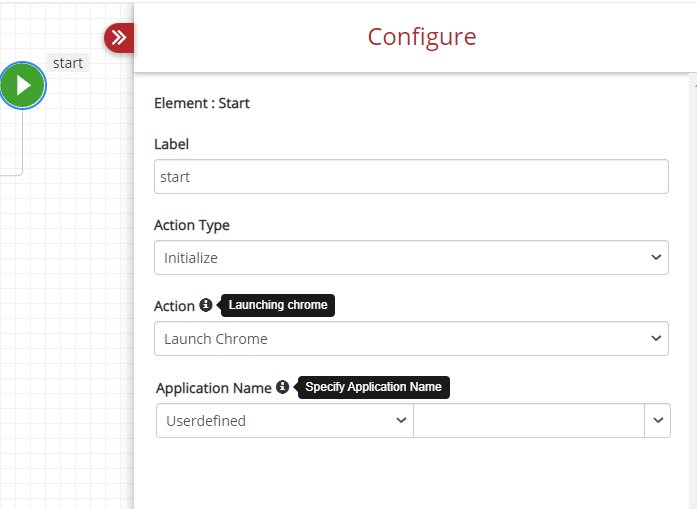
Fig. 5.10 Action and Action Type Description
5.1.1. Start Element
This is a mandatory element to start a test case. This element will be displayed automatically on this page as in the above figure. On hover of this element,
icon will be displayed where the user can insert other elements if required. Once you click on the START button, a toggle drawer will pop up which gives options such as Label, Action Type and Action as shown below.
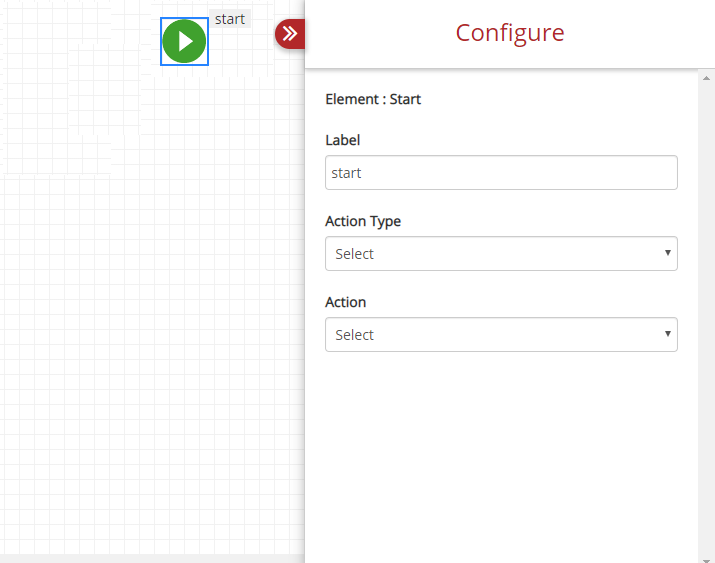
Fig. 5.11 Start Element
User can provide label name if needed. Once you label your test case, you need to choose an Action Type.
Action Type contains a set of Actions. Currently, the Action Type has only one option – Initialize.

Fig. 5.12 Start Element Action Type
Once the Action Type is selected, you need to select Action from the drop-down. Action has multiple options as shown below:
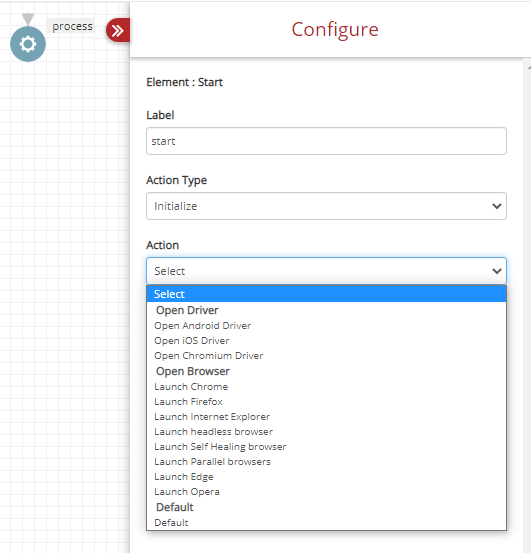
Fig. 5.13 Start Element with Action
- Initialize
Open Driver: Open Driver allows users to launch a mobile test case. Users have two options:
Open Driver: Open Android Driver: To run an Android test case.
Open Driver: Open iOS Driver: To run an iOS test case.
Open Browser: This allows the user to launch a browser of their choice.
It has 4 options:
Open Browser:
Launch Chrome: This will allow the user to launch the Chrome browser to evaluate automation testcases. Once the user selects Chrome user has to provide Application Name in Userdefined field.
Note
Application name must be as same as the Application Name in the Selenium Grid . Click on Selenium Grid to see the steps for perquisites for launching any browsers.
Open Browser:
Launch Firefox: This will allow the user to launch the Firefox browser to test automation testcases. Once the user selects Firefox user has to provide Application Name in Userdefined field.
Open Browser:
Launch Internet Explorer: This will allow the user to launch the Internet Explorer browser to test automation testcases. Once the user selects Internet Explorer user has to provide Application Name in Userdefined field.
Open Browser:
Launch Headless Brower: This will allow the user to launch the chrome browser to test automation testcases. Once the user selects chrome user has to provide Application Name in Userdefined field.
Open Browser:
- Launch Self Healing Browser: This will allow feature to change the locators dynamically at run time.Self healing is an alternative.
- The ids, xpath, and other identifiers used to find web elements in development environments are frequently different. For their testcases to function, the users must thus continuously change these locators. So that users may continue to execute the previous testcases they have generated, the locators will be changed dynamically during runtime.
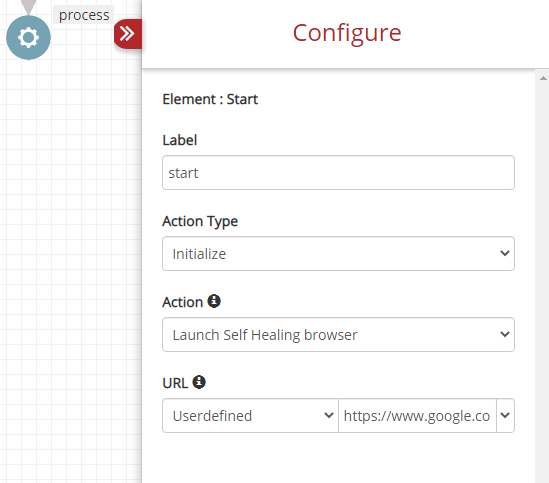
Fig. 5.14 Launch Self Healing Browser
Open Browser:
Launch Edge: This will allow the user to launch the Launch Edge browser to test automation testcases. Once the user selects Launch Edge user has to provide Application Name in Userdefined field.Open Browser:
Launch Opera: This will allow the user to launch the Opera browser to test automation testcases. Once the user selects Opera user has to provide Application Name in Userdefined field.
Default: We use default action if it does not belongs to browser related.

Fig. 5.15 Start Element
On the above figure, certain properties will appear on selecting Action field for better execution.
5.1.2. Web Element
WEB Input is used to perform web-related Actions. It has many action-combinations that make testing very easy. WEB Input element has Label, Action Type and Action options as shown below. It also has a Screenshot checkbox that you can check if you wish to take screenshots of that selected Action. If you do not wish to take screenshots, this box can be left unchecked. The label field is user choice.
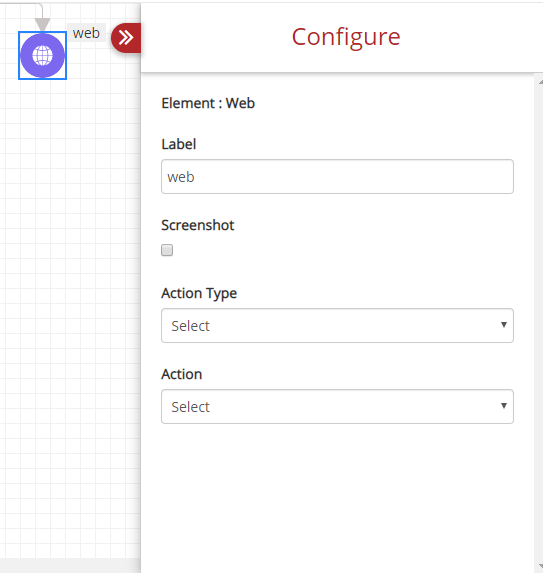
Fig. 5.16 Web Input
In Action Type, the following options are:
- Get Operations
- Set Operations
- Mouse Operations
- Keyboard Operations
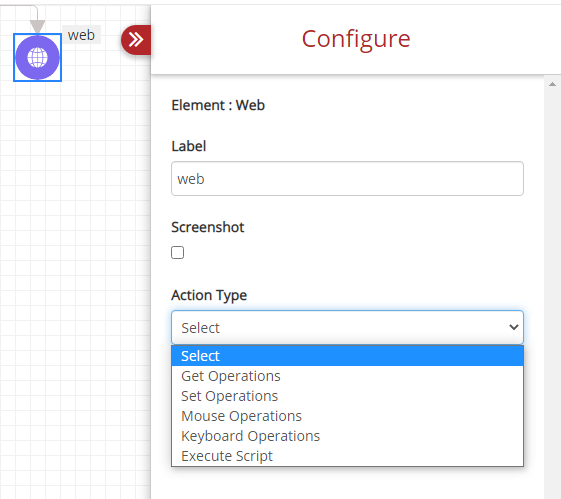
Fig. 5.17 Action Type
Each of these options are explained with its action-combinations below:
a. Get Operations: The below figure shows all the action-combinations available with Get Operations.
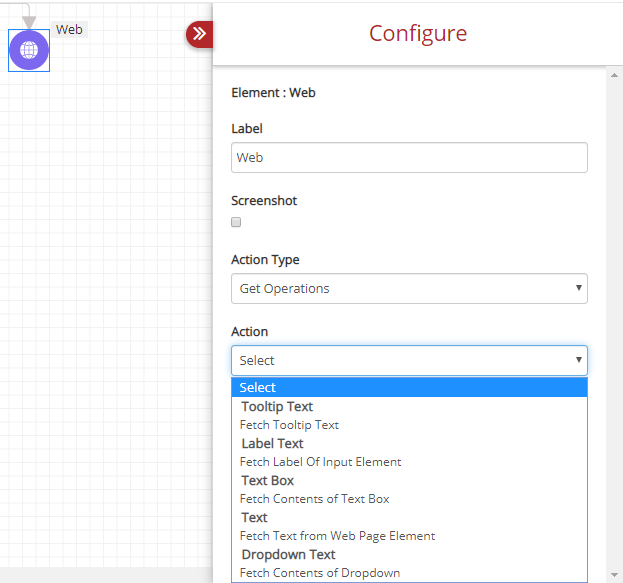
Fig. 5.18 Web Input Get Operations
Once you select Get Operations, you can select the following action-combinations from the Action drop-down.
- Tooltip Text: Fetch Tooltip Text: To fetch the Tooltip text from a web element.
- Radio Button Text: Fetch Radio Button Label: To fetch the details on the radio button label.
- Text Box: Fetch Contents of Text Box: To get contents from a text box.
- Text: Fetch Text from Web Page Element: To pull out text from a web page.
- Dropdown Text: Fetch contents of dropdown: To get contents from a drop-down menu.
- Set Operations: This action-combinations is used to set a value.
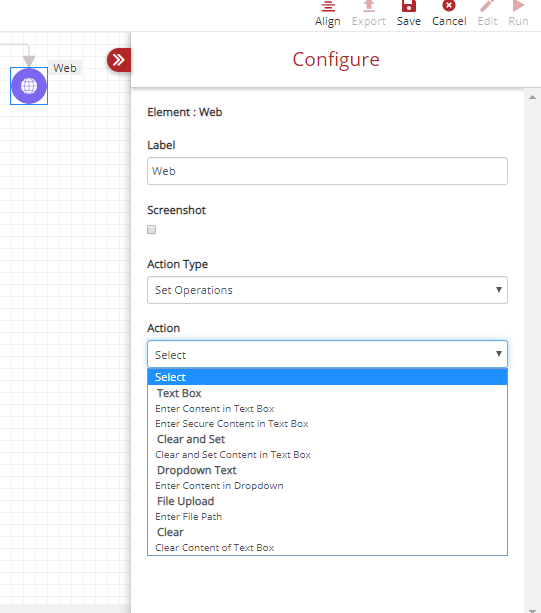
Fig. 5.19 Web Input Set Operations
Label and Screenshot option has the same functionality as before. Once you select Set Operations under Action Type, you have a list of action-combinations in the Action drop-down.
- Text Box
Text Box: Enter Content in Text Box: To enter custom text in a text box.
Text Box: Enter Secure Content in Text Box: To enter secure data like password.
- Clear and Set: Clear and Set Content in Text Box: To clear a text box and set the content.
- Dropdown Text: Enter Content in Dropdown: To enter content in the drop-down box.
- File Upload: Enter File Path: This option is to upload files.
- Clear: Clear Contents of Text Box: This is selected to clear the content of a text box.
- Mouse Operations: It has a range of action-combinations as shown below:
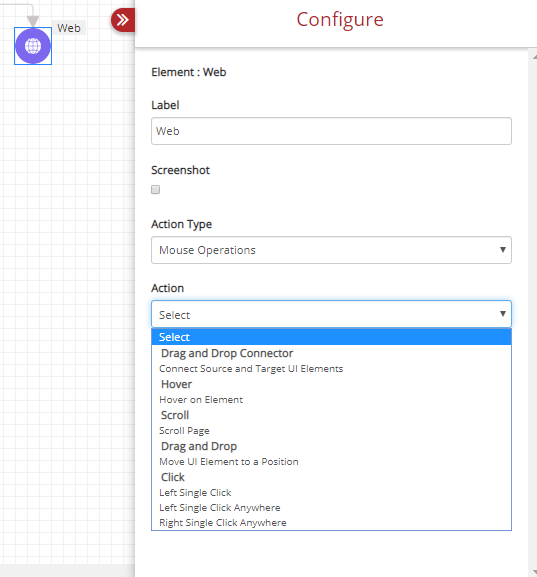
Fig. 5.20 Mouse Operations
- Drag and Drop Connector: Content Source and Target UI Element: This option allows users to Connect source and target UI elements.
- Hover: Hover on Element: To select or trigger an action when the cursor (mouse pointer) is over an element.
- Scroll: Scroll Page: To traverse up and down the pages.
- Drag and Drop: Move Ui Element to a Position: This option is used to move various UI elements to position, depending on your testing needs.
- Click: Click is a pressing action performed by a user. It has four options:
Click: Left Single Click
Click: Left Single Click Anywhere
Click: Right Single Click Anywhere
- Keyboard Operations: This has only one Action.
- Key: Press Key from Keyboard: This option selected to press any key from keyboard as shown below:
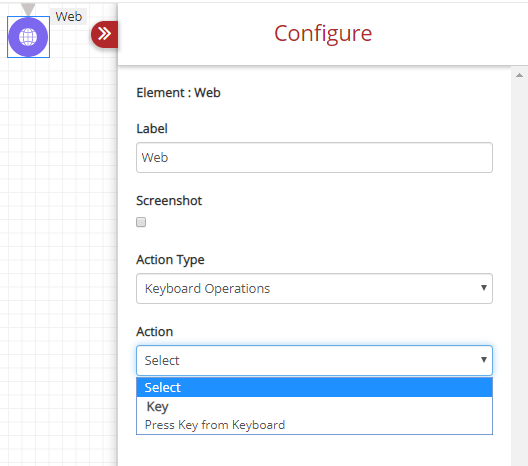
Fig. 5.21 Keyboard Operations
- Execute Script: It has only one Action.
- Execute: Execute Scripts: To execute the scripts as shown below:
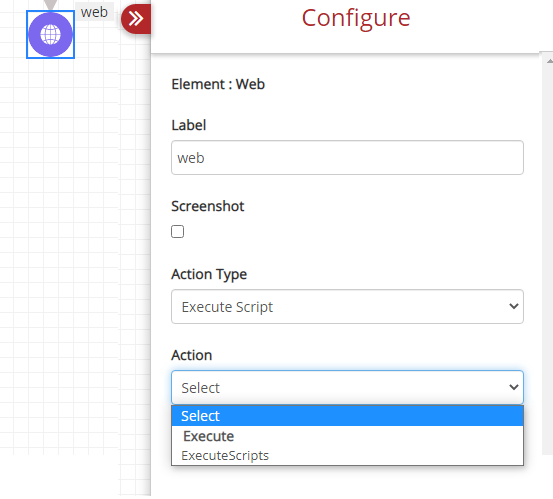
Fig. 5.22 Execute Script
This helps users to create an action to execute a selenium script. The steps to execute a selenium script is as shown below:
Step 1: Select the Start element.
- Label: A name for the element.
- Action Type: Initialize.
- Action: Users must select either Launch Chrome, Launch Firefox, or Launch Internet Explorer.
- Click on here to see the prerequisites for launching any browsers.
- Application Name: Provide the application name.
Note
The Application Name and the name given for the application in the selenium grid node has to be same.
Step 2: Select the Web element and provide each field with the following values:
- Label: A name for the element.
- Action Type: Execute Script.
- Action: ExecuteScripts.
- Map to Previous Step: Select the required mapping element.
- Script: Provide the required selenium script.
Step 3: Select Stop element.
Click Save and Run button to execute the test case. Click the report icon  on the test suite page for a quick view of the report.
Users can also view the detailed report with execution details by clicking the report icon from the homepage as shown below:
on the test suite page for a quick view of the report.
Users can also view the detailed report with execution details by clicking the report icon from the homepage as shown below:
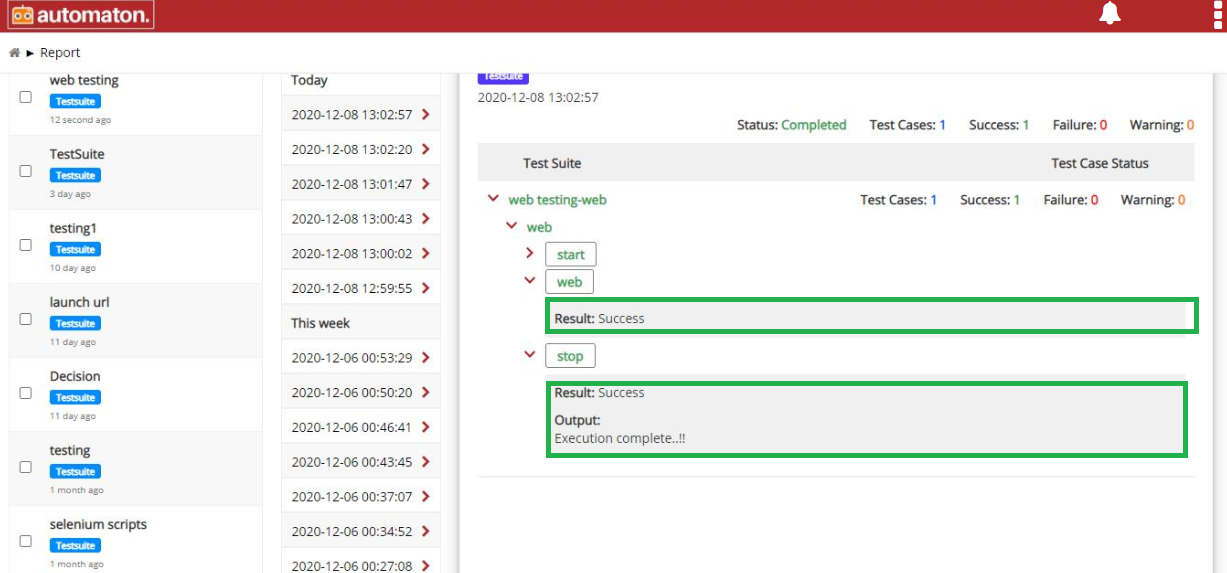
Fig. 5.23 Report Page of Execute Selenium Script
5.1.3. Process Element
This element allows you to perform many action-combinations as shown below:
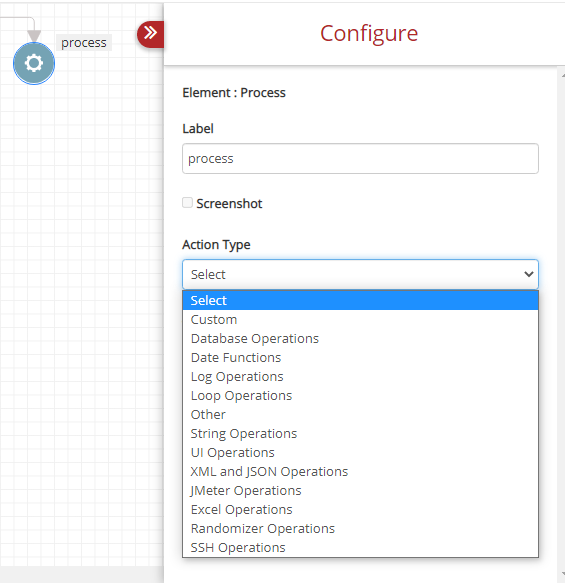
Fig. 5.24 Process Element
- Custom
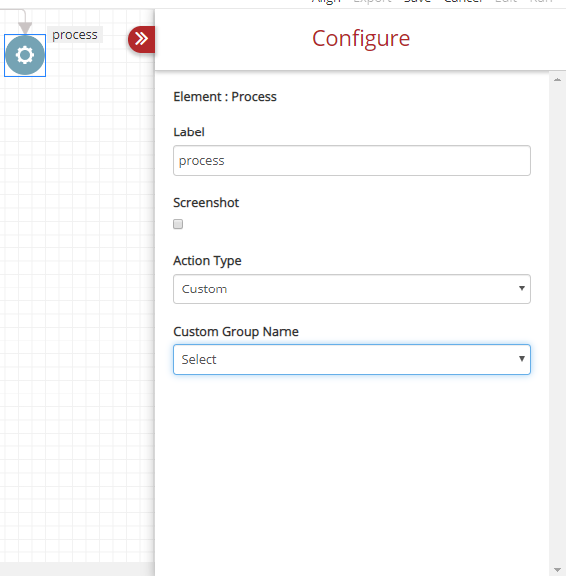
Fig. 5.25 Custom Action
You can use any name under Label for process element. If you want to take a screenshot, check the textbox on Screenshot. If the user chooses Custom under Action Type, the Custom Group Name, will list all the custom group names as shown below. The custom group names are created for each custom action on the Custom Action List page. Click on here to see how to create a custom action.
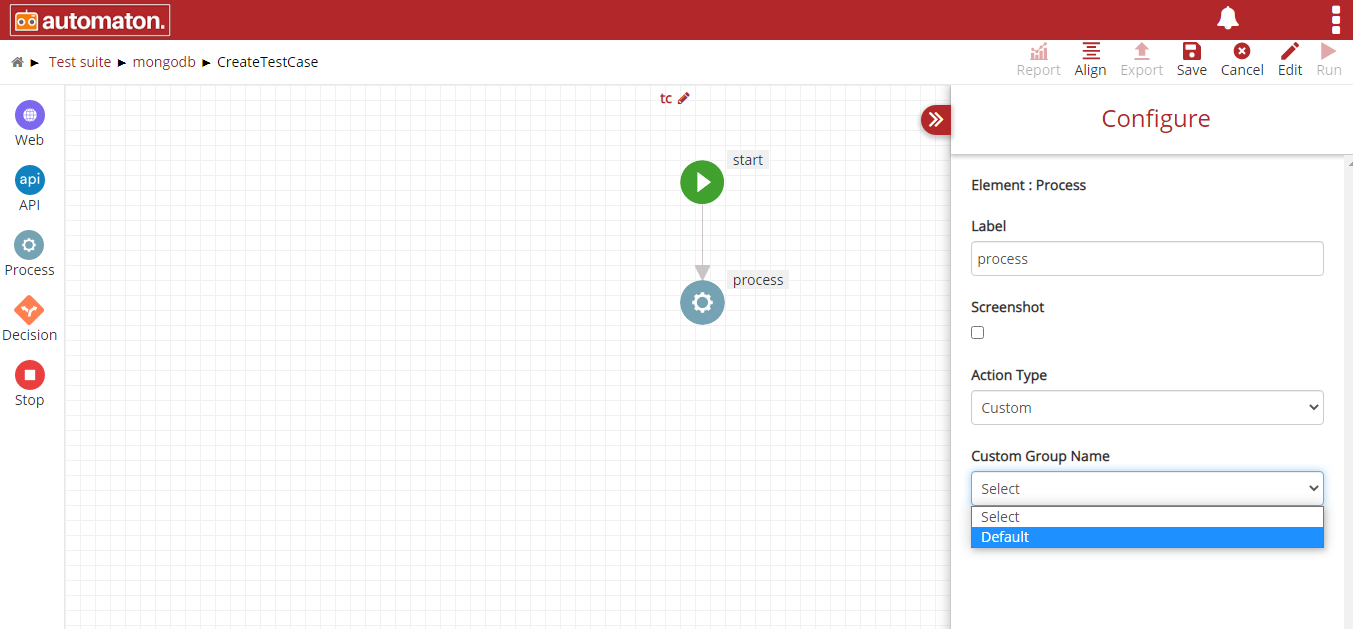
Fig. 5.26 Custom Group Name
On selecting a Custom Group Name the corresponding custom actions will be displayed under Action as shown below. Users can select any custom action.
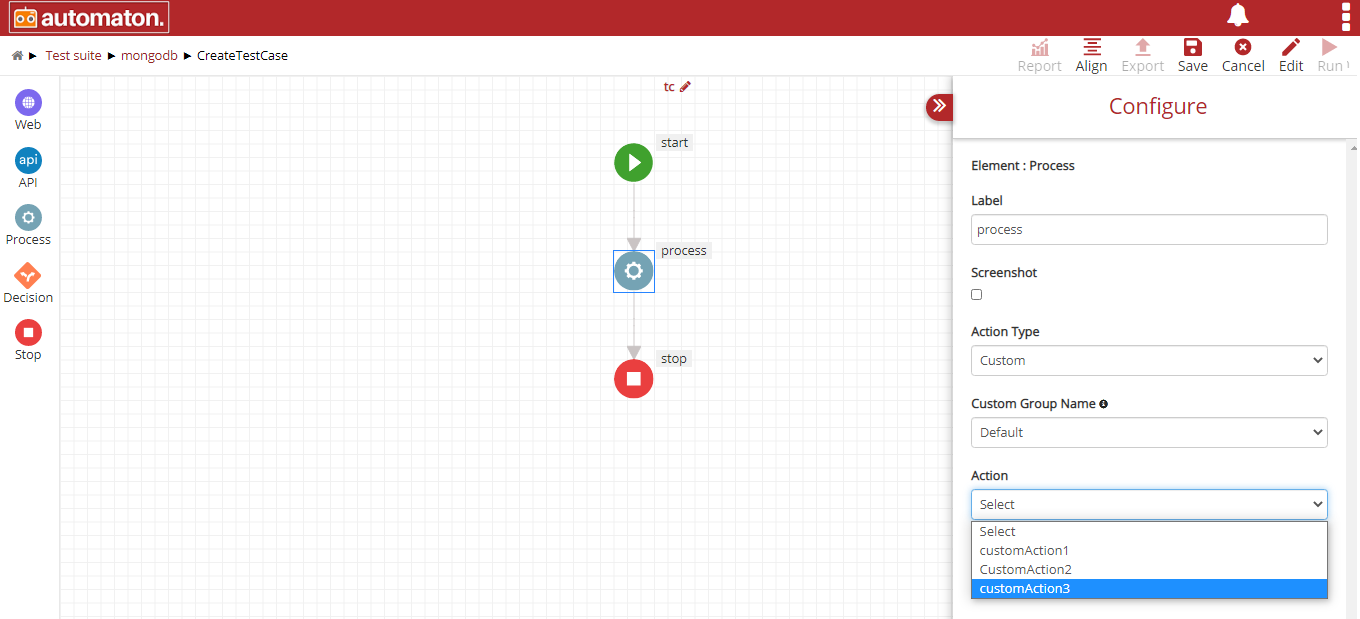
Fig. 5.27 Actions
Once the custom action is selected an Open Customaction link will be displayed as shown below:
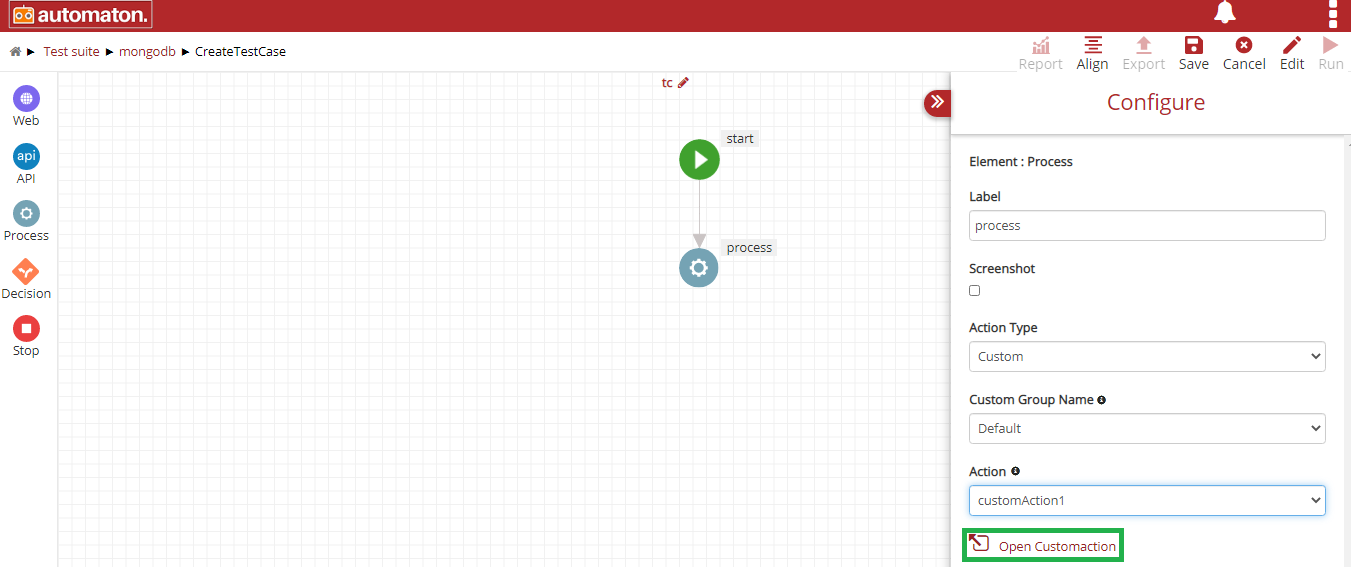
Fig. 5.28 Open Custom Action
Click the Open Customaction to display the Custom action flow as shown below:
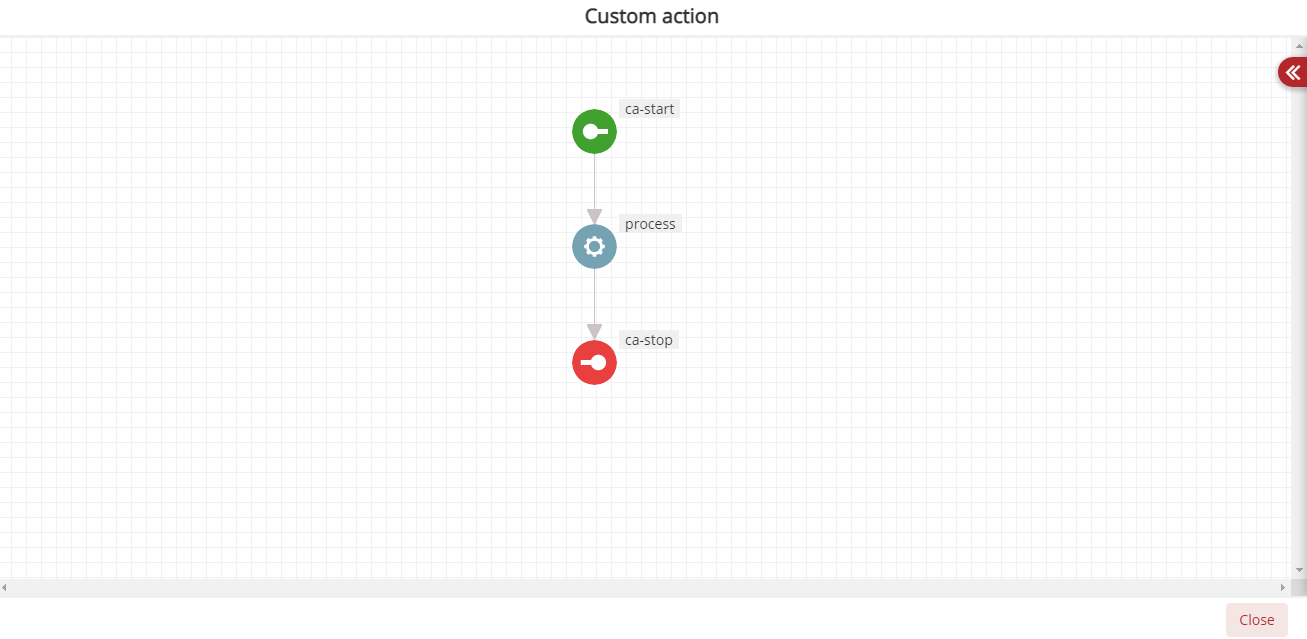
Fig. 5.29 Custom Action
Users can click any node except the Start and Stop. Here users can see the details in the non-editable mode except the drop-down fields (eg: Map to Previous Step). This helps users to cross the values provided in each field. If users want to modify any field value they have to navigate to the Custom page and modify. Click the process element to display the Configure panel to see the details as shown below:
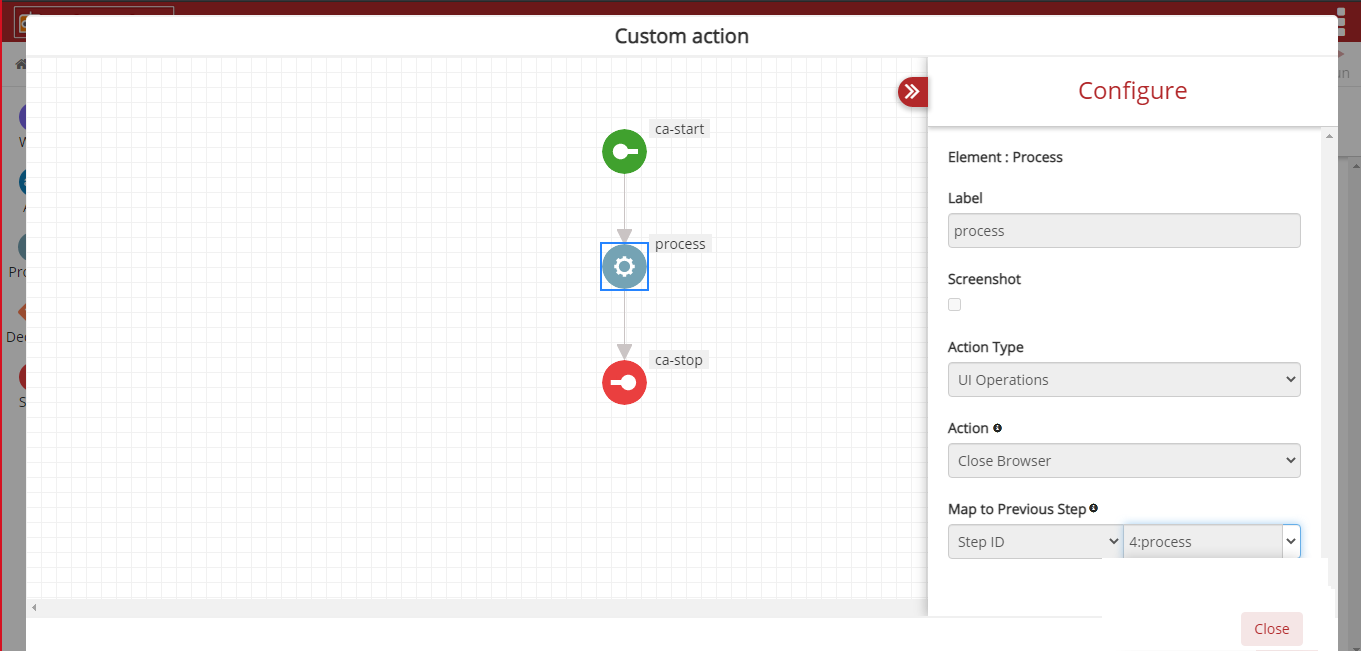
Fig. 5.30 Map to Previous
Map to Previous step will list all the elements id both from custom action as well as the test case. Here users can reassign to any other nodes.
- Database Operations
Next option you can select under Action Type is Database Operations as shown in the below figure. It gives you options such as Query, Connect and Column.
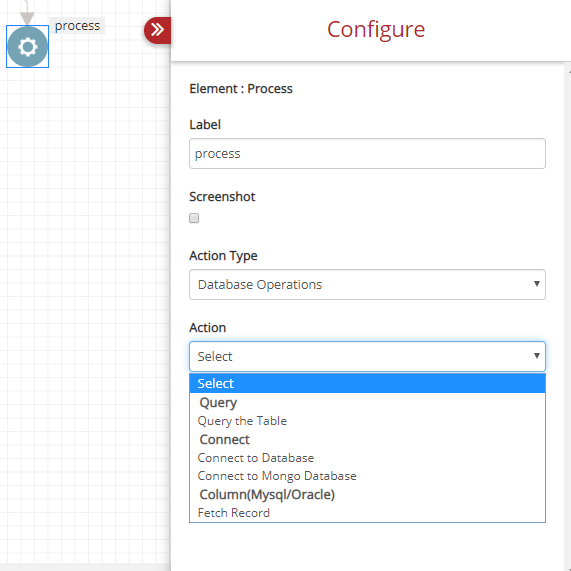
Fig. 5.31 Process Element DB Operations
- Query: Query the Table: It is used to make a query to the table.
- Connect: Connect option allows you to connect to the Database or Mongo Database.
Connect: Connect to Database: Enter the Connection URL and Driver Name as shown below: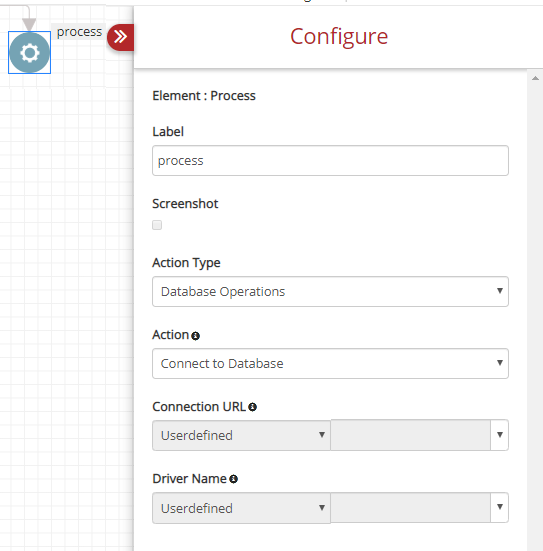
Fig. 5.32 Connect to Database
Connect: Connect to Mongo Database: Enter the Mongo database URL as shown below: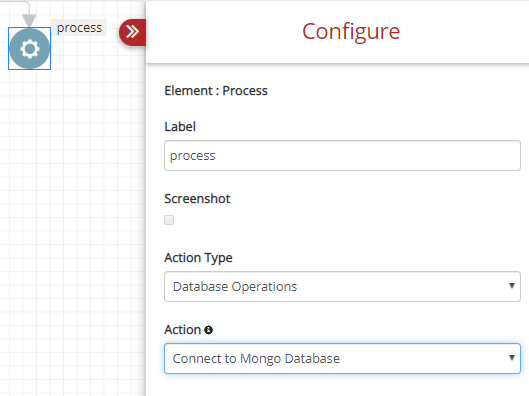
Fig. 5.33 Connect to Mongo database
- Column: Fetch Record: The column is selected to fetch records.
- Date Functions: This has many action combinations as shown below:
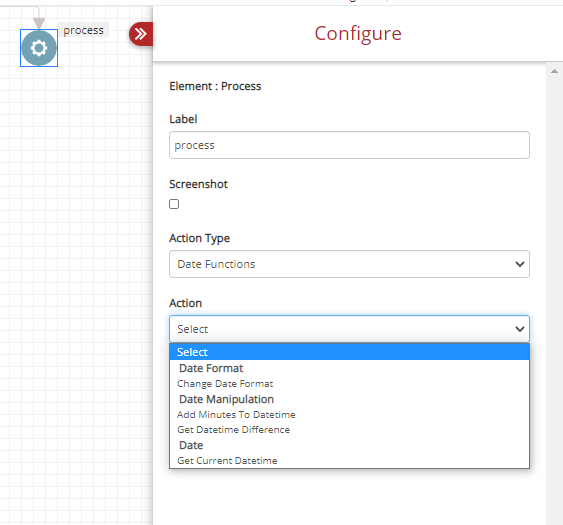
Fig. 5.34 Process Element Date Functions
- Date Format: Change Date Format: This action type allows user to change the date format as shown below:
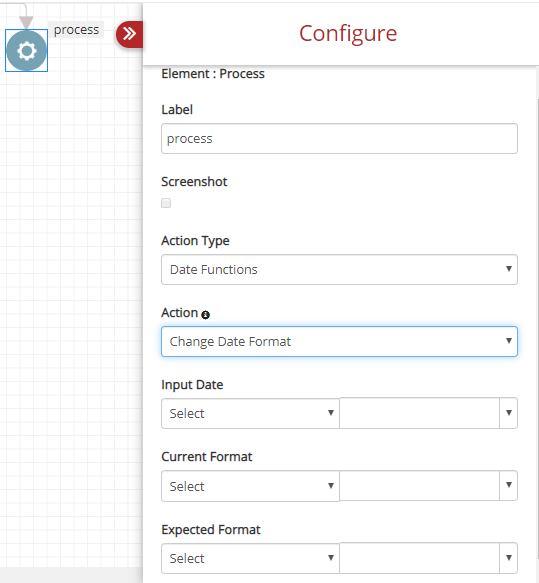
Fig. 5.35 Change Date Format
Enter the Input Date, and the current date format under Current Format. Enter the expected date format under Expected Format.
Data Manipulation: It has two options Add Minutes To DateTime and Get DateTime Difference.
Data Manipulation: Add Minutes To DateTime: Select Add Minutes To DateTime to fetch the date time after adding minutes to the current date time as shown below:
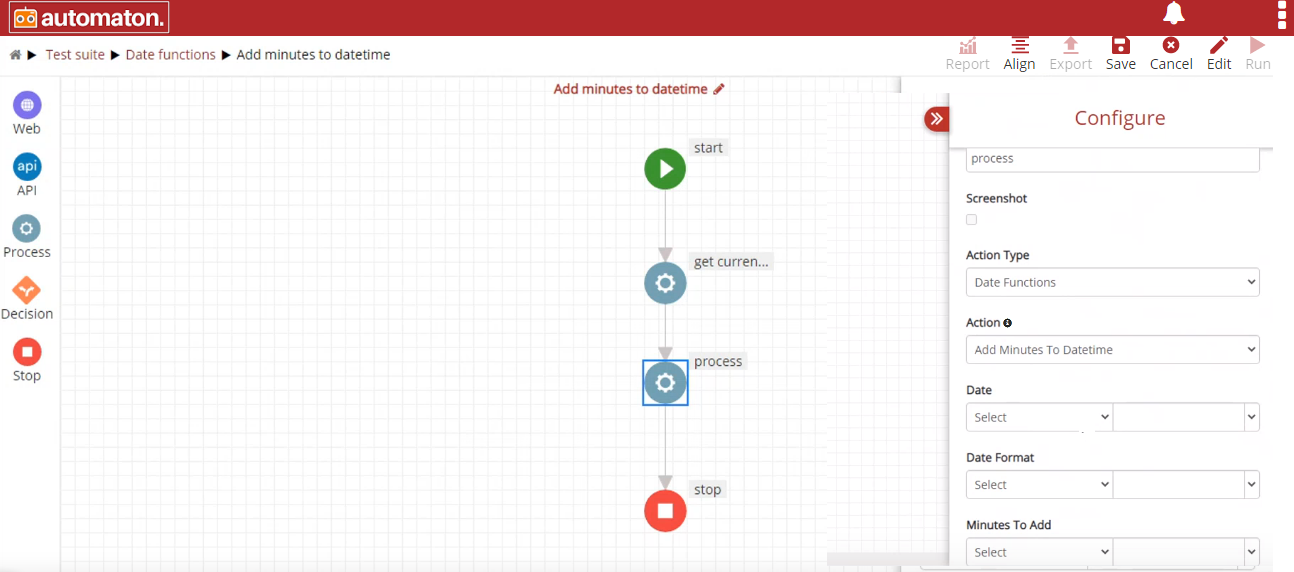
Fig. 5.36 Add Minutes to Date Time
For the fields Date, Date Format, Minutes To Add users can select any one of the options:
Step-ID: To fetch data from the previous step.
Userdefined: To define the format.
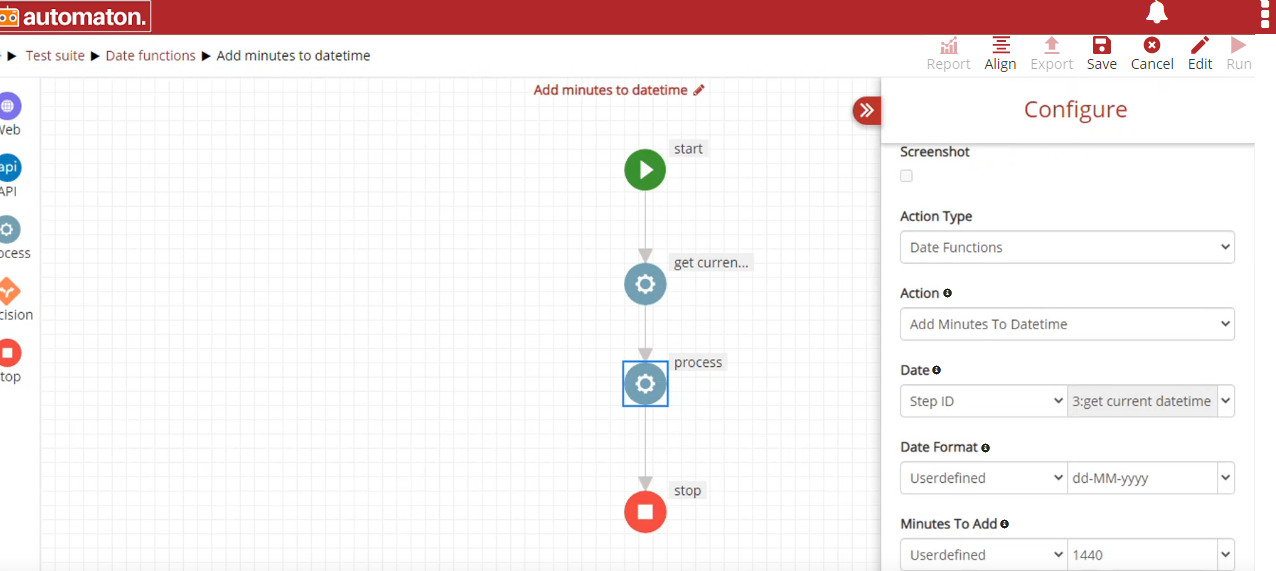
Fig. 5.37 Add Minutes to Date Time with Value
Note
Minute To Add value must be a positive integer and the value must be given in minutes.
Click Save and Run button to execute the test case. Add Minutes To DateTime function will add the values given in the Minutes To Add field with the value given in the Date field and the result will be displayed in the date format given in the Date Format field. Click the report icon
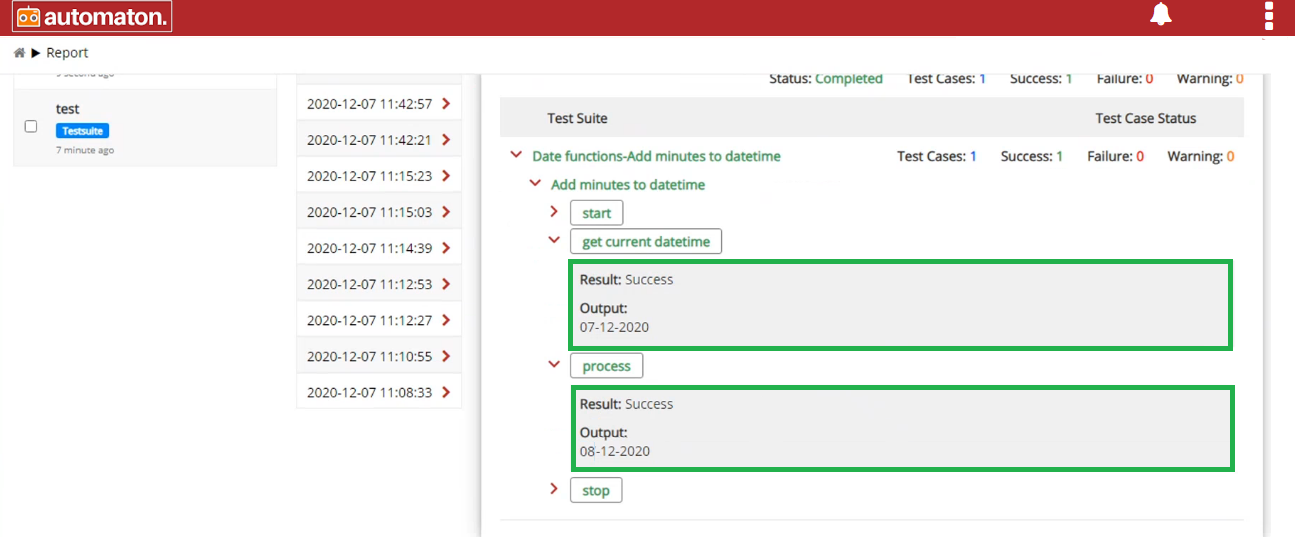
Fig. 5.38 Report Page of Add Minutes to Date Time
On the above example Date: Step-Id of 3(07-12-202)+ Minutes To Add: 1440(24 hours) is 08-12-2020 in the date format specified in the Date Format field.
Data Manipulation: Get DateTime Difference: Select Get DateTime Difference to calculate datetime difference as shown below: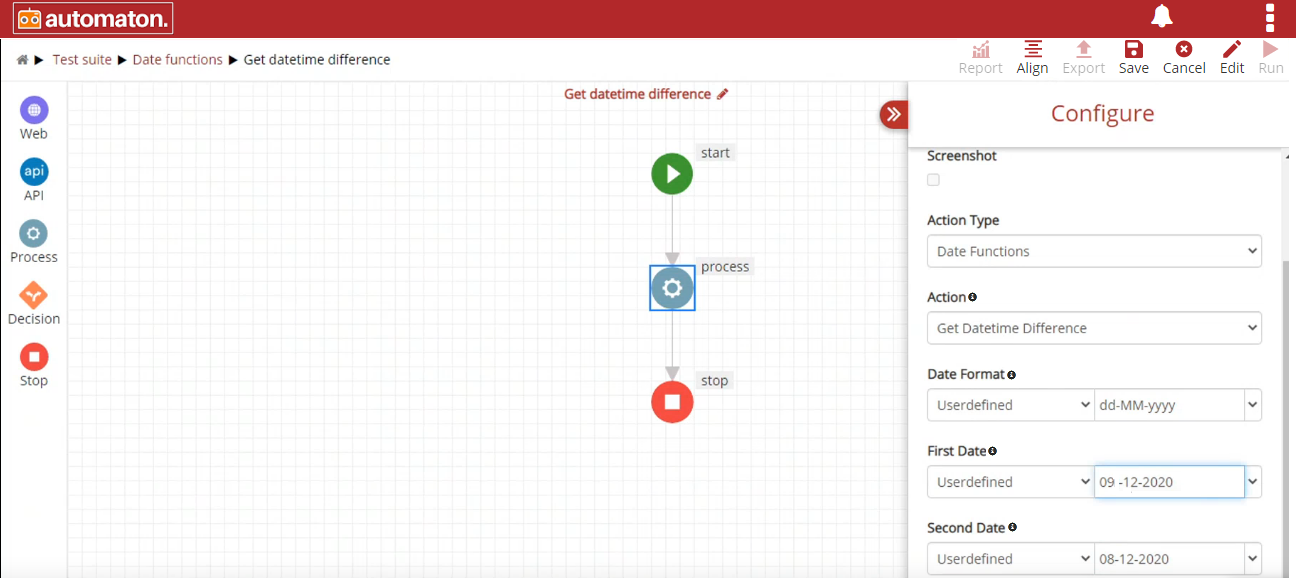
Fig. 5.39 Date Time Difference
For the fields Date Format, First Date, Second Date users can select any one of the options:
Step-ID: To fetch data from the previous step.
Userdefined: To define the format.
The Get Datetime Difference function will find the difference between the First Date and Second Date. Click the report icon
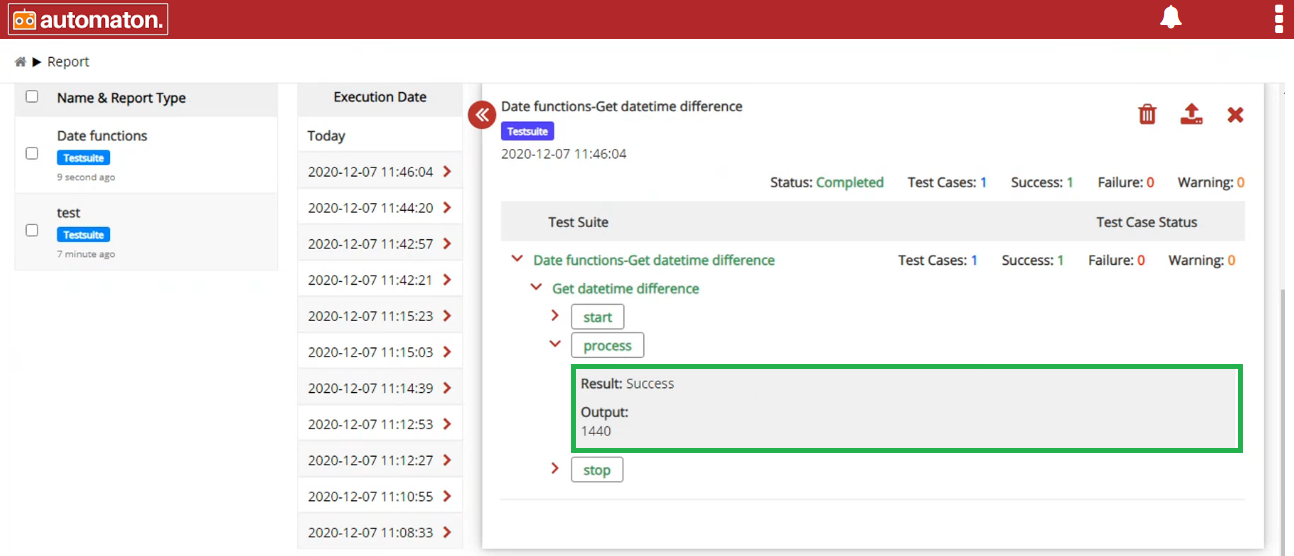
Fig. 5.40 Report Page of Date Time Difference
Note
The comparison result will be always a positive number.
Date: It has only one option Get Current DateTime.
Date: Get Current DateTime: Select Get Current DateTime to fetch the current date and time as shown below:
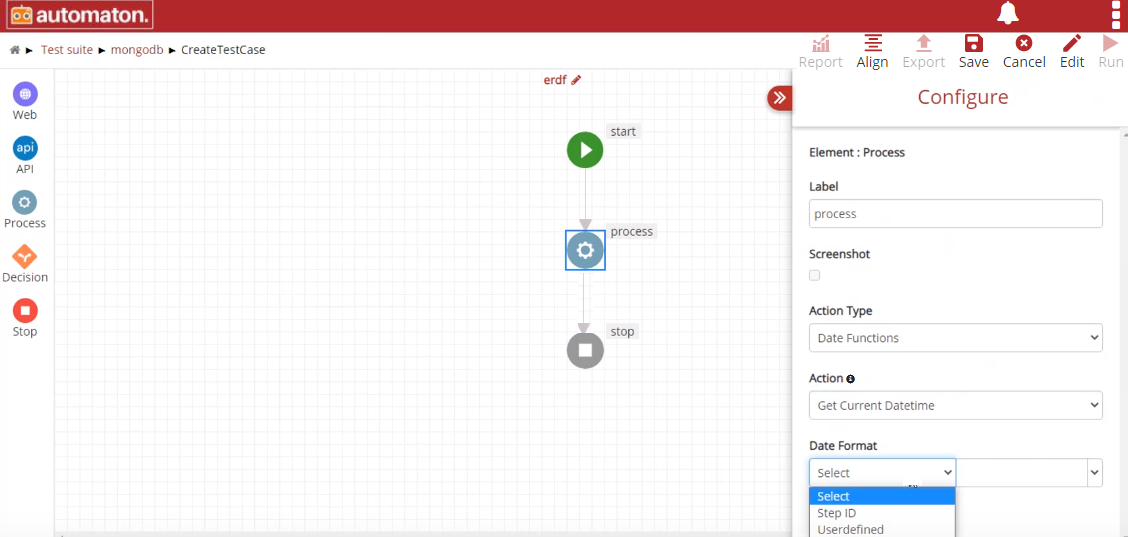
Fig. 5.41 Current Date Time
In the Date Format field, users can select Step-ID or user defined.
If Step-ID is chosen, then users have to select any previous step id from the current element.
If Userdefined is chosen, then users have to provide the format for the date and time.
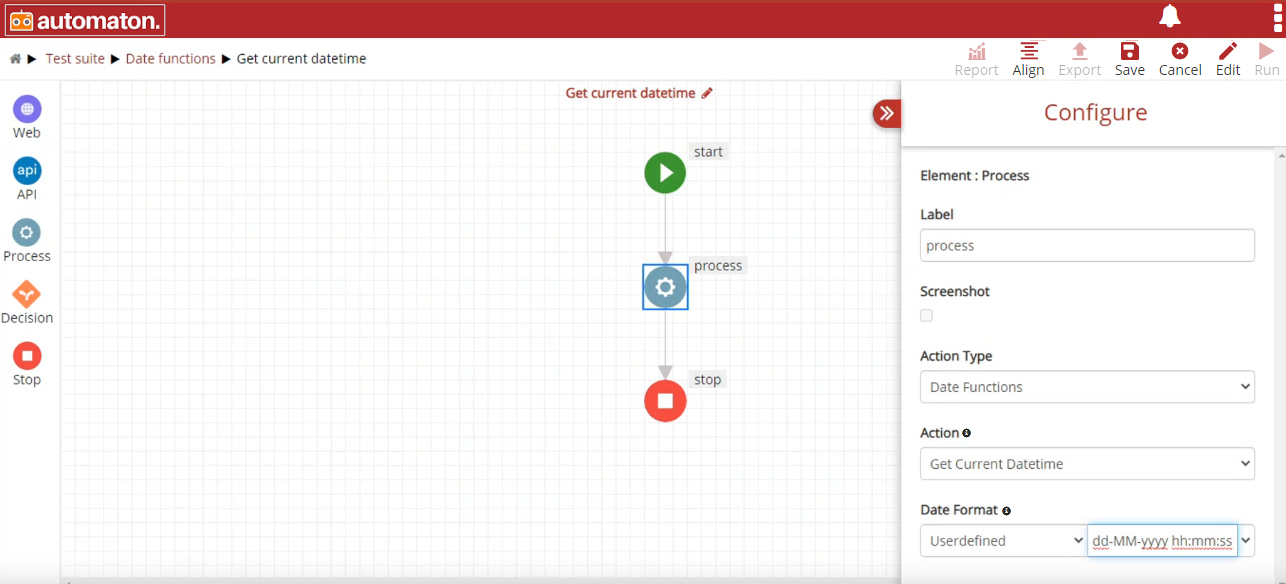
Fig. 5.42 Userdefined Current Date Time
Note
Users can provide any format for date and time.
Click Save and Run button to execute the test case. Click the report icon on the test suite page for a quick view of the report.
Users can also view the detailed report with execution details by clicking the report icon from the homepage as shown below:

Fig. 5.43 Report page of Current Date Time
- Log Operations: This allows users to search for a phrase or a key value. The Action combination of Log Operations are:
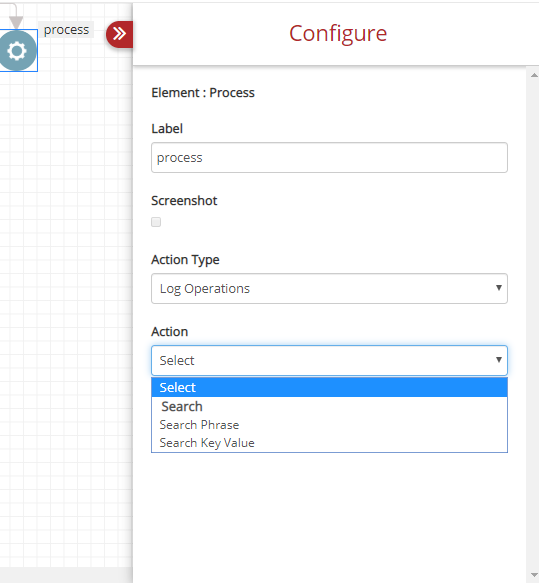
Fig. 5.44 Process Element of Log Operations
- Search: Search Phrase: To search a phrase as shown below:
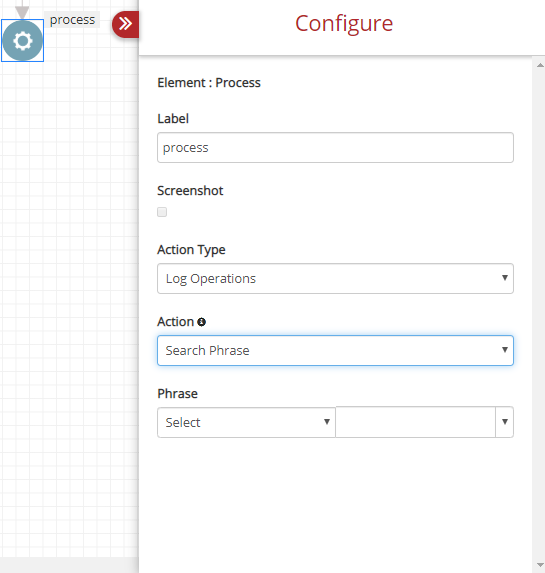
Fig. 5.45 Search Phrase
You can enter the term under Phrase.
- Search: Search Key Value: To search for a key value.as shown below:
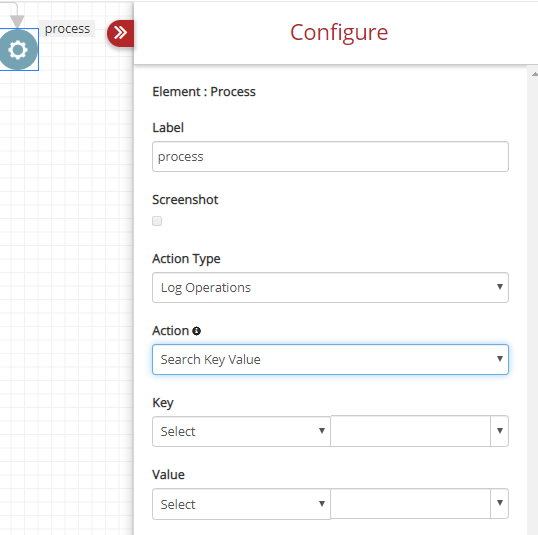
Fig. 5.46 Search Key Value
Enter the Key and Value in the respective columns to perform the search.
- Loop Operations: To perform various loop functions. You have two options to choose under Action.
- Loop: Iterate Over Set Values Using Loop.
- Loop: Iterate Over List Using Loop.
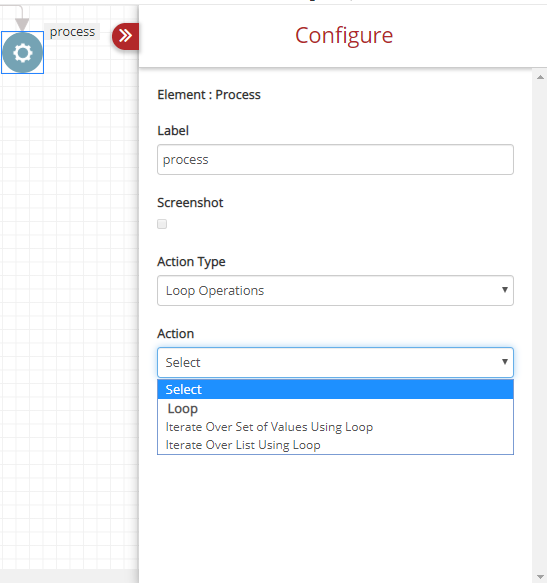
Fig. 5.47 Process Element Loop Operations
- Other: Other refers to a couple of action-combinations displayed.
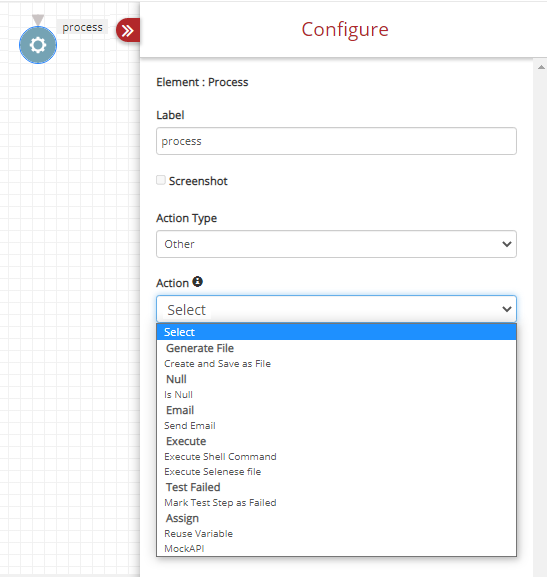
Fig. 5.48 Process Element Other
The options under Other are listed below:
- Generate File: Create and Save as File: This option is selected to generate a file and save it.
- Null: Is Null: This option is selected to check previous element value is null or not.
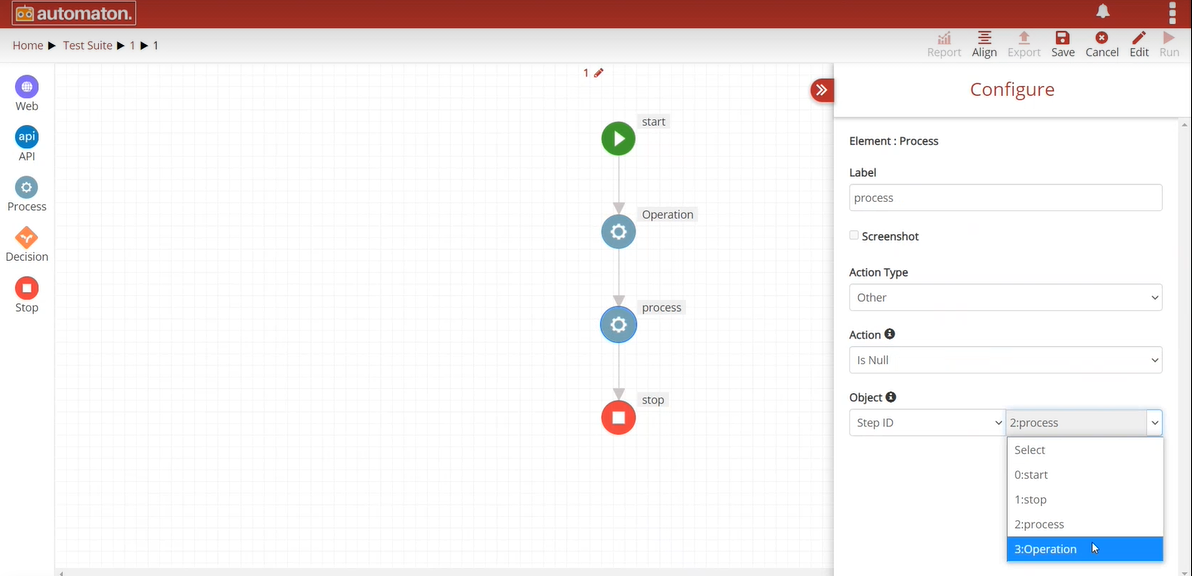
Fig. 5.49 Is Null
Here user must select a Step ID and it will check the element corresponding to that step id is returning null or not. On the above figure Process element will check the Operation element is returning null or not.
- Email: Send Email: Select the Send Email option to send mail through an action. To perform this action, users must provide the values for each field as shown below:
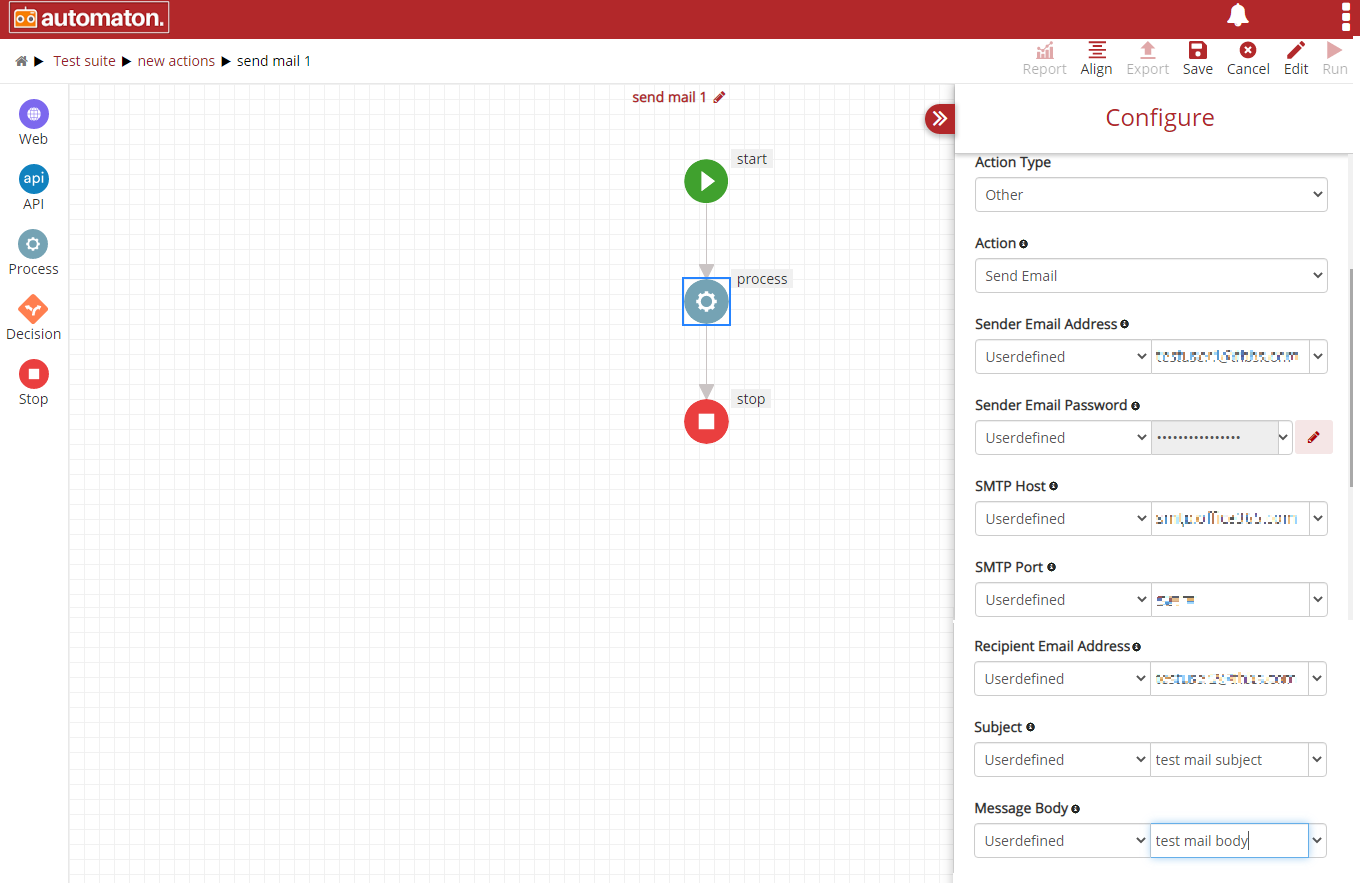
Fig. 5.50 Send Mail
Note
The Email-id and Password will be encrypted and stored in the database to ensure the confidentiality of information.
Once the user provides all the information click the Save and Run button to execute the test case. Click the report icon
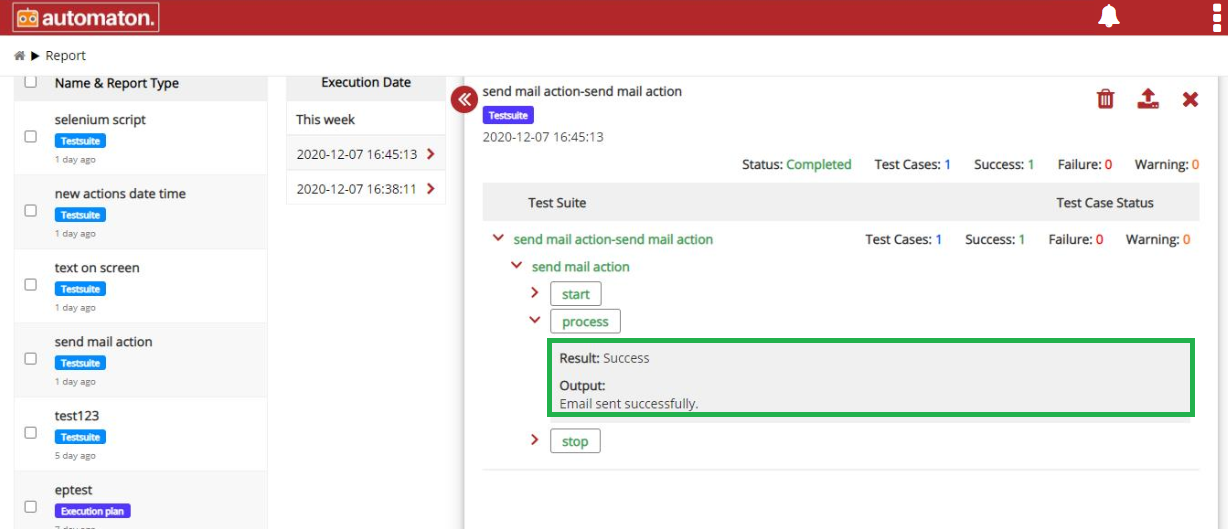
Fig. 5.51 Report Page of Send Mail
- Execute: Execute Shell Command: Users can select this option to execute a shell command.
- Execute: Execute Selense file: Users can select this option to perform web testing of recorded interactions. Using this users will be able to record the user interactions with websites using certain browser plugins like selenium ide,katalon recorder etc. This will be saved as side/selenese files. The steps to perform the same with selenium ide is as shown below:
Step1: Click the https://chrome.google.com/webstore/detail/selenium-ide/mooikfkahbdckldjjndioackbalphokd?hl=en link to download Selenium IDE extension.
Step 2: Click the extension, Welcome to Selenium IDE dialog will be displayed as shown below:

Fig. 5.52 Selenim IDE
Step3: Select an option from the above-listed options under ‘What would you like to do?’. Here we have selected Record a new test in a new project.
Step 4: Enter the Project name as shown below:
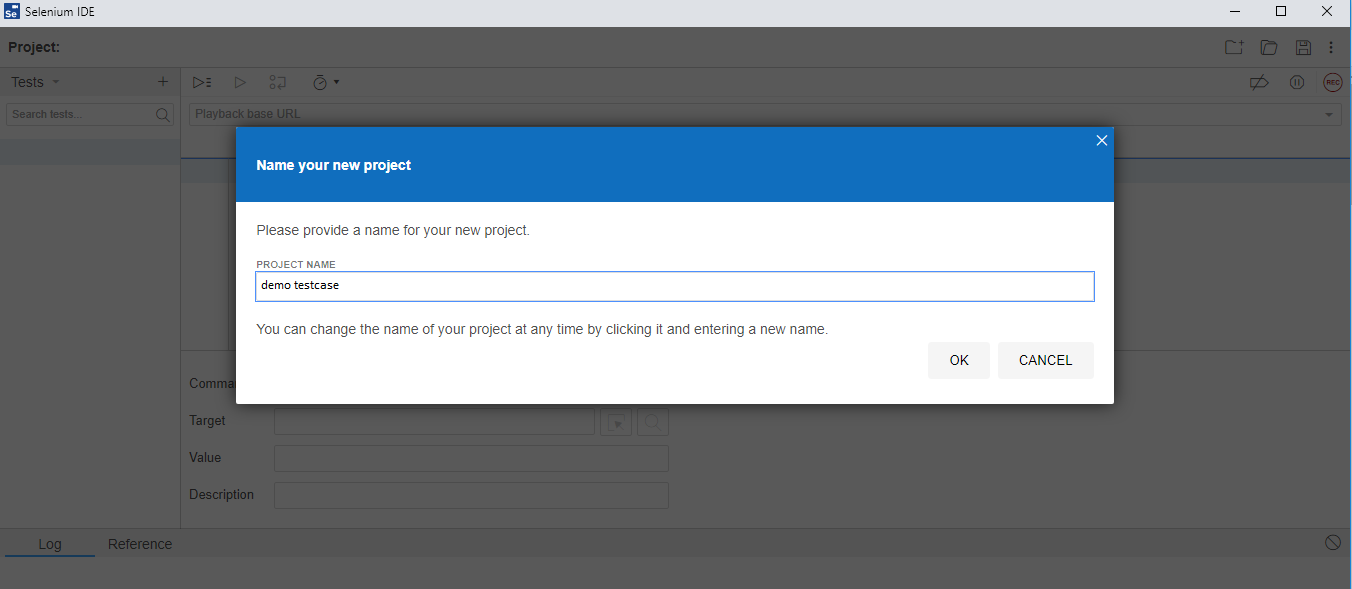
Fig. 5.53 Project Name
Step 5: Enter the URL of the website for which the recording needs to be done as shown below: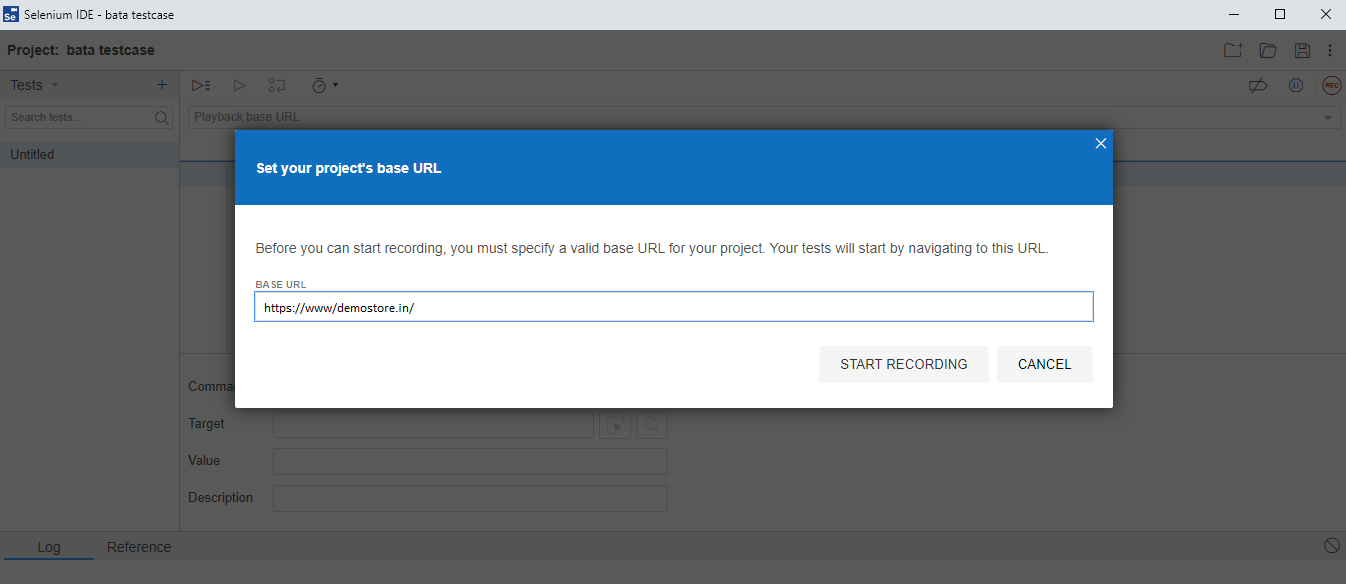
Fig. 5.54 Base URL
Click the Start Recording button to record the action or Cancel to exit. Once the user clicks the Start Recording button, it will navigate to the URL specified in the BASE URL in the Set your project’s base URL dialog as shown on the above figure. Users can perform the required action and click stop recording.
Fig. 5.55 URL for Recording
Once the recording is stopped it will display all possible IDs of the clicked events and it will be saved in Selenium IDE.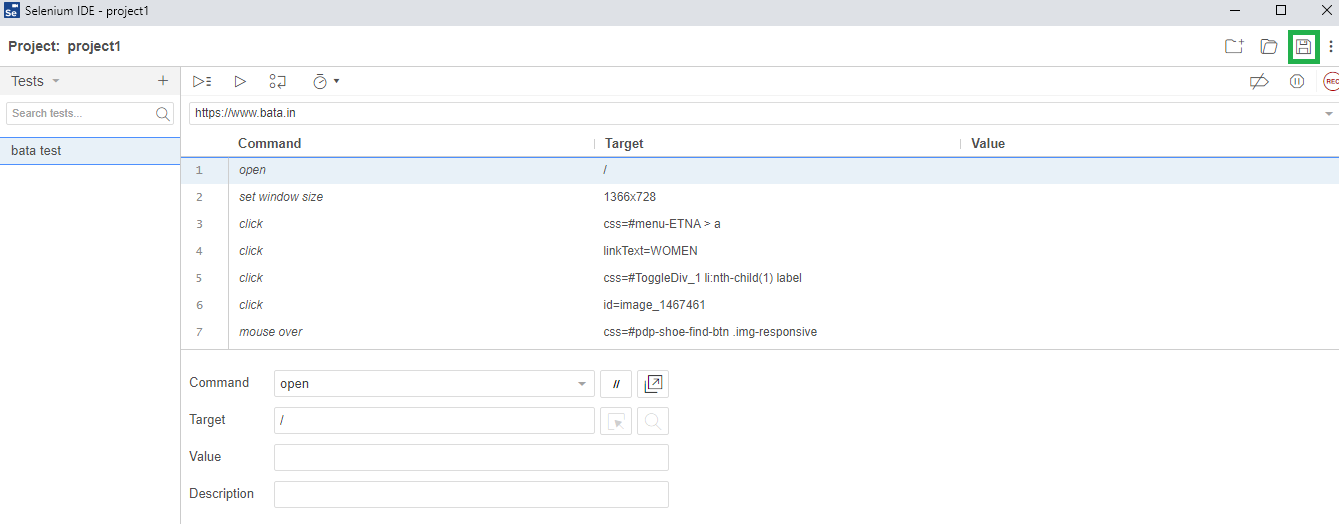
Fig. 5.56 Xpath & IDs
Step 6: Click the Save button to save the file. Users must specify the location (D>New folder). The file will be saved with a side extension(.side).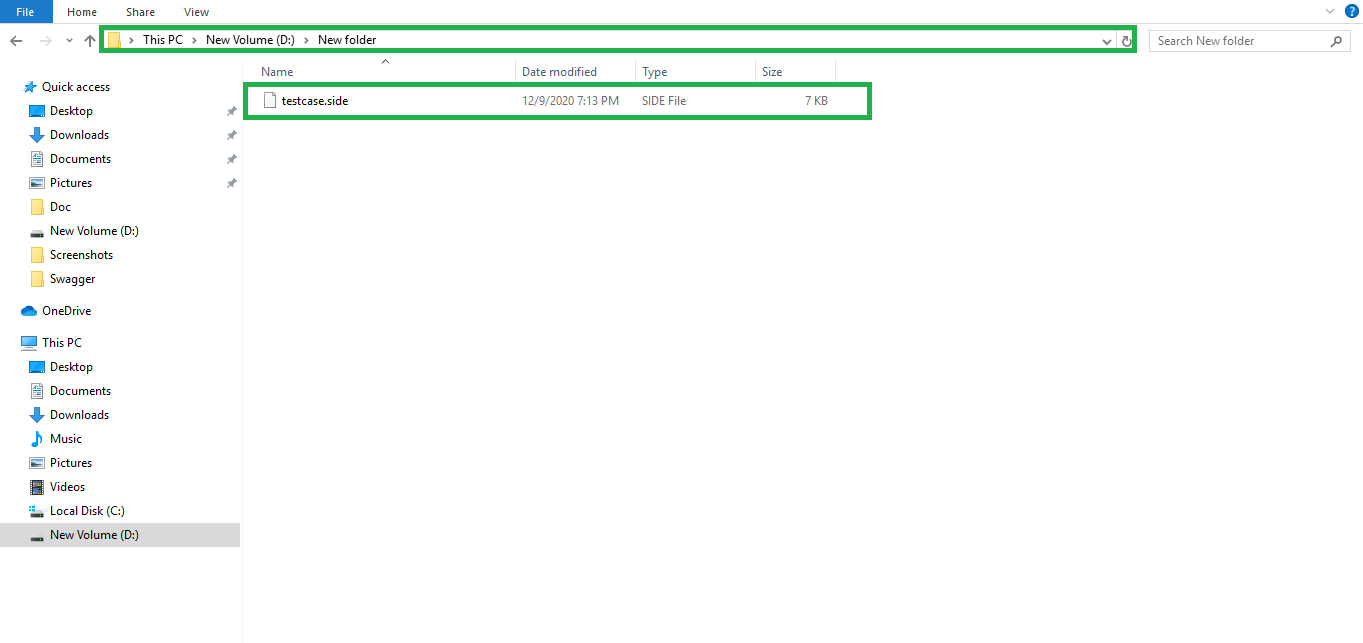
Fig. 5.57 Saved Selenium IDE
In Automaton, navigate to the respective test case and provide the values for each field as shown below:
- Action Type: Other.
- Action: Execute Selense file.
- File Path: The location where the side is saved (on the above example D>New folder) as shown below:

Fig. 5.58 Selenium IDE Test Case
Click Save and Run button to save and execute the test case. Click the report icon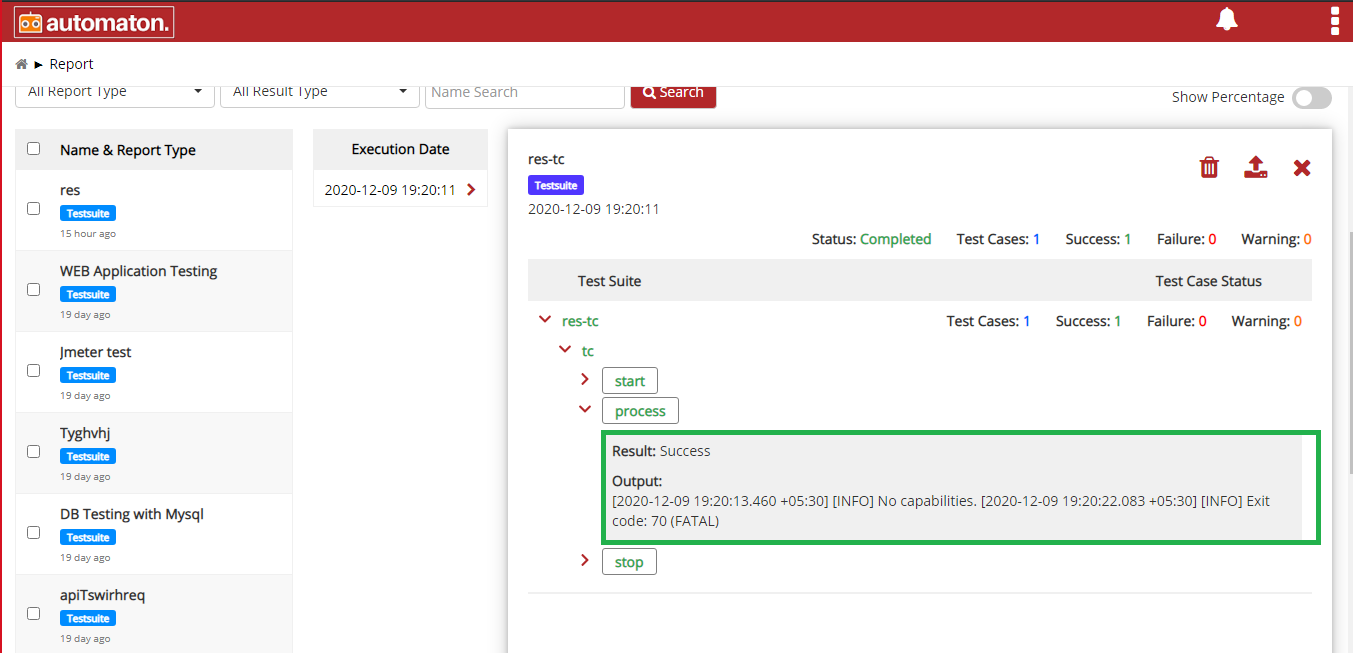
Fig. 5.59 Report page of Selenese
- Test Failed: Mark TestStep as Failed: Depending on your testing requirements, you can mark a test step as ‘failed’ if needed.
- Assign:
Resuse Variable: Assign is selected to reuse variables.
Mock API: This API element to mock api data and responses.
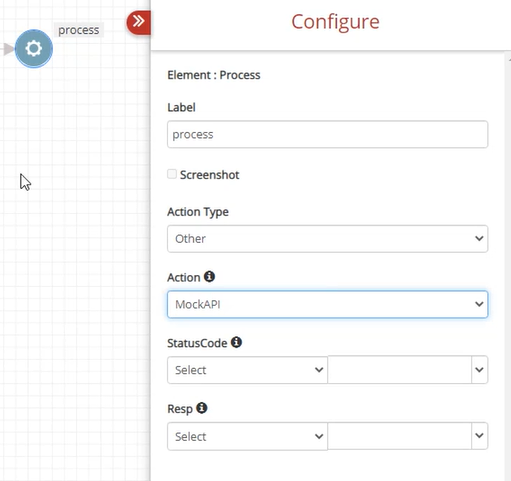
Fig. 5.60 Mock API
Here users can choose the Step ID or Userdefined for Status code and Response. Select the Step ID if the user wants to mock other elements output in the Status Code or Response. Select user-defined , if the user wants to mention the desired the status code or response.
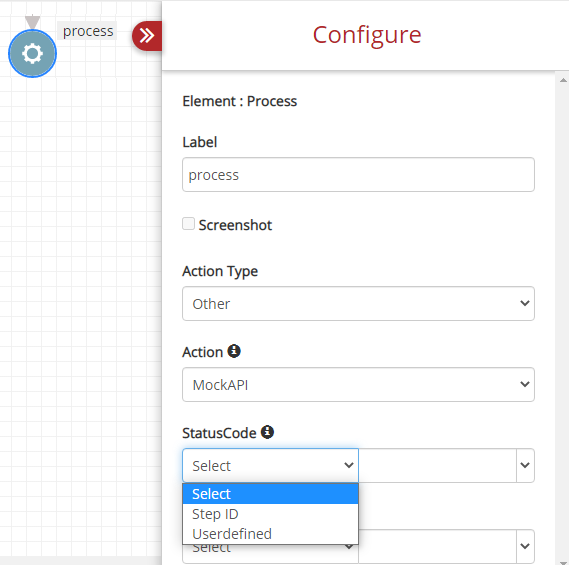
Fig. 5.61 Mock API User Defined
For example, if the user chooses Userdefined he can provide required info in Status Code and Response that will be displayed when it hit that particular endpoint.
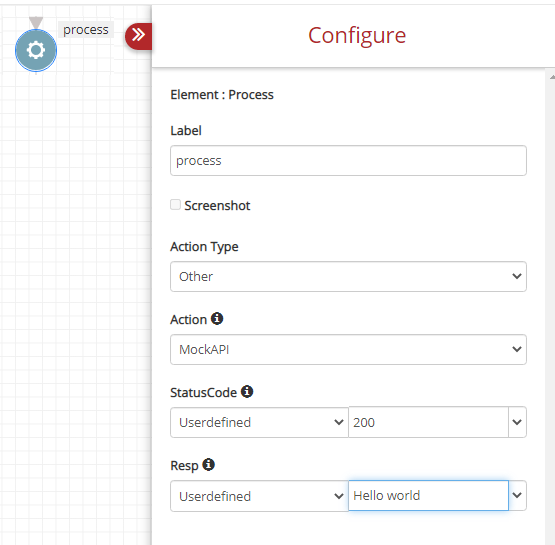
Fig. 5.62 Mock API User Defined
Click Save and Run button to execute the test case. Click the report icon
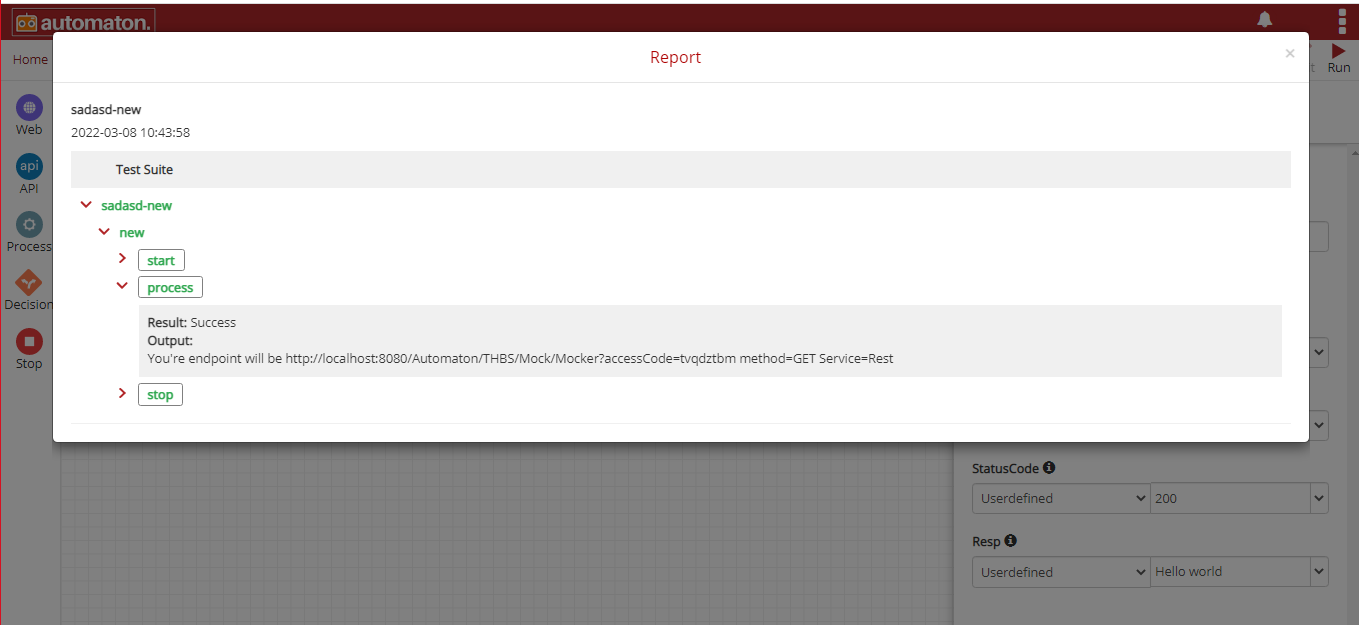
Fig. 5.63 Report Page of User Defined Mock API
If the user copies the URL and hit in the browser, it will display the content we have given in the browser as shown below:
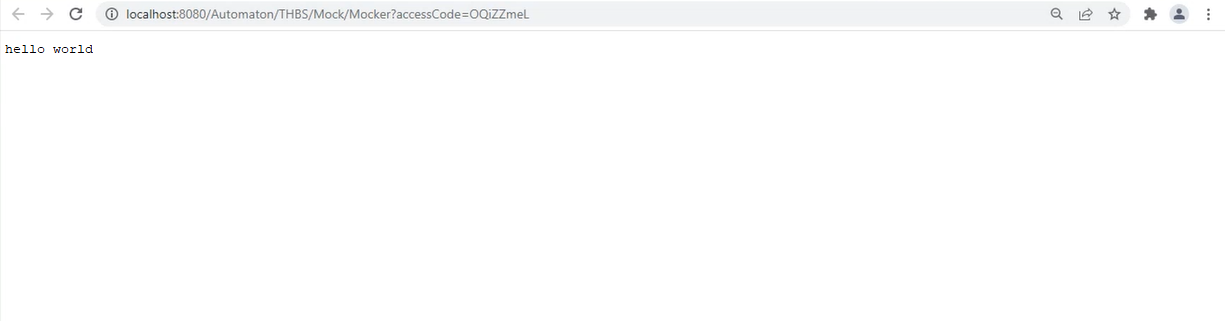
Fig. 5.64 Mock API Output
- String Operations: String Operations allows you to perform different types of string operations.
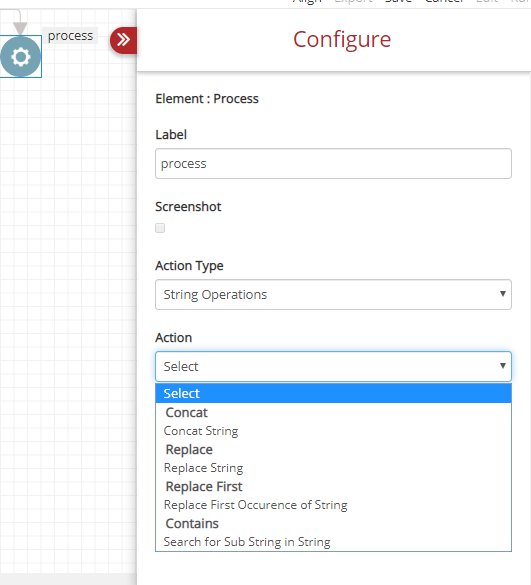
Fig. 5.65 Process String Operations
- UI Operations
UI Operations has a comprehensive range of action-combinations that are categorized under Open Driver, Window, Alert Options, Open URL, Take Screenshot, Switch To, Close, Image, Open Browser and Wait as shown in the below figures.
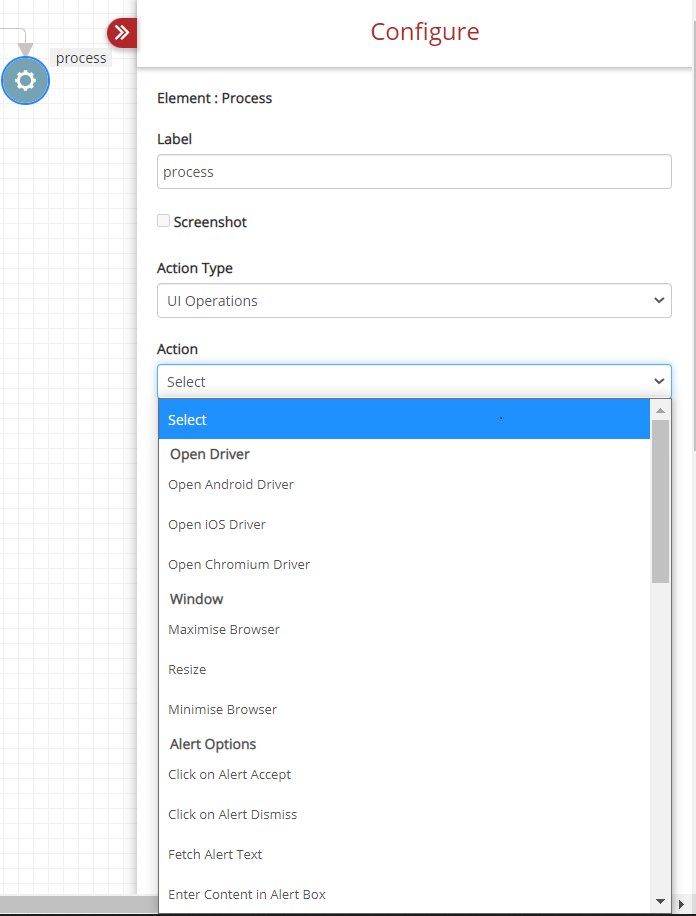
Fig. 5.66 UI Operations 1
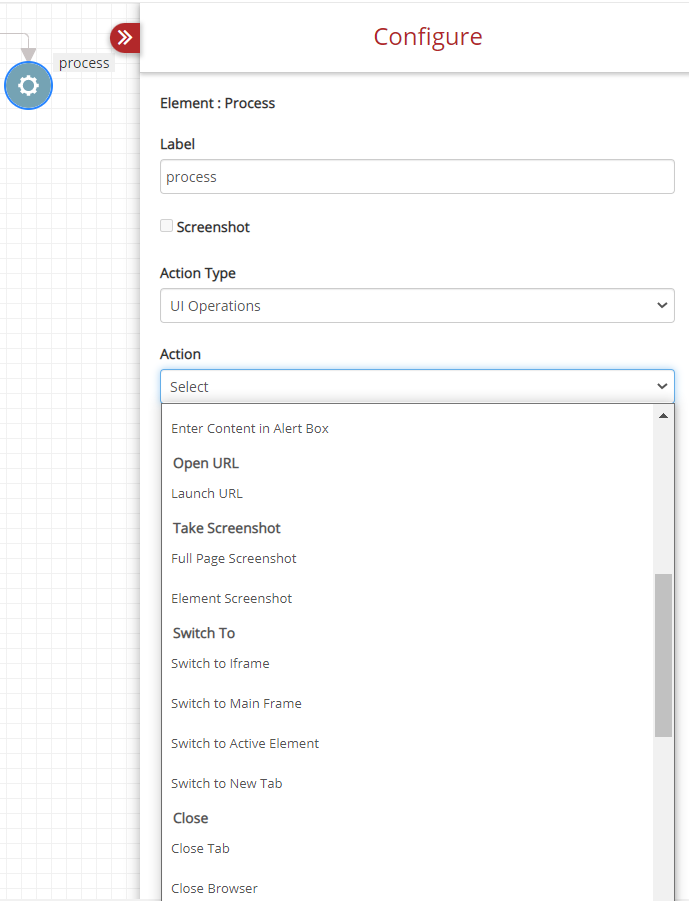
Fig. 5.67 UI Operations 2
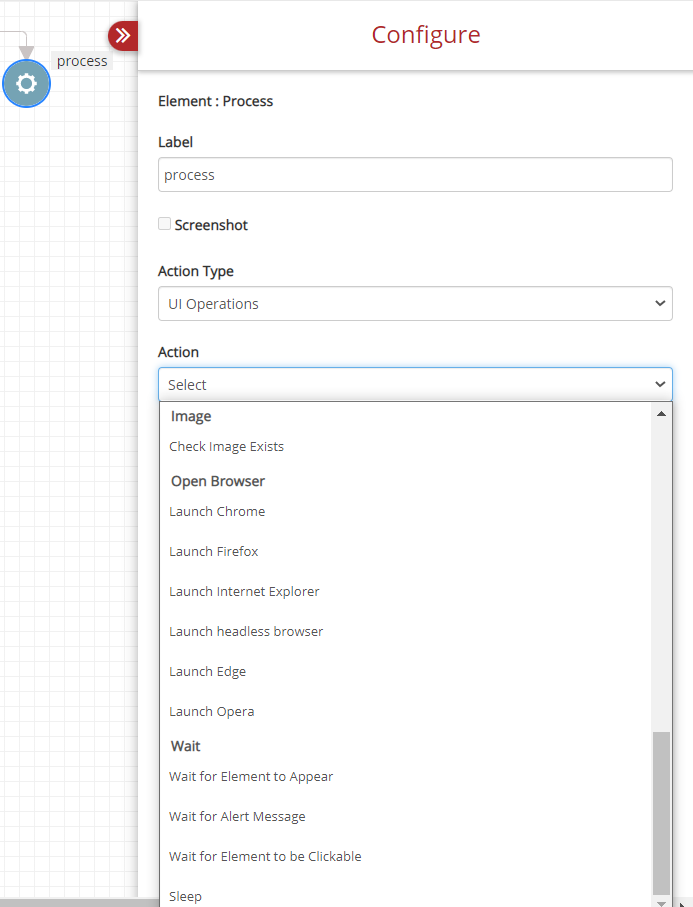
Fig. 5.68 UI Operations 3
Various Action-combinations of UI Operations can be seen in figures UI Operations 1, UI Operations 2 and UI Operations 3.
- Open Driver: Open Driver is used for mobile testing.It has two options.
Open Driver: Open Android Driver. Once the user selects this option the Configure dialog is as shown below: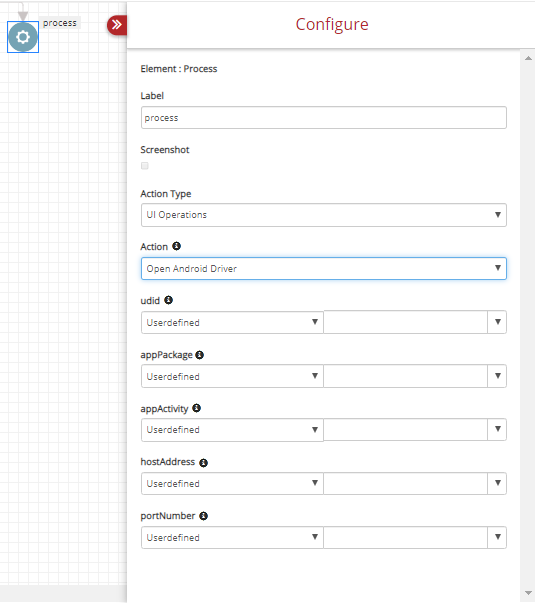
Fig. 5.69 UI Ops Open Android Driver
You need to fill the information such as udid (Unique device ID), appPackage details, appActivity, host address and port number. This is discussed in detail in the Mobile Testing section.
Open Driver: Open iOS Driver. Once the user selects this option the Configure dialog is as shown below: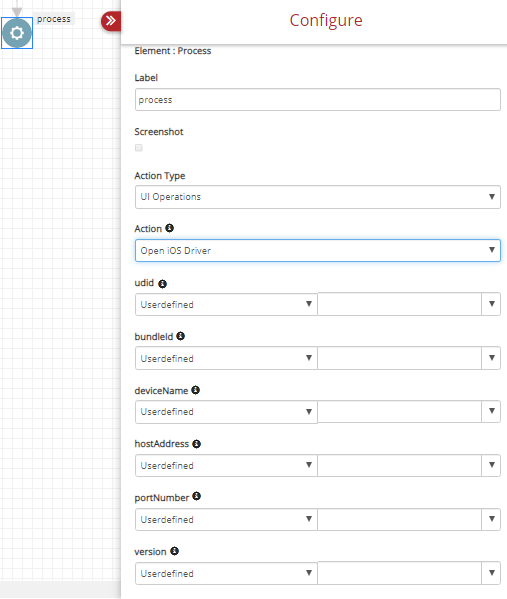
Fig. 5.70 UI Ops Open iOS Driver
For iOS testing, you need to enter the udid, bundle ID, device name, host address, port number and the version of the iOS you are using.
Window: Maximise Browser: Allows the user to maximize the browser.
Window: Maximise Resize: Allows the user to resize the browser.
Window: Minimise Browser: Allows the user to minimize the browser.
The resize option is as shown below:
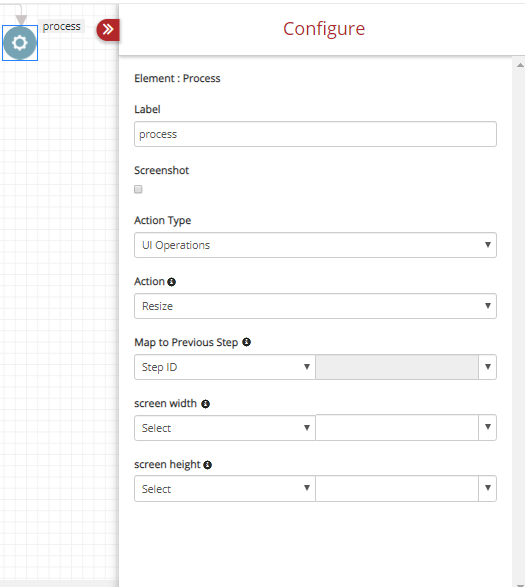
Fig. 5.71 Resize Browser
Alert Options: Alert Options in UI Operations allow you to perform different following alert related actions:
Alert Options: Click on Alert Accept: To accept an alert.
Alert Options: Click on Alert Dismiss: To dismiss an alert.
Alert Options: Fetch Alert Text: To copy the test from an alert pop up.
Alert Options: Enter Content in Alert Box: To add custom content to an alert box.
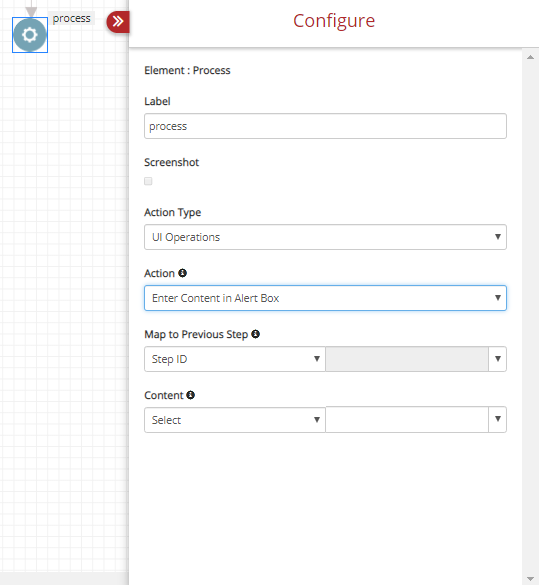
Fig. 5.72 Enter Content In Alert Box
You have a Content box after mapping to the Previous Step to enter the text.
Open URL: It has only one option, Launch URL.
Open URL: Launch URL: Once you select the Launch URL, you need to enter the Step ID and the URL details .
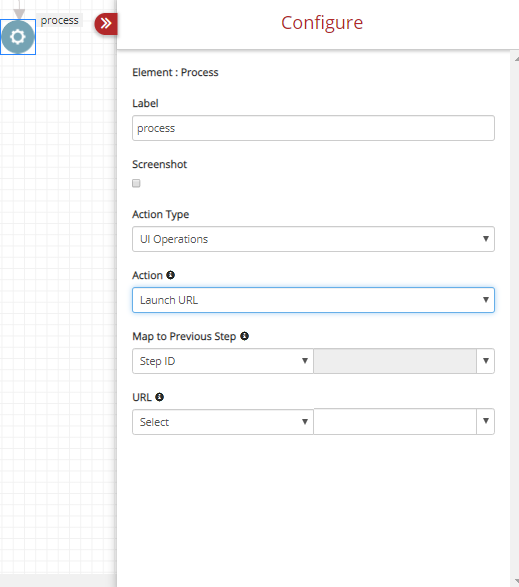
Fig. 5.73 Launch URL
Take Screenshot: Full Page Screenshot: This option is used for taking screenshots. These supports taking full page screenshots.
Switch To: Switch To has – Switch to Iframe, Switch to Main Frame, Switch to Active Element and Switch to New Tab.
Switch To: Switch to MainFrame: Switching to the mainframe or switching to the active element can be done with Step ID.
Switch To: Switch to iframe: Switching to Iframe is done with Locate By Switch To iframe.
Switch to new tab has an additional column to enter the tab number so that you can locate a tab specifically Switch To New Tab_.
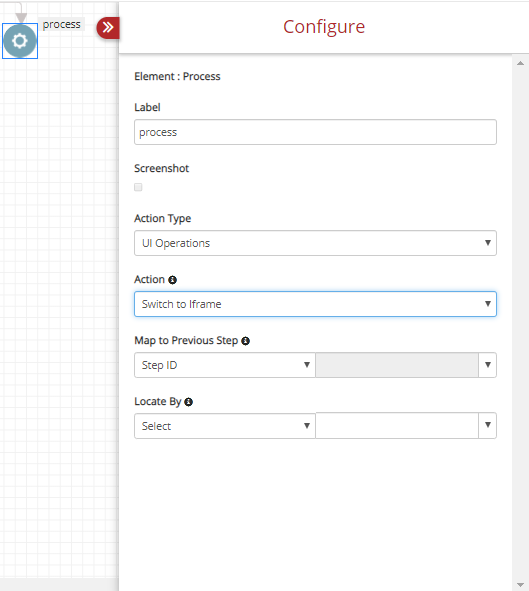
Fig. 5.74 Switch To iframe
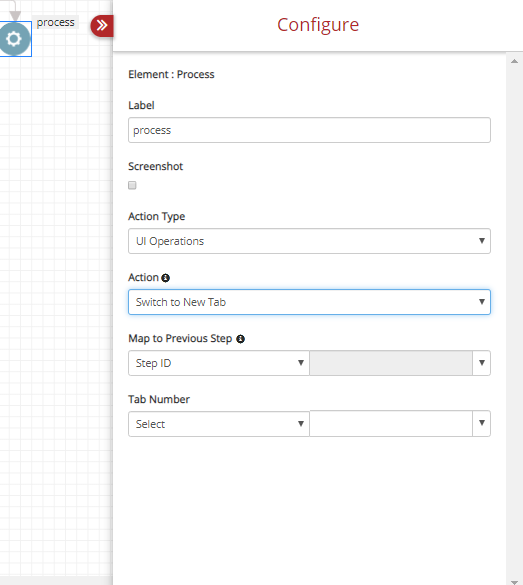
Fig. 5.75 Switch To New Tab
Close: Close actions are used to close a tab or browser. You can do this by selecting the appropriate one from the drop-down.
Close: Close Tab.
Close: Close Browser.
Open Browser: Open Browser opens the browser of your choice. Currently, it supports Chrome, Firefox, Internet Explorer, and a headless browser.
Open Browser: Launch Chrome.
Open Browser: Launch Firefox.
Open Browser: Launch Internet Explorer.
Open Browser: Launch headless browser.
Wait: The wait element will suspend the execution of the test case for a given time and resumes after that. The different options for Wait are:
Wait: Wait for Element to Appear.
Wait: Wait for Alert message.
Wait: Wait for Element to be Clickable.
For any of the above options, users must select the Locate By option to locate the element using xpath, class name, id, Step ID, cssSelector, querySelector, or Text. The time entered for the above options will be calculated in seconds.
Wait: sleep: This allows delay starting all the functionalities in Automaton in addition to the smart wait time. Here users must provide the required time for delaying and time is calculated in milliseconds.
Smart Wait
By default, all functionality in Automaton will wait for a predefined time of three milliseconds until the web element is visible or clickable.
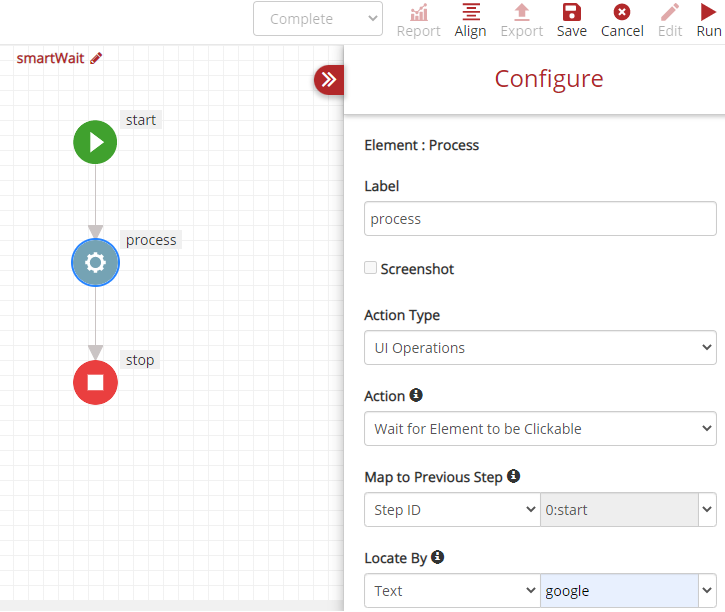
Fig. 5.76 Smart Wait

Fig. 5.77 Smart Wait sucessfully
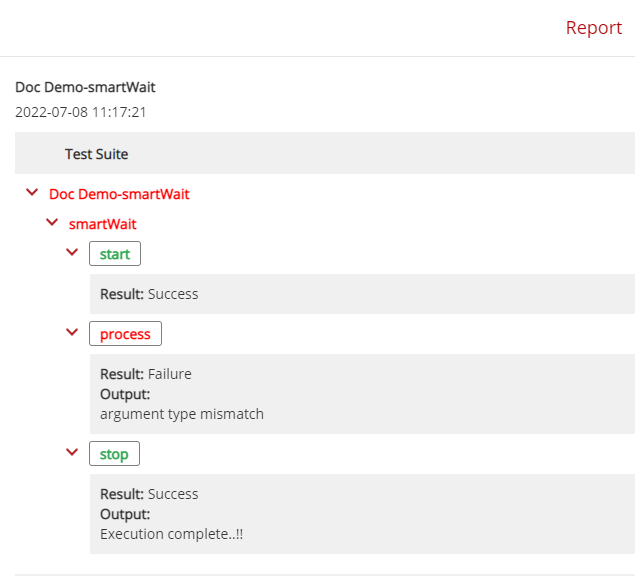
Fig. 5.78 Smart Wait Report
- XML and JSON Operations
XML and JSON Operations are used to fetch the value of a JSON or XML key. If it is the JSON key, you need to enter the key’s path into the Key Path drop-down. If it’s XML, you need to enter the key value in the Key-Value drop-down.

Fig. 5.79 Fetch Value Of json Key
- Randomizer Operations: This element will generate random data which can be used in the testcase.
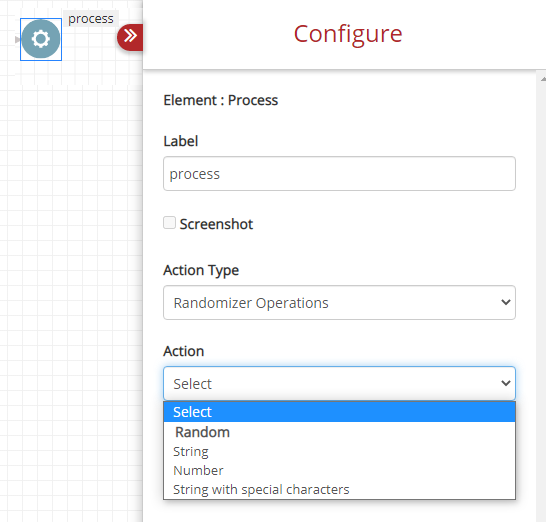
Fig. 5.80 Randomizer Operations
- String: Select ‘String’ if the user wishes to generate the random text as a string. Here user can choose the Step ID or Userdefined as shown below:
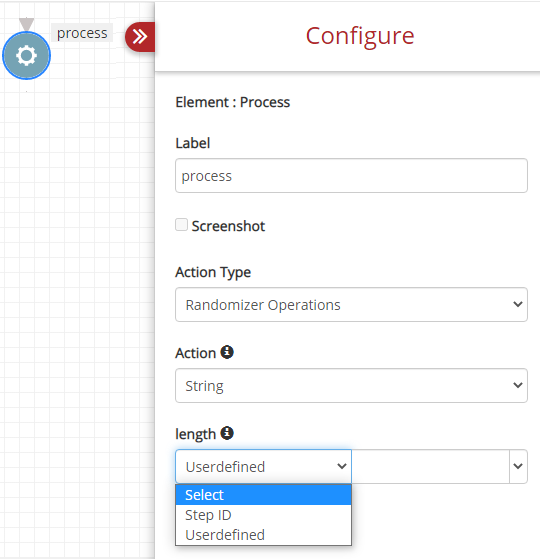
Fig. 5.81 Randomizer Operations Actions
Select the Step ID if the user wants to display other elements’ output as the random data.
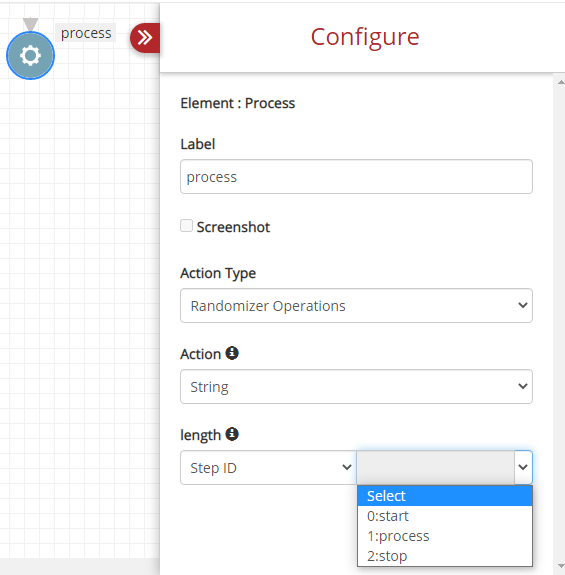
Fig. 5.82 Randomizer Operations Actions With Step-ID
Select user-defined if the user wants to mention the desired length of text.
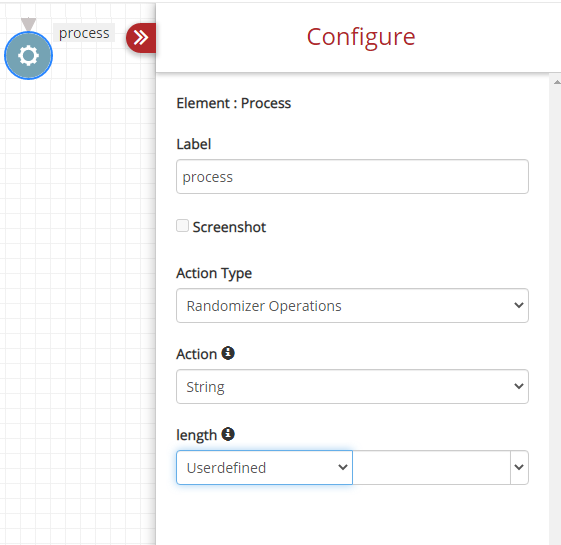
Fig. 5.83 Randomizer Operations Actions With Userdefined
- Number: Select Number if the user wishes to generate the random text as numerics. Here user can choose the Step ID or Userdefined. The functionality is same as shown in String.
- String with Special Characters: Select this option if the user wishes to generate the random text as a string along with special characters. Here user can choose the Step ID or Userdefined. The functionality is the same as shown in String.
Click Save and Run button to execute the test case. Click the report icon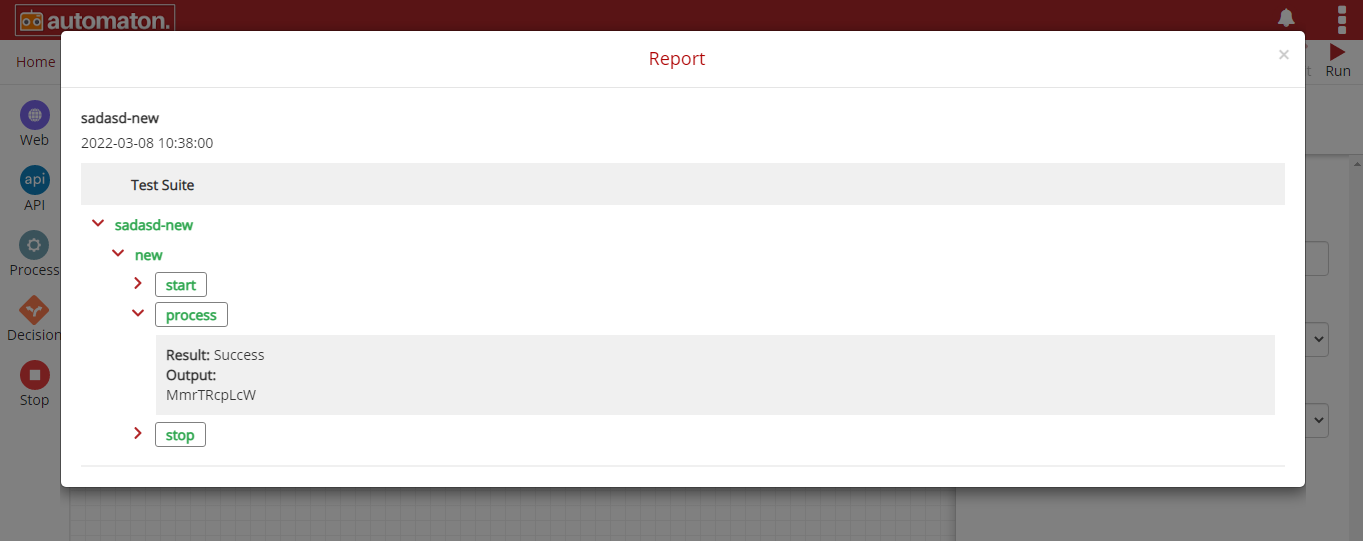
Fig. 5.84 Report Page of String Randomizer Operations
- SSH Operations: This action allows users to establish ssh connections with remote machines and execute the shell commands.
- Connect and Execute Commands: This allows users to automate the establishment of ssh connections with remote machines and execute the shell commands.
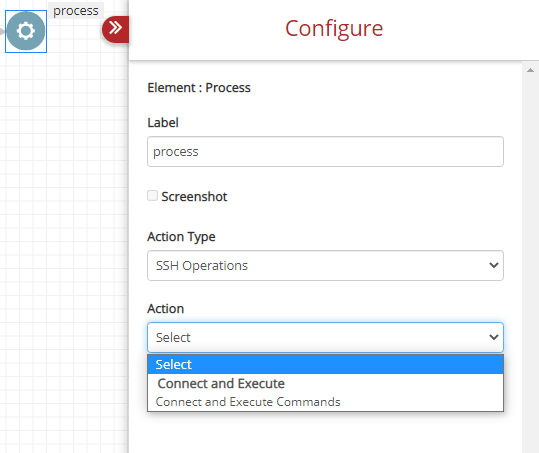
Fig. 5.85 Process Element SSH Operation
Host: The user must provide the domain name or IP address of the remote machine.
Port: The user must specify the place for being physically connected to some other device. Here port will be 22 since it is an SSH connection.
Username: Type-in the address of the remote machine.
Pem File Path: The user must provide the file location of pem files.
Commands: General unix and linux commands.
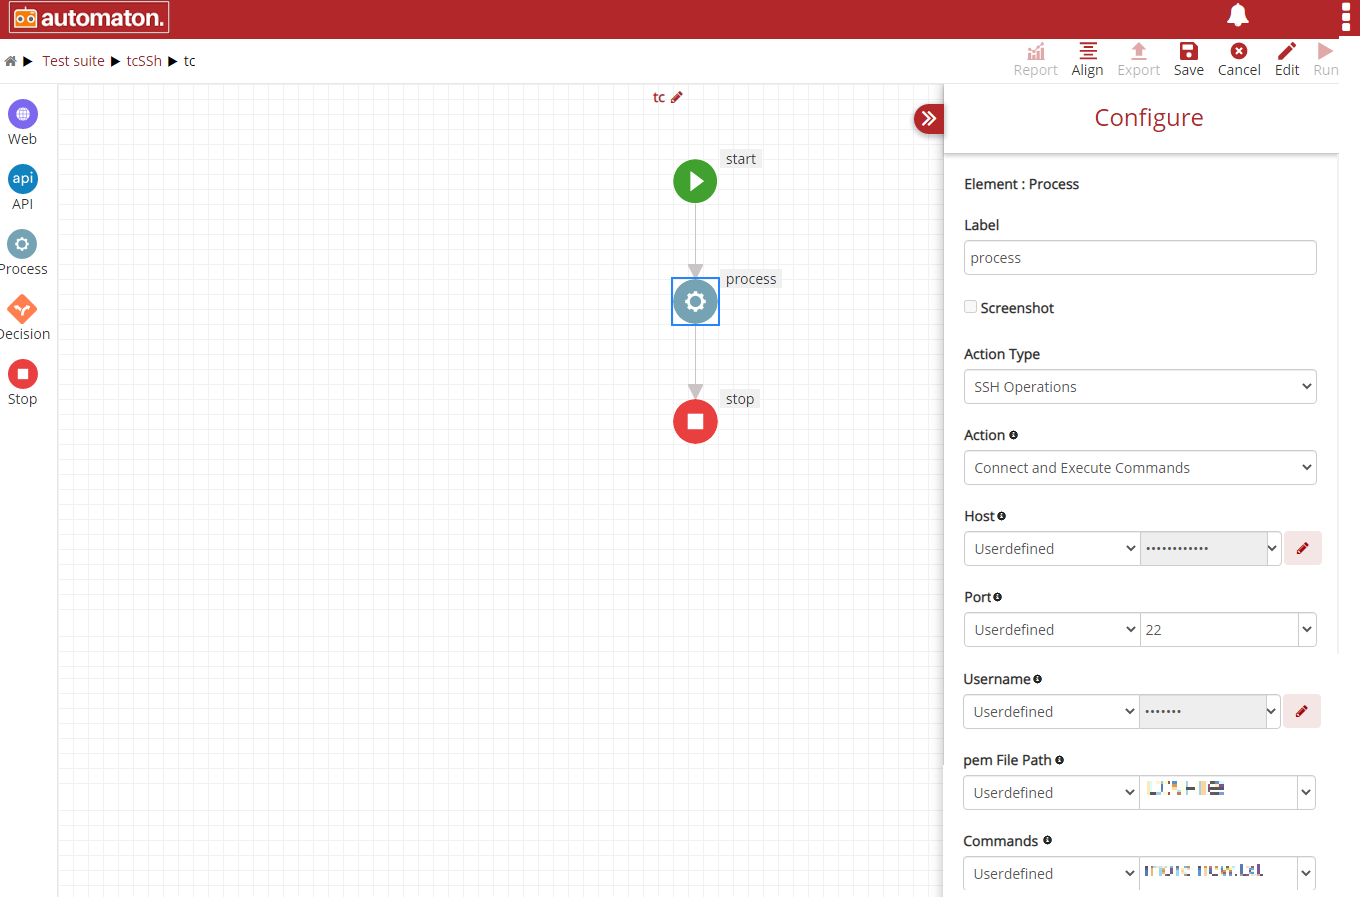
Fig. 5.86 SSH Properties to establish remote machines Connections
Click Save and Run button to execute the test case. Click the report icon on the test suite page for a quick view of the report also user can view the detailed report with execution details by clicking the report icon from the homepage as shown below:
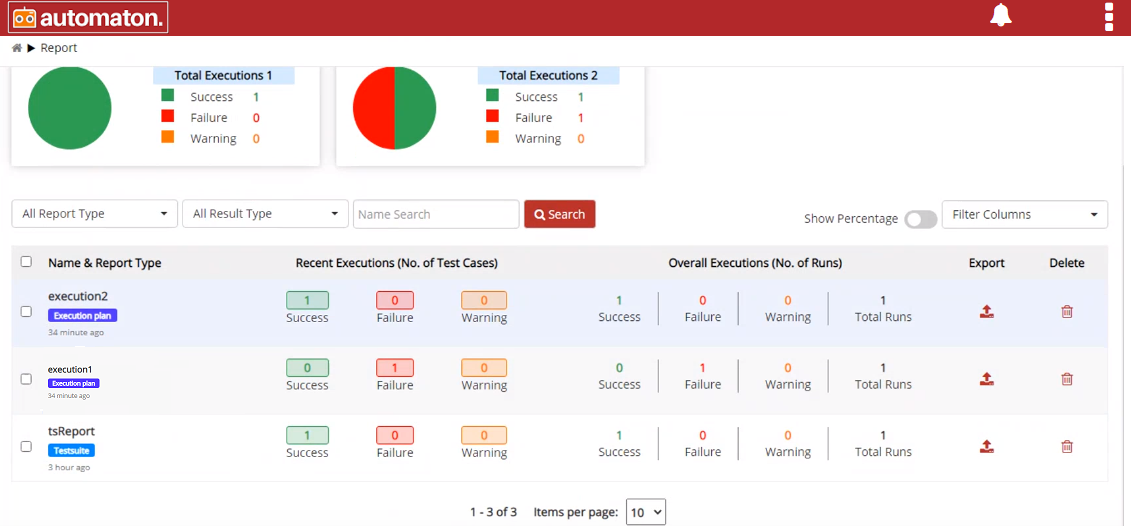
Fig. 5.87 Report Page
5.1.4. Decision Element
Decision is used for comparing two values which can be String, Numbers, Datetime etc. You can perform many action-combinations with this element.

Fig. 5.88 Decision Element
The fields of the DECISION elements are:
- Label: This allows the users to name the test step as per their choice.
- Test Failed: Check the check box if the user wants to fail the test.
- Action Type: This has only the Compare option.
- LHS: Enter the LHS value.
- Operator drop-down has =,<, >, <=, >=, JSON, XML, KEYS and IMAGE. Users have to select the operator accordingly.
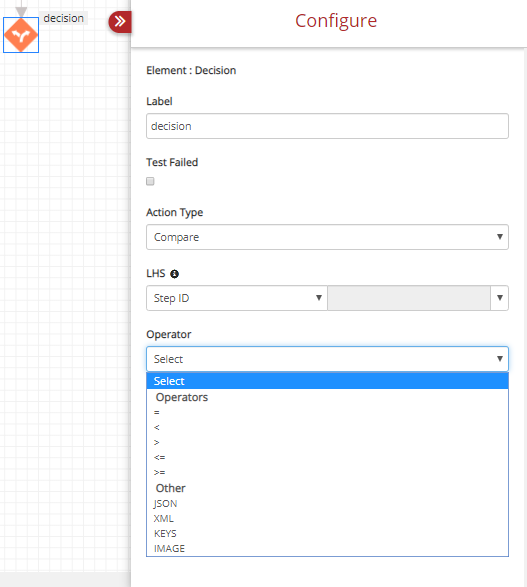
Fig. 5.89 Decision Element Operator
- RHS: Enter the RHS value.
- Comparison Type: It is a drop-down having String, Number, Boolean, Datetime and Other options.
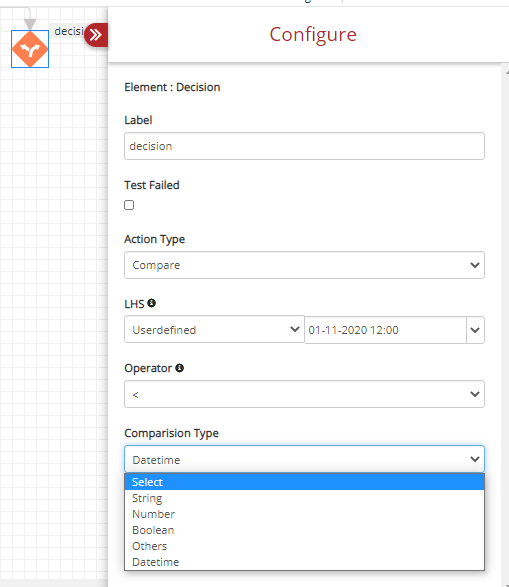
Fig. 5.90 Decision Element Comparison Type
Decision element allows users to compare the date and time of LHS with RHS. Users can perform this action by selecting the respective fields as shown below:
- Action Type: Compare.
- LHS: Users can select Step ID or Userdefined. If Userdefined is selected, then users must provide date and time.
- Operator: To compare date and time users can select only the arithmetic operators like: =, <, >, <=, >=.
- Comparison Type: In this field, users can select String or Datetime.

Fig. 5.91 Comparison Type
- RHS: Users can select Step ID or Userdefined. If Userdefined is selected, then users must provide date and time.
Note
Users must give the same date and time format in the LHS and RHS.
Click Save and Run button to save and execute the test case. Click the report icon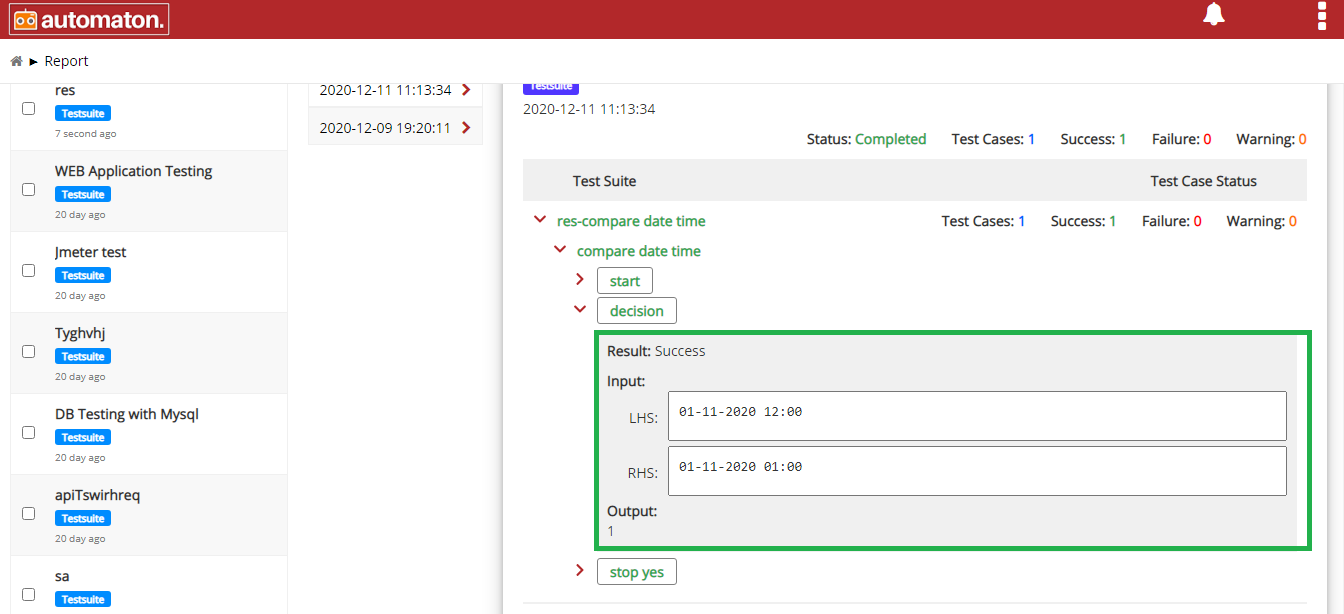
Fig. 5.92 Report Page of Date and Time
5.1.5. Stop Element
The Stop is a mandatory element in a test case, just like START. STOP is used to end a test case. Select Stop from Action Type drop-down and End Task from Action.
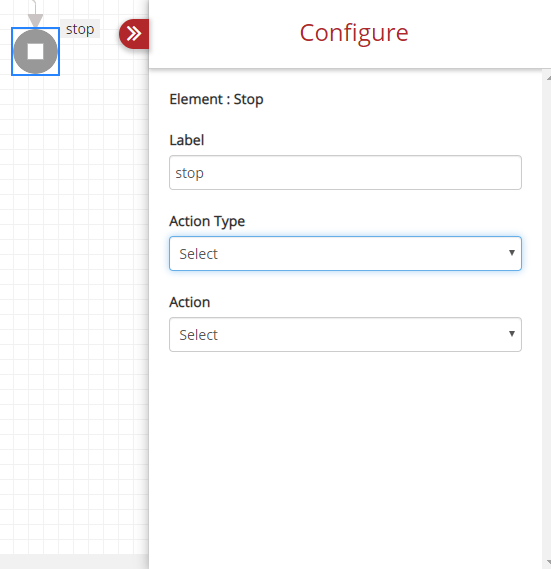
Fig. 5.93 Stop Element